https://backcountrypilot.org/images/ori ... ef6341.jpg
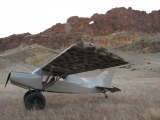
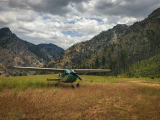
Bushwacker rebuild is finally complete, still working the bugs out so not completely satisfied yet. Here are some of the details of the rebuild:
Extended the 33'8 wing to 36' (added 12" to each spar and used the Dakota wing tips)
Shortened the flaps from 120" to 114"
Extended the ailerons from 60" to 77" (best flying Experimental Maule ever for roll control)
Went from Lycoming O-360 (180hp) to Lycoming IO-360 (200hp angle valve)
Went from 90" fixed pitch to 84" constant speed propeller
Added the tip tanks back in for a total of 67 gallons of fuel from the original 44 gallons.
Changed the yoke side by side seating to center line seating with stick for pilot and cub style heel brakes and rudder pedals, moved the rear sling seat forward 6"
Changed the angle of incidence of wing attach fittings from 1 11/16" to 3 1/8" (made horizontal ground adjustable to get the angle correct after initial testing)
Made cub style cowling and custom dynafocal engine mount shortened and lowered
Weight before rebuild 1325 with empty CG at 12.6 weight after rebuild 1359 with empty CG at 13.0 (gross weight of 2500)
Simplified instrument panel and lowered top by around 3"
Made the extended baggage flat with the rest of the baggage area so there is around 7 feet of flat floor from the back of the cub style seat to the back of the baggage.
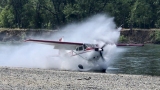
I only have 10 hours in it but based on what I have seen so far it looks like it will cruise around 115 mph at 26 imp 2400 rpm at 1300 MSL,
it will land at around 35 mph GPS at sea level and the visibility over the nose is better then my cub.
I put a bunch of pictures in my album if anyone is interested: https://backcountrypilot.org/me/my-phot ... bumid=6130
Bushwacker 2.0
Sun Feb 10, 2019 9:45 am
Bushwacker 2.0
Last edited by Mauleguy on Sun Feb 10, 2019 10:05 am, edited 1 time in total.
Sun Feb 10, 2019 9:54 am
Re: Bushwacker 2.0
There is a fairly long thread on Supercub.org titled "Bushwacker 2.0 a.k.a. Cub Killer" for a lot more details.
Sun Feb 10, 2019 10:47 am
Re: Bushwacker 2.0
Looks awesome! Nice work! 
Sun Feb 10, 2019 11:33 am
Re: Bushwacker 2.0
Super cool! Hope to see it out and about soon.
- Scolopax offline

- Posts: 1696
- Joined: Tue Sep 27, 2005 5:02 pm
- Location: Nottingham
- FindMeSpot URL: http://share.findmespot.com/shared/face ... 4aYqSexnZC
Sun Feb 10, 2019 5:33 pm
Re: Bushwacker 2.0
Cant wait to see more!
Sun Feb 10, 2019 6:30 pm
Re: Bushwacker 2.0
Very cool! Great work!
Mon Feb 11, 2019 12:47 pm
Re: Bushwacker 2.0
Very cool. Thanks for posting and sharing the pics. I'll have to look up the thread on SC.org.
Now we need a "Challenge Island" 2.0 don't we?
Now we need a "Challenge Island" 2.0 don't we?

Mon Feb 11, 2019 5:06 pm
Re: Bushwacker 2.0
Mauleguy wrote:There is a fairly long thread on Supercub.org titled "Bushwacker 2.0 a.k.a. Cub Killer" for a lot more details.
I think you should have also posted the build thread on www.clownpenis.fart, but that's just me. Let's do Challenge Island Part DeuXXX!
- Zzz offline


- Posts: 2855
- Joined: Fri Oct 08, 2004 11:09 pm
- Location: northern
- Aircraft: Swiveling desk chair
Half a century spent proving “it is better to be thought a fool than to open your mouth and remove all doubt.”
Mon Feb 11, 2019 5:42 pm
Re: Bushwacker 2.0
I think you should have also posted the build thread on http://www.clownpenis.fart, but that's just me. Let's do Challenge Island Part DeuXXX!
I did post it on http://www.clownpenis.fart but I had to many requests for information on how big and long the stick was.
Sorry I did not do a post at the same time here. To be honest I tried and could not figure out the picture thing here the first time around. I gave up and posted it on the other .org that I knew how to work the system. I was bored and gave it another try I think last Sunday, I figured out how to upload the pictures but I still could not figure out how to include them in the post so I kind of figure screw it. When you get old if it does not come easy you give up, Anyway I do!
Greg
Mon Feb 11, 2019 5:45 pm
Re: Bushwacker 2.0
I would be happy to answer any questions about the build here if requested.
Mon Feb 11, 2019 5:57 pm
Re: Bushwacker 2.0
Mauleguy wrote:I did post it on http://www.clownpenis.fart but I had to many requests for information on how big and long the stick was.
Mauleguy wrote: To be honest I tried and could not figure out the picture thing here the first time around.
I'm just busting your chops, I really don't mind. As for the photo thing, it's like...once you see it, it's actually super easy and more convenient than the attachment style: https://www.youtube.com/watch?v=ys3aGNIaTTc
- Zzz offline
- Posts: 2855
- Joined: Fri Oct 08, 2004 11:09 pm
- Location: northern
- Aircraft: Swiveling desk chair
Half a century spent proving “it is better to be thought a fool than to open your mouth and remove all doubt.”
Tue Feb 12, 2019 3:50 pm
Re: Bushwacker 2.0
Greg, few questions for you:
Is this a fuel injected engine? Any hot restart issues? Did you add a boost pump and mechanical pump? Tell me more about the fuel system.
I'm not sure I follow. Does this mean you lowered the rear wing attach point 1.4405" How much incidence is this in degrees?
Also, really curious why you did this. In theory that would cause the airplane to fly more nose down in cruise, but if your rear stabs are 3-4* negative incidence then I would expect it to act like you took some incidence out of the rear stab if those remained unmodified. I wonder how all of this is effected by the thrustline. I suspect the airplane flies very different, regardless of the additional wing area.
I'm trying to understand what you were after with this change, how it worked out, how it related to the rear stab and thrust line, and why this route instead of slats or a cuff, or the number of other slow flight mods people use.
Any plans for valdez this year? I'll be there with my cessna, but my experimental is still in the oven... apparently on the slow cooker setting.
Mauleguy wrote:Went from Lycoming O-360 (180hp) to Lycoming IO-360 (200hp angle valve)
Is this a fuel injected engine? Any hot restart issues? Did you add a boost pump and mechanical pump? Tell me more about the fuel system.
Mauleguy wrote:Changed the angle of incidence of wing attach fittings from 1 11/16" to 3 1/8" (made horizontal ground adjustable to get the angle correct after initial testing)
I'm not sure I follow. Does this mean you lowered the rear wing attach point 1.4405" How much incidence is this in degrees?
Also, really curious why you did this. In theory that would cause the airplane to fly more nose down in cruise, but if your rear stabs are 3-4* negative incidence then I would expect it to act like you took some incidence out of the rear stab if those remained unmodified. I wonder how all of this is effected by the thrustline. I suspect the airplane flies very different, regardless of the additional wing area.
I'm trying to understand what you were after with this change, how it worked out, how it related to the rear stab and thrust line, and why this route instead of slats or a cuff, or the number of other slow flight mods people use.
Any plans for valdez this year? I'll be there with my cessna, but my experimental is still in the oven... apparently on the slow cooker setting.


Tue Feb 12, 2019 6:17 pm
Re: Bushwacker 2.0
Really cool project Greg, I think you have the double slotted flaps now too?
I hear those flaps are great for improving deck angle during approach to land, and of course your wing incidence change will have helped that a lot too. I would be interested to hear your impressions of them.
I hear those flaps are great for improving deck angle during approach to land, and of course your wing incidence change will have helped that a lot too. I would be interested to hear your impressions of them.
Tue Feb 12, 2019 10:00 pm
Re: Bushwacker 2.0
Yes it is fuel injected now, I changed the rear facing sump to a forward facing sump by doing the machine work. Now it has a very simple airbox connected directly to the bracket air filter which then has about 4" of 3" scat before going straight into the fuel servo. It works well, no stumbles. I have a mechanical fuel pump and a boost pump. Other then that I have a rear port and a front port in each of the fuel tanks with 3/8" fuel line. No problems even in a long steep climb. No problems with hot starts so far as long as I do hot start procedures.
Angle of incidence was changed only at the front wing attach fitting (jacked up). I changed it for more nose down visibility on approach and landing and it really does make a big difference. I used what a stock Super Cub is (2 3/8" difference between the front and rear attach fittings) plus 3/4" of an inch. I really did not know if it would work on a Maule but I did know what a cub flies like with this exact measurement, the engine is still perpendicular to the original water line (just like a stock Maule). The horizontal was made to be ground adjustable because there is no way to predict how much you have to change the horizontal when making the wing incidence different and I did not want to have to go into the tail and start cutting right after I finished the project because I did not have enough nose up or nose down trim to compensate.
I am not a fan of slots of slats, anything on the front of the wing is going to require higher deck angles to fly slower and anything on the back of the wing is going to produce better visibility for slow flight and landing. I already had adapted the double slotted flaps to Bushwacker a number of years ago and I did not change anything about the flaps other than shortening them by 6" to 114". This airplane is about being practical, not about winning a short field contest. If I was to build an airplane for that it would be more like Frank Knaps Little Cub. Since that is not my mission and hunting, fishing and adventuring is I wanted to build an airplane that would cruise faster on 35" ABW and still land as slow as I was landing before. I accomplished most of what I was trying. It lands 2 mph slower then it did before (35 mph) and cruises around 20 mph faster at 115 mph (higher fuel burn though). I do have more fuel capacity now, I added the tip tanks in for 23 more gallons there and I have a tank with a quick disconnect that goes behind my seat for an additional 24 gallons if I really want to stay in the air. Total fuel would be 88 gallons at 12 gph gives a fairly long range. That's around 6.5 hours of fuel or 750 miles powered up. Slow down the cruise to 100 and get the fuel burn to 9 gph and gives me 9 hours or 900 miles
Last edited by Mauleguy on Tue Feb 12, 2019 10:25 pm, edited 1 time in total.
Tue Feb 12, 2019 10:16 pm
Re: Bushwacker 2.0
More thoughts on the wing, the wing incidence made the sight picture on landing better right off the bat. Visibility being very noticeable, it was a little unnerving too, the airplane could be stalled in ground effect without the airplane feeling like it was at a very high angle of attack. If you think about it, it makes sense because the wing was at a much higher angle of attack then I was use to flying Bushwacker before.
That was an easy fix, I had not put my micro VG's back on for the first few hours of testing and when I noticed how easily I could stall it that was the first change I made. I add the VG's back on in there original placement. Now in order to stall it you are at a very high angle of attack. You can not get yourself at this angle without really being so nose high that there is obviously something wrong.
That was an easy fix, I had not put my micro VG's back on for the first few hours of testing and when I noticed how easily I could stall it that was the first change I made. I add the VG's back on in there original placement. Now in order to stall it you are at a very high angle of attack. You can not get yourself at this angle without really being so nose high that there is obviously something wrong.
Wed Feb 13, 2019 4:23 am
Re: Bushwacker 2.0
I was sad the day I saw the post of the destruction first of the rough landing, and then to see what the wind did to it the next day.
It's good to see Bushwhacker back up in the air. I have always enjoyed your videos and builds. It's really something to define your mission and build the airplane for your needs. I look forward to watching you explore with/in v2.0!
It's good to see Bushwhacker back up in the air. I have always enjoyed your videos and builds. It's really something to define your mission and build the airplane for your needs. I look forward to watching you explore with/in v2.0!
- Crzyivan13 offline
- Posts: 1811
- Joined: Sat Nov 24, 2012 9:50 pm
- Location: Ohio- OI27 Checkpoint Charlie
- FindMeSpot URL: https://share.delorme.com/EvanDavis
- Aircraft: 1957 Cessna 182A
Wed Feb 13, 2019 9:35 am
Re: Bushwacker 2.0
I now have 14 degrees angle of attack sitting at 3 point attitude. I was interested to see how that compared to my cub because visually it looked like the Super Cub had more and since I assumed that I had made the fuselage the same that did not make sense. The Super Cub has 15.5 even though it is 18" longer so even though the wing attach fittings are the same now the Cub still has more at 3 point. This is not to say the incidence is different because you would have to compare water line to water line and relationship to wing attach fittings. This is not something I have looked at print to print so I don't have the answer. A Super Cub fuselage is a lot different from a Maule fuselage, the placement of key components is radically different and since I decided not to make it a Super Cub with Maule wings there is really no comparison. Bushwacker 2.0 has way better visibility for both taxing and landing then my Super Cub, another thing I really like!
Wed Feb 13, 2019 10:48 am
Re: Bushwacker 2.0
Mauleguy wrote:More thoughts on the wing, the wing incidence made the sight picture on landing better right off the bat. Visibility being very noticeable, it was a little unnerving too, the airplane could be stalled in ground effect without the airplane feeling like it was at a very high angle of attack. If you think about it, it makes sense because the wing was at a much higher angle of attack then I was use to flying Bushwacker before.
That was an easy fix, I had not put my micro VG's back on for the first few hours of testing and when I noticed how easily I could stall it that was the first change I made. I add the VG's back on in there original placement. Now in order to stall it you are at a very high angle of attack. You can not get yourself at this angle without really being so nose high that there is obviously something wrong.
That is really interesting.... In a way your design requires VG's to be safe, but with VG's it does what you need, nose down attitude.
Do you have VG's on the underside of the tail as well? Also, which direction did you have to adjust the tail? I would guess in the stock location it would have felt very tail heavy and that you needed to raise the leading edge.
The way I have always visualized it is the center of gravity is in front of the center of lift which causes a nose down attitude, then the tail has 3-4* of negative incidence to balance equation. Kinda like the center of lift being the teeter totter with the fat kid on the nose (engine) and the light kid (H-stab) on the tail.
A few more questions about the fuel system if you don't mind, since I'm in the middle of mine.... what did you use for a transfer pump? Is it the stock maule part? Is that a facet shaker pump? What did you use for a boost pump?
Also, any plans for balancing the injectors and LOP operations if you are on a long XC and are just trying to get somewhere with minimal fuel burn? I'm planning on running the Airflow performance fuel system like Batson so that I can throttle back and LOP to have super economy cruise just so that I have a way to conserve fuel or extend range should my mission call for that.
Oh, which prop are you running? Do you prefer aluminum or composite props. Curious to what you your opinion is on that given your backcountry experience.
Anyway, your build sounds super interesting, hopefully I'll get to see it some day.
Wed Feb 13, 2019 2:09 pm
Re: Bushwacker 2.0
That is really interesting.... In a way your design requires VG's to be safe, but with VG's it does what you need, nose down attitude
So to clarify a bit, I am using power to fly the attitude I like to land at. Before with Bushwacker I would touch down with my tail a foot or so off the ground (modified wheel landing) I than used the brake pressure as needed to keep the tail up with the wings if you looked out almost level flight attitude. If I do that same landing now my tailwheel is on the ground, I therefore can fly with better visibility but the wing is closer to stalled if that makes sense, allowing me to fly slower... I never liked the airplane before without VG's and although I flew it for a few months the first time around without I could tell a big difference as soon as I installed them. I knew I was facing the same issues, they just were more apparent with the higher incidence on landing. I fly my Super Cub with no VG's because I don't feel it needs them, would they make the airplane safer in slow and close to the ground operations, the answer is yes but the airplane has great flight characteristics without them and I have never felt like I was on the ragged edge.
Do you have VG's on the underside of the tail as well? Also, which direction did you have to adjust the tail? I would guess in the stock location it would have felt very tail heavy and that you needed to raise the leading edge.
I also have the VG's on the tail and a gap seal on the elevator. I had it up above stock position by 1" for the first flight and I ran out of up elevator on landing along with not enough nose up trim. I lowered it to stock and that helped some, I then lowered it 1" below stock and that help more. I still have to hold back stick pressure when empty fully trimmed nose up, if I throw 35 lbs. in my extended baggage that goes away. I am currently building a horizontal tail surface that is based on the N.A.C.A. 0012 airfoil to energize my tail. It should require a lot less trimming and lower stick pressures when slow. It will probably be several months before I complete them but I think this should be the cats meow.
The way I have always visualized it is the center of gravity is in front of the center of lift which causes a nose down attitude, then the tail has 3-4* of negative incidence to balance equation. Kinda like the center of lift being the teeter totter with the fat kid on the nose (engine) and the light kid (H-stab) on the tail.
A few more questions about the fuel system if you don't mind, since I'm in the middle of mine.... what did you use for a transfer pump? Is it the stock maule part? Is that a facet shaker pump? What did you use for a boost pump?
Yes they are the Facet to transfer tips to mains. I have a CJ Aviation boost pump.
Also, any plans for balancing the injectors and LOP operations if you are on a long XC and are just trying to get somewhere with minimal fuel burn? I'm planning on running the Airflow performance fuel system like Batson so that I can throttle back and LOP to have super economy cruise just so that I have a way to conserve fuel or extend range should my mission call for that.
Have not given much thought to that. I currently see the EGT's within about 30 degrees of each other which is way better then what I see with a carb.
Oh, which prop are you running? Do you prefer aluminum or composite props. Curious to what you your opinion is on that given your backcountry experience.
I am running a Hartzell compact hub, metal blades, 84" diameter. Blade stops are at 8 degrees and 38 degrees according to the prop shop. I have played with the set screw on the hub and seen take off RPM's at 2690 the way it was first set up. I screwed the set screw in 1 turn and that dropped it to 2580 on take off (I did not like it as well so I am back to 2690). I am going to set the governor to allow for higher RPM's (2800-2900) and see what difference this might make. Right now at 2690 it does not feel like it pulls as hard as my 90" fixed pitch did pitched at 33 (turning only 2450 static). I hope to get it where I am using the full 200 hp and it pulls really hard.
Anyway, your build sounds super interesting, hopefully I'll get to see it some day.
Last edited by akschu on Wed Feb 13, 2019 5:37 pm, edited 2 times in total.
Reason: Fixed quotes
Reason: Fixed quotes
Wed Feb 13, 2019 3:00 pm
Re: Bushwacker 2.0
Mauleguy wrote:I also have the VG's on the tail and a gap seal on the elevator. I had it up above stock position by 1" for the first flight and I ran out of up elevator on landing along with not enough nose up trim. I lowered it to stock and that helped some, I then lowered it 1" below stock and that help more. I still have to hold back stick pressure when empty fully trimmed nose up, if I throw 35 lbs. in my extended baggage that goes away. I am currently building a horizontal tail surface that is based on the N.A.C.A. 0012 airfoil to energize my tail. It should require a lot less trimming and lower stick pressures when slow. It will probably be several months before I complete them but I think this should be the cats meow.
Thanks for the information. BTW, I make some wood shims for the bearhawk guys that might make your tail upgrade faster. I just drew a NACA 0012 airfoil in cad with the same cord as the stock tail width, then subtracted out the existing stab leaving the upper and lower shims needed, then my friend cuts them on his laser cutter. You just sand them a little, glue them on, seal them up, then cover.
- ribs.png (909.97 KiB) Viewed 3348 times
It's a quick way to get to where you are going, and not hard to make you a custom set.
DISPLAY OPTIONS
Who is online
Users browsing this forum: No registered users and 0 guests
Latest Features
-
Live to Tell
A Minnesota pilot is surprised to learn that the sudden asymmetric drag of an out-of-rig ski can…Read More -
Creators
Working in some of the Yukon's most beautiful and remote environments, photographer Simon Blakesley captures aircraft in…Read More -
Aircraft Ownership and Maintenance
Upgrading to big tires can make a huge difference in backcountry performance, but with those gains come…Read More -
Tales from Yesteryear
In this tale from bush flying yesteryear, Don Cogger signs up to help Atlee Dodge Jr recovery…Read More


Latest Knowledge Base
-
Destinations
A regional guide with ideas for winter camping destinations in California, Nevada, New Mexico, and Arizona.Read More -
Aircraft
Finding an affordable aircraft that can handle the backcountry for $80K or less? A challenge for sure, but with the…Read More -
Aircraft
01.29.2018 - Zane - Updated tire diameter graphic to add 8.50x10 Guide to tires for use in the backcountry and off-airport landing…Read More -
Pilots
12.22.2013 - Initial article format Operating aircraft on skis and negotiating a snow-covered landscape is an entirely unique skillset and environment.…Read More


