Calling on Figerglass gurus..adding a bubble to a cowl
Tue Jun 09, 2015 8:41 pm
Calling on Figerglass gurus..adding a bubble to a cowl
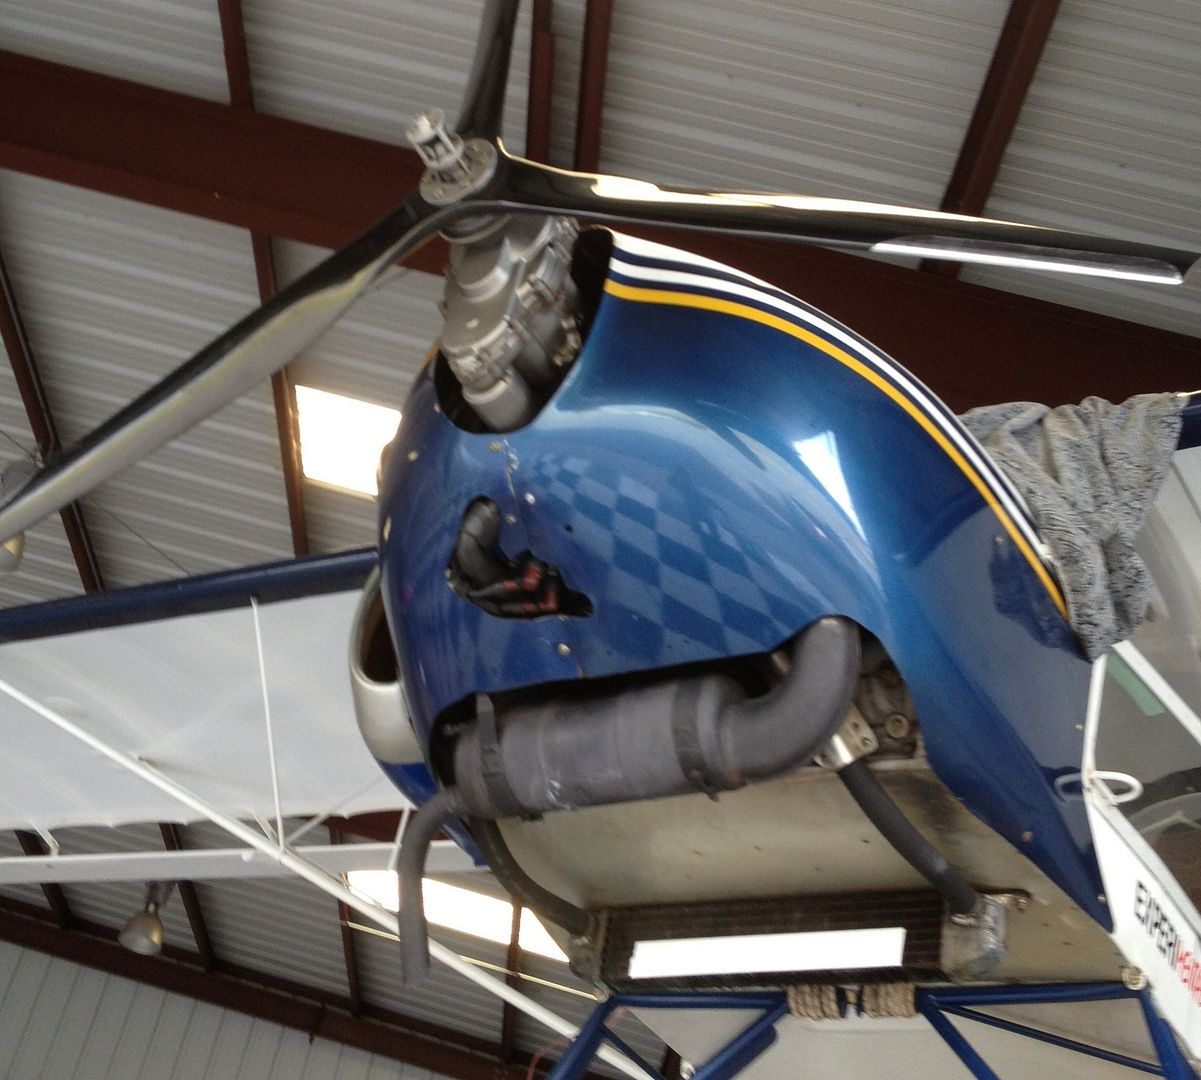
I've learned a lot wrenching on my little experimental but fiberglass work is not one of them. I am reworking my cowling trying to get ride of some drag. I want to add a bubble over the top of the big hole I have in the front. I've had to expand it over the years after a different engine and a few other mods. Building a bubble is straight forward but the kicker on this one is the cowl splits into a right and left side right down the middle of that big hole. If you look close you can see the fasteners. Curious what the best way would be to attack this. Make a removable bubble with separate fasteners maybe? Really hack into the cowl and just make it come down lower to clear that stuff and eliminate the bubble all together? Keep in mind this is an experimental. Imagination is the limit.

Experimental Avid Flyer STOL 582 Rotax
Tue Jun 09, 2015 8:59 pm
Re: Calling on Figerglass gurus..adding a bubble to a cowl
This would be super easy Joe. I have some two part uerathane foam that is really easy to shape. It's small enough that you might just be able to use crack dealer or just shape some pink insulation foam from Home Depot. You could cover the surrounding area with packing tape and essentially do a splash mold, trim it, and the use countersink fasteners as noted. There are other ways too. I got all the stuff but going flying with my bro this weekend.
2009 Rans S-7S Sold,
Folsom, CA
http://picasaweb.google.com/emmetw
http://oneechowhiskey.wordpress.com
https://vimeo.com/emflys/videos
Folsom, CA
http://picasaweb.google.com/emmetw
http://oneechowhiskey.wordpress.com
https://vimeo.com/emflys/videos
Tue Jun 09, 2015 9:29 pm
Re: Calling on Figerglass gurus..adding a bubble to a cowl
emflys wrote: It's small enough that you might just be able to use crack dealer
Yes.
- Zzz offline


- Posts: 2854
- Joined: Fri Oct 08, 2004 11:09 pm
- Location: northern
- Aircraft: Swiveling desk chair
Half a century spent proving “it is better to be thought a fool than to open your mouth and remove all doubt.”
Tue Jun 09, 2015 9:40 pm
Re: Calling on Figerglass gurus..adding a bubble to a cowl
Zzz wrote:emflys wrote: It's small enough that you might just be able to use crack dealer
Yes.
Haha!

Tue Jun 09, 2015 9:55 pm
Re: Calling on Figerglass gurus..adding a bubble to a cowl
Sometimes think these projects would be easier if I was on crack. Emmet we need to get together sometime anyways. I'm out of town with the big jet till the 17th.
Experimental Avid Flyer STOL 582 Rotax
Wed Jun 10, 2015 7:03 am
Re: Calling on Figerglass gurus..adding a bubble to a cowl
I know a guy.
He also deals crack sealer which may be less fun but more functional.
Damn iPhone. Had to force it to write sealer instead of dealer. I guess it's AI has learned too much from my typical typing.
He also deals crack sealer which may be less fun but more functional.
Damn iPhone. Had to force it to write sealer instead of dealer. I guess it's AI has learned too much from my typical typing.
2009 Rans S-7S Sold,
Folsom, CA
http://picasaweb.google.com/emmetw
http://oneechowhiskey.wordpress.com
https://vimeo.com/emflys/videos
Folsom, CA
http://picasaweb.google.com/emmetw
http://oneechowhiskey.wordpress.com
https://vimeo.com/emflys/videos
Wed Jun 10, 2015 7:40 am
Re: Calling on Figerglass gurus..adding a bubble to a cowl
major modification but, you could cut the cowl vertically at about where it starts to curve in, forming the nose bowl, Approximatly front of copilot radiator scoop. extend cowl forward until your gear box is inside the front oval opening. It would make more room in the lower front of your cowl and clean up the appearance of the gear box sticking out the front of the cowl. I recently changed my Avid with a 582 from a B-box to a C-box and had to cut the front of the cowl off to make it fit. After I hacked it off I rethought what I did and wished I would have done it the way I just explained to you.
Wed Jun 10, 2015 1:44 pm
Re: Calling on Figerglass gurus..adding a bubble to a cowl
Joey - take a look at some of Dan Horton's threads over at Vans Airforce. They guy does some amazing stuff with fiberglass. Great example: http://www.vansairforce.com/community/showthread.php?t=44856
The good part about doing a removable part is that you can do it on the plane without ever taking it out of service (until you do the final install). You could also permanently attach to one side of the cowl and just use removable fasteners on the other.
Do you have your paint?
The good part about doing a removable part is that you can do it on the plane without ever taking it out of service (until you do the final install). You could also permanently attach to one side of the cowl and just use removable fasteners on the other.
Do you have your paint?
2009 Rans S-7S Sold,
Folsom, CA
http://picasaweb.google.com/emmetw
http://oneechowhiskey.wordpress.com
https://vimeo.com/emflys/videos
Folsom, CA
http://picasaweb.google.com/emmetw
http://oneechowhiskey.wordpress.com
https://vimeo.com/emflys/videos
Wed Jun 10, 2015 5:39 pm
Re: Calling on Figerglass gurus..adding a bubble to a cowl
I bought that firewall forward from anther guy and it was close enough that I never bothered painting it. I will take this opportunity to make it match the color of the scallops on my wings. Cliff I have two extra B model cowls if you ever decide to redo it. I have the E gearbox which requires even more hacking. My intent was to use one of these spares and do all the mods so I didn't have to take mine out of service but I also just removed my side radiator scoop and replumbed my cooling system which left a gigantic hole in the side of my current cowl so now I'm committed. The hole has flat edges and should be pretty simple to glass over. Another option someone mentioned was to use a cheap universal hood scoop and flip it around backwards. I found for some pretty basic ones for $10-12 on Amazon.
Experimental Avid Flyer STOL 582 Rotax
Thu Jun 11, 2015 1:12 am
Re: Calling on Figerglass gurus..adding a bubble to a cowl
Fairly simple, you're looking at about an afternoon worth of effort not counting paint.
Put two or three coats of automotive wax on the cowling, and rub it off like you are waxing the car. Take clear packing tape or shelf paper and lay it down on your blue jeans, then peel it off the fabric. This kills about half or 2/3 of the adhesive. Then re-apply the tape or shelf paper onto the waxed cowling at least 6 inches all around the hole.
Cover the exposed engine parts with a few rags into the hole. Then cover the rags with thin packing tape or shelf paper. Get some OIL-based clay... not water base. Push the clay into the hole around the rags and onto the taped cowling. Shape the clay using small plastic paint scrapers, popsicle sticks, fingers, playing cards, spoons, etc.
Apply two or three layers of medium fiberglass cloth, somewhere between 4 layers of 4 ounce, or 3 layers of 9 ounce woven cloth. Forget about which direction the fibers are running... unimportant. Stick the first layer to the clay by hand, then carefully "wet out" the cltoth using a disposable brush. Apply each layer and wet it with laminating epoxy until there are no white (dry) spots.
If you don't know someone who can give you a cup of epoxy, and you have to go buy it, the easiest stuff is West Systems 105/205 with the little pump dispensers. But any good THIN laminating epoxy will work. The glass cloth should cover the clay and extend two or three inches onto the (taped) cowling.
Wipe away any epoxy that has run or dripped but try to not disturb the glass cloth. Let it cure completely, probably 4-6 hours. You can help it along by warming it SLIGHTLY with a hair dryer, or settingup a little space heater pointing at it.
When it's completely dry, mark a Sharpie line around where you want the perimeter of the bubble. Then drill four or six fastener holes through the fiberglass and through the cowling (before you remove the bubble). This will allow you to Cleco the bubble back into position and use screws to hold it on.
Peel off the bubble carefully and remove all the tape, rags, etc. Trim the perimeter of the mounting flange using tin snips. This is dishonorable cheating for professional level composites people, but it works fine and is a lot less tricky than the gurus using "knife-trim" or "green-trim" halfway through the cure cycle. Sand the cut edge smooth using 220 grit paper.
IF you are willing to remove the bubble each time you remove the cowl, then you can install Rivnuts or Tinnerman clip nuts to hold the bubble,a nd proceed to Bondo and paint. If you want to permanently mount left and right halves of the bubble to the cowl halves, there is a whole other process for that. If anyone is interested I'll describe thet otherwise you can just remove the bubble before splitting the cowl.

.
Thu Jun 11, 2015 1:06 pm
Re: Calling on Figerglass gurus..adding a bubble to a cowl
EZFlap wrote:Fairly simple, you're looking at about an afternoon worth of effort not counting paint.
Put two or three coats of automotive wax on the cowling, and rub it off like you are waxing the car. Take clear packing tape or shelf paper and lay it down on your blue jeans, then peel it off the fabric. This kills about half or 2/3 of the adhesive. Then re-apply the tape or shelf paper onto the waxed cowling at least 6 inches all around the hole.
Cover the exposed engine parts with a few rags into the hole. Then cover the rags with thin packing tape or shelf paper. Get some OIL-based clay... not water base. Push the clay into the hole around the rags and onto the taped cowling. Shape the clay using small plastic paint scrapers, popsicle sticks, fingers, playing cards, spoons, etc.
Apply two or three layers of medium fiberglass cloth, somewhere between 4 layers of 4 ounce, or 3 layers of 9 ounce woven cloth. Forget about which direction the fibers are running... unimportant. Stick the first layer to the clay by hand, then carefully "wet out" the cltoth using a disposable brush. Apply each layer and wet it with laminating epoxy until there are no white (dry) spots.
If you don't know someone who can give you a cup of epoxy, and you have to go buy it, the easiest stuff is West Systems 105/205 with the little pump dispensers. But any good THIN laminating epoxy will work. The glass cloth should cover the clay and extend two or three inches onto the (taped) cowling.
Wipe away any epoxy that has run or dripped but try to not disturb the glass cloth. Let it cure completely, probably 4-6 hours. You can help it along by warming it SLIGHTLY with a hair dryer, or settingup a little space heater pointing at it.
When it's completely dry, mark a Sharpie line around where you want the perimeter of the bubble. Then drill four or six fastener holes through the fiberglass and through the cowling (before you remove the bubble). This will allow you to Cleco the bubble back into position and use screws to hold it on.
Peel off the bubble carefully and remove all the tape, rags, etc. Trim the perimeter of the mounting flange using tin snips. This is dishonorable cheating for professional level composites people, but it works fine and is a lot less tricky than the gurus using "knife-trim" or "green-trim" halfway through the cure cycle. Sand the cut edge smooth using 220 grit paper.
IF you are willing to remove the bubble each time you remove the cowl, then you can install Rivnuts or Tinnerman clip nuts to hold the bubble,a nd proceed to Bondo and paint. If you want to permanently mount left and right halves of the bubble to the cowl halves, there is a whole other process for that. If anyone is interested I'll describe thet otherwise you can just remove the bubble before splitting the cowl.
Nice write up Bill!
- marcusofcotton offline


- Posts: 257
- Joined: Sun Jan 02, 2011 6:44 am
- Location: Northern MN
DISPLAY OPTIONS
Who is online
Users browsing this forum: No registered users and 0 guests
Latest Features
-
Live to Tell
A Minnesota pilot is surprised to learn that the sudden asymmetric drag of an out-of-rig ski can…Read More -
Creators
Working in some of the Yukon's most beautiful and remote environments, photographer Simon Blakesley captures aircraft in…Read More -
Aircraft Ownership and Maintenance
Upgrading to big tires can make a huge difference in backcountry performance, but with those gains come…Read More -
Tales from Yesteryear
In this tale from bush flying yesteryear, Don Cogger signs up to help Atlee Dodge Jr recovery…Read More


Latest Knowledge Base
-
Destinations
A regional guide with ideas for winter camping destinations in California, Nevada, New Mexico, and Arizona.Read More -
Aircraft
Finding an affordable aircraft that can handle the backcountry for $80K or less? A challenge for sure, but with the…Read More -
Aircraft
01.29.2018 - Zane - Updated tire diameter graphic to add 8.50x10 Guide to tires for use in the backcountry and off-airport landing…Read More -
Pilots
12.22.2013 - Initial article format Operating aircraft on skis and negotiating a snow-covered landscape is an entirely unique skillset and environment.…Read More


