×

Error

You need to login in order to reply to topics within this forum.

Backcountry Pilot • Project: Bo Beautification...

Project: Bo Beautification...

Aircraft building and project-level overhaul forum -- Kitplanes, experimental amateur-built, homebuilding, or even restoration of certified aircraft.
47 postsPage 3 of 31, 2, 3

Re: Project: Bo Beautification...

mtv wrote:Nice job! It's really nice to see what some elbow grease (and talent) can do for a plane that's just a little long in the tooth. Looks to me as if you've got your priorities well in hand.....touch up yourself, using sweat equity and saving your bank account for avgas.

Keep us posted.

MTV


Thanks - I wouldn't call it talent... More like severe trial and error coupled with relentless polishing.

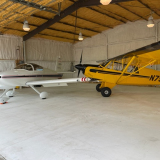
Next will be finishing the polishing and shooting the belly. I figure I've got another solid three days of work.

Ordered a new glare-sheild and lenses for the wingtips. Not much to do inside as the interior looks new. Polished the yoke today and wiped down the panel. Looks great.

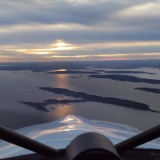
Can't wait to be done and go fly somewhere.

Jim
jaudette offline
User avatar
Posts: 617
Joined: Mon Feb 25, 2013 2:12 pm
Location: Westcliffe
Aircraft: Husky A-1B
Vans RV-7a

Re: Project: Bo Beautification...

CamTom12 wrote:Wow, it looks great! Hopefully not too pretty to fly, haha!


I can assure you, it will not be too pretty to fly!!!
jaudette offline
User avatar
Posts: 617
Joined: Mon Feb 25, 2013 2:12 pm
Location: Westcliffe
Aircraft: Husky A-1B
Vans RV-7a

Re: Project: Bo Beautification...

Well... I'm almost done. The project grew into a bigger ordeal than I thought it would (not really).

Finished with all the touch-up painting, polished the whole plane (except the ruddervators and roof of the plane), restored all the emblems, replaced all the decals, replace wingtip lenses and waxed the thing.

All that is left is to polish the ruddervators, replace the glare-sheild (on order) and rebuild the passenger seat (in process). I'll take some final pictures and you guy's can criticize my work.

Here are a couple before and afters:

V35B emblem before I restored it:

Image

After:

Image

Wingtip lens before:

Image

New wingtip lens:

Image

Hope with one more days work i'll be flying!
Last edited by jaudette on Sun May 18, 2014 4:30 pm, edited 1 time in total.
jaudette offline
User avatar
Posts: 617
Joined: Mon Feb 25, 2013 2:12 pm
Location: Westcliffe
Aircraft: Husky A-1B
Vans RV-7a

Re: Project: Bo Beautification...

Looks great!!!

I think we're both similar in that we love a project. It's even better when it's something as cool as an airplane!
CamTom12 offline
User avatar
Posts: 3705
Joined: Sun Jul 08, 2012 1:08 pm
Location: Huntsville
FindMeSpot URL: https://share.delorme.com/camtom12
Aircraft: Ruppe Racer
Experimental Pacer
home hand jam "wizard"

Re: Project: Bo Beautification...

That's quite a transformation after a lot of hard work.

In retrospect, do you wish you just had the entire plane stripped and repainted?
MAU MAU offline
User avatar
Posts: 407
Joined: Sat Aug 24, 2013 4:23 pm
Location: New Hampshire & Maine
Maule MXT-7-180A

Re: Project: Bo Beautification...

MAU MAU wrote:That's quite a transformation after a lot of hard work.

In retrospect, do you wish you just had the entire plane stripped and repainted?


I've been thinking about that... I don't think so. The paint (other than the chips on the leading edge) was in very good shape. If I had the thing repainted, I would have had it painted in the same scheme anyway. So, touching it up and giving me another 5-6 years until I have to bite the bullet (I figure 13-15K'ish for a strip and re-paint) seemed like a good decision. The other thing - Other than not flying it for a couple of months (I did manage to get some time in other planes though), working on it and making it my own was really kind of therapeutic!

If I were starting the project over, I would have shot the entire leading edge instead of shooting individual spots and then polishing them to blend with the older paint. The way I did it required a TON more time - All's well that ends well. Before I started, it was a a fifty foot paint job. I'd call it a solid 5 footer at this point.

Jim

EDIT: BTW - Here is a pic the day I flew the plane home. You can see the oxidation on the grayish color and the dullness of the white paint (I'll post some after shots when I'm totally done):

Image
jaudette offline
User avatar
Posts: 617
Joined: Mon Feb 25, 2013 2:12 pm
Location: Westcliffe
Aircraft: Husky A-1B
Vans RV-7a

Re: Project: Bo Beautification...

lovley work on a lovley plane! good work mate
DrifterDriver offline
User avatar
Posts: 940
Joined: Sun Aug 25, 2013 3:37 am
Location: GOONENGERRY
"When everything seems to be going against you, remember that the airplane takes off against the wind, not with it..." HENRY FORD

DISPLAY OPTIONS

Previous
47 postsPage 3 of 31, 2, 3

Who is online

Users browsing this forum: No registered users and 0 guests

Latest Features

Latest Knowledge Base