Backcountry Pilot • Firewall bushings...

Firewall bushings...

Have problems with your aircraft? Maybe just questions about how best to tune or adjust something? Regs or maintenance? Need to know the best way to do something?
19 postsPage 1 of 1

Firewall bushings...

The other day my son and I were pushing the 182A back in the hangar and I noticed the engine seemed to move more than normal when pushing on the prop. We pulled the cowling and noticed the lower firewall mounting bolts could be turned by hand. Two months ago when the annual was done, they seemed to be in good shape. I suspect the rubber bushings broke down when we started flying the plane after over 3 years of sitting dormant. The rubber bushings are falling apart.

After spending a few hours on the google box, I learned all there is to know about firewall bushings LOL!

What surprised me was that the aluminum "sea plane" mounts (0751004-1/2) were about $50/each (bushing and collar) about 10 years ago from YingLing (according to old forum posts), and now they are about $250/each... OUCH!

Found the SeaPlanes West bushings at about $300 for the set, while not nearly as pricey as the Cessna ones, I still couldn't fathom paying that much for some aluminum bushings.

A $20 stick of 1 3/8" 6061-T6 aluminum bar stock (with certs), and 2 hours on the lathe...

If it's not 100 degrees tomorrow morning, I'm going to start pulling the old bushings out and cleaning everything up so my mechanic can come take a peek before I bolt my shiny new "owner produced" parts in :D

On a side note, this is the first time I've ever used Alodine. Cool stuff!

I have a ton of projects I want to tackle, but I'm afraid of that "rabbit hole" that everyone talks about!

IMG_1126.JPG


IMG_1135.jpg
ebag offline
User avatar
Posts: 36
Joined: Sun Feb 11, 2018 9:34 am
Location: Upland
Aircraft: '58 182A

Re: Firewall bushings...

Very nice!
I'm in the need of a set as well. After at the prices, I figured I could almost buy a second hand lathe and cut them myself.
Yours turned out very nice.
Bagarre offline
User avatar
Posts: 794
Joined: Wed Apr 16, 2014 7:18 pm
Location: Herndon
Aircraft: 1952 Cessna 170B project

Re: Firewall bushings...

While it's a lot more fun to make your own for these simple parts, I think Univair had them available pretty reasonably, in the airplane sense (around 15) for those who don't happen to have a late in their shop.
lesuther offline
Posts: 1429
Joined: Fri Sep 24, 2010 1:26 pm
Location: CO

Re: Firewall bushings...

lesuther wrote:While it's a lot more fun to make your own for these simple parts, I think Univair had them available pretty reasonably (around 15) for those who don't happen to have a late in their shop.

Those are the rubber ones.
Bagarre offline
User avatar
Posts: 794
Joined: Wed Apr 16, 2014 7:18 pm
Location: Herndon
Aircraft: 1952 Cessna 170B project

Re: Firewall bushings...

Of course, rubber bushings are also easy to mold yourself too. I've molded the gear leg seals for around a buck or so each compared to a bajillion dollars from vendors.
lesuther offline
Posts: 1429
Joined: Fri Sep 24, 2010 1:26 pm
Location: CO

Re: Firewall bushings...

ebag wrote:...What surprised me was that the aluminum "sea plane" mounts (0751004-1/2) were about $50/each (bushing and collar) about 10 years ago from YingLing (according to old forum posts), and now they are about $250/each... OUCH!
Found the SeaPlanes West bushings at about $300 for the set, while not nearly as pricey as the Cessna ones, I still couldn't fathom paying that much for some aluminum bushings. A $20 stick of 1 3/8" 6061-T6 aluminum bar stock (with certs), and 2 hours on the lathe...


I googled seaplanes west firewall bushings and came up with this.
http://www.seaplaneswest.com/pricing.html
$277 for the kit, but no pics etc.

Where are you getting the dimensional information for fabricating your new bushings?
I have a (bootleg?) set that came with my airplane but I'm not sure if they're sized correctly.
Also, is this an STC'd type mod, or a logbook-entry-only installation of alternative standard parts?
hotrod180 offline
Supporter
User avatar
Posts: 10534
Joined: Wed Jan 26, 2005 11:47 pm
Location: Port Townsend, WA
Cessna Skywagon -- accept no substitute!

Re: Firewall bushings...

lesuther wrote:Of course, rubber bushings are also easy to mold yourself too. I've molded the gear leg seals for around a buck or so each compared to a bajillion dollars from vendors.


I'll bite, how do you do this?
AEROPOD offline
Posts: 479
Joined: Sun Jul 22, 2012 11:02 pm
Location: Aurora, CO

Re: Firewall bushings...

Interested myself. Following
jugheadF15 offline
Contributing author
User avatar
Posts: 309
Joined: Sun Sep 20, 2009 6:12 am
Location: Snohomish

Re: Firewall bushings...

Went up to the hangar at 6am on Saturday to try and beat the heat. It worked, sort of... Over 100 degrees by 9am, ugh!!

We were able to swap out and install the aluminum firewall bushings in about an hour, once we were happy with how the engine was supported with the hoist. I think the lifting ring is setup to balance with no prop installed. A strategically placed ratchet strap and we could take the weight off the mounts and the engine just magically hovered in place :)

I was happily surprised with how "round" the holes were, you could see where the lower right side bushing was gone and the bolt had contacted the firewall, but no deformation of the metal, just a slight "polished" spot. Used a borescope to inspect the backside of the mounts behind the panel, they looked great. The new bushings fit perfect and I used longer bolts (as spec'd in the Cessna parts manual, for the seaplane bushings) and new nuts. It's odd to me how just about everything under the cowling is safety wired, but the four AN6 bolts that hold the entire motor on the front of the plane just use lock nuts :shock:

One step closer to getting her back in the air. I'm working on new inside door handle pivots, I'll post some photos when I get them assembled. Then I'll see if I can't get the hours flown to exceed the hours wrenching :D

Re: the dimensions for the aluminum bushings were obtained from a member of another interweb forum who measured actual Cessna parts and made his own. He was kind enough to share the drawings. Short of buying a part and measuring it myself, I checked all his measurements against what they were bolting to, the plane, and the hardware I was suppose to use, from the parts list. Everything checked out and someone at the field who had installed a set of Cessna parts recently said they looked identical.

On the topic of casting rubber bushings, I've done plenty of those for suspension bushings and semi-solid motor mounts in race cars. Simple really, pour a silicone mold around a master part, then mix up some urethane and pour it in. Hardest part is dealing with the bubbles, I never got into pressure casting, or vacuum potting the silicone. Unless you need some custom part that no one makes, it's easier and generally cheaper to just buy them already made.


IMG_1139.JPG
ebag offline
User avatar
Posts: 36
Joined: Sun Feb 11, 2018 9:34 am
Location: Upland
Aircraft: '58 182A

Re: Firewall bushings...

I make a lot of rubber molds for my business for proto and pilot runs, generally with HDPE as the mold base. I have a full CNC shop to fab with at home. I made a pressure injection system out of a grease gun and can share how the gun was made if curious, but that is for shooting 500ml to a liter at a time or for hard to pack molds. A simple syringe works fine for onesie twosies or easy to pack molds. Undercuts are a non-issue for most rubber molding, so simple core-cavity designs with whatever inserts make mold fabrication a pretty straightforward thing. I use all thread or screws to clamp the mold together in layers. This technique also works for urethane or epoxy cast proto or pilot parts- you just have to make the molds with lots of draft and usually a basic mold stripping capability. The limitations of this approach do affect part design somewhat...you can't get away with minimal drafting with this process.

I can typically design and fab a set of molded rubber or simple plastic parts before I would even get an answer back from a rapid proto shop or other avenue.

For the gear leg gaskets, I think it took me about 6 hours to measure, design, cut (CNC/ball mill), and mold them with vaguely color matched 40 shore A silicone. Works for the '62 182. For the firewall gaskets, I'd estimate quite a bit less time, and you could make the mold with a simple drill press or lathe rather than a milling machine. Perhaps a few hours end to end. The molds can be placed in the oven at 150F to cure in a half hour for small parts, but otherwise I leave them out for the full length cure (6-24hours, depending on the resins). The silicones I use are good up to around 450F before they begin to embrittle. For the mounts, though, a tougher shore A 90 urethane is a better bet...if you need extreme heat resistance, you have much larger problems on your hand after all. You want toughness.

Here are a few samples of my most recent mold activity for a new product. Mostly silicone rubber, but the hard parts are glass filled cast epoxy. The final parts are Nylon 6 molded by an actual mold shop. But they took three days to make and mold, and I think I saved perhaps $6k in prototyping costs and at least a few weeks.
molds.jpg
molds
lesuther offline
Posts: 1429
Joined: Fri Sep 24, 2010 1:26 pm
Location: CO

Re: Firewall bushings...

I spoke to Paul at Seaplanes West yesterday about their bushing kit.

They will sell the bushings separately if you have the hardened washers already ($25 minimum order).

Their bushing setup is different from others who are replicating the rubber bushings in aluminum. After a bit of discussion I agree that making the rubber design in aluminum is severe overkill.

In the photo below, Part 64 is an aluminum 'spacer' 0.25" thick. The 'bushing' is part 65 or 66 and only fills the firewall and bracket thickness. Part 65/66 outside diameter fits the hole in your firewall and is 0.275" thick which is about the thickness of your firewall and bracket. It's two part numbers because one is predrilled for the AN6 motor mount bolt while the other is undrilled in case your mount isnt exactly straight.

Part 74 is the hardened washers.

The setup requires shorter bolts as you don't have the 0.25" thick donut spacer on the inside of the firewall. The rubber donut is used to spread out the load of the washer and nut on the inside of the firewall - which isnt needed if it's a solid mount and not squishy rubber.

Hopes this info helps someone.
Image
Bagarre offline
User avatar
Posts: 794
Joined: Wed Apr 16, 2014 7:18 pm
Location: Herndon
Aircraft: 1952 Cessna 170B project

Re: Firewall bushings...

Good info... I agree with this logic, however, rather than copy the SPW design I decided to just copy Cessna's setup. I figured it would be easier to justify an "owner produced part" if I was replicating a factory item, rather than copying someone else's intelligent design.

SPW parts are definitely not over priced, I just enjoy making stuff :)
ebag offline
User avatar
Posts: 36
Joined: Sun Feb 11, 2018 9:34 am
Location: Upland
Aircraft: '58 182A

Re: Firewall bushings...

ebag wrote:Good info... I agree with this logic, however, rather than copy the SPW design I decided to just copy Cessna's setup. I figured it would be easier to justify an "owner produced part" if I was replicating a factory item, rather than copying someone else's intelligent design.

SPW parts are definitely not over priced, I just enjoy making stuff :)


If I was to owner make these, I'd certainly copy what Cessna did to avoid issues.
It would be a fun exercise to make these if I had a lathe as well but SPW's prices make this an easy buy vs build decision for me.
Bagarre offline
User avatar
Posts: 794
Joined: Wed Apr 16, 2014 7:18 pm
Location: Herndon
Aircraft: 1952 Cessna 170B project

Re: Firewall bushings...

Thanks to ebag for sending me his drawings, I was able to make these seaplane bushings for my 180. Was a fun project on the lathe and they came out pretty nice I think.

I just finished making the 8 steel washers, machined, hardened, tempered and blued. The washers currently on the plane look like regular AN large area washers and are bending into the rubber bushings which are pretty much shot. I found dimensions for the washers on another post of the same topic here on BCP, and now I'm thinking they were dimensions for the SPW setup, and not necessarily the same size that came from the factory. I made them to 1" diameter and .100" thickness. I think the hardened washers are a bit overkill now that the rubber part of the sandwich will be gone, but want to keep it as stock as possible...unlike the current setup #-o

Does anybody have the dimensions for the factory washers?? Or can you tell me if they look right in the pictures?

Also, after mocking up the setup on the bench, it's looking like the bolt may be one size too short, even though they are the longer bolts specified in the parts manual for the seaplane setup. Part of this may be because I can't accurately measure everything until I get it all apart, and part of it may be that the washers are too thick...remains to be seen, but I'm trying to figure this out before I take her down for the MX.

Another helpful dimension to have would be the thickness of the firewall/bracket sandwich that the bushings go through to make sure I'll have enough squeeze on the bushings before they bottom out. Measuring the bushings, I'll need slightly more than .285" to get them to torque down properly, but not too much that I'll run out of bolt length. I might be overthinking this part as I've seen more than one drawing for the bushing dimensions and they both matched. I can always machine off part of the chamfered edge on the bushings and get back 40-50 thousandths easily,

I've also ordered some new Lord mounts that are on the way, as soon as those arrive I'll start de-cowling and hopefully find out it all fits fine!!

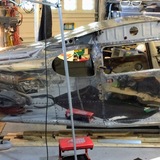
For reference, in the pics the green protector is simulating the engine mount sleeve, and I have it all mocked up like it would be installed minus the nut. Also the washers in the foreground look bigger, but are all the same size (within a few thousandths anyways :mrgreen: )

Image

Image
bart offline
User avatar
Posts: 545
Joined: Fri Aug 21, 2009 7:54 pm
Location: Fresno, CA
FindMeSpot URL: http://share.findmespot.com/shared/face ... 1ZTy9zAEWv
Aircraft: Cessna 180

Re: Firewall bushings...

I'm planning this change for mine in the future sometime, like at engine overhaul time.
Thanks for posting the pics.
hotrod180 offline
Supporter
User avatar
Posts: 10534
Joined: Wed Jan 26, 2005 11:47 pm
Location: Port Townsend, WA
Cessna Skywagon -- accept no substitute!

Re: Firewall bushings...

Revisiting a thread from early last year...
I'm looking to accomplish this change to my airplane this winter,
so I've been doing some research.
I found S.L. 180/182-63 which addresses changing to the aluminum seaplane bushings
in the factory service information summary:

Image

And I found this article in the 180/185 Club manual:

Image

Image

(I dunno why the second photo comes out upside down--
I took it twice, making sure the second time to have the phone oriented correctly.
Darn computers......)
hotrod180 offline
Supporter
User avatar
Posts: 10534
Joined: Wed Jan 26, 2005 11:47 pm
Location: Port Townsend, WA
Cessna Skywagon -- accept no substitute!

Re: Firewall bushings...

I installed my factory-style (stepped) aluminum seaplane bushings yesterday.
Gathered up two pairs of bolts, one dash-number longer than what (I thought) I had,
per the Cessna 180 IPC, so I'd have everything that I needed on hand.
Nope, wrong again-- don't know why, but it turns out that my existing bolts
were longer than even the bolts listed in the IPC for use with the seaplane bushings.
Go figure.
It was a bit of scramble to come up with the right length bolts,
got her done though.
hotrod180 offline
Supporter
User avatar
Posts: 10534
Joined: Wed Jan 26, 2005 11:47 pm
Location: Port Townsend, WA
Cessna Skywagon -- accept no substitute!

Re: Firewall bushings...

Hotrod, how does mine look compared to yours. My IA mechanic friend who owned a "55" 180 installed them back in 1988. I wasn't here when he did it but thought he used the same bolts as the very sagged out rubber jobs that came with the plane.
Image
180Marty offline
Supporter
User avatar
Posts: 2313
Joined: Mon Jan 02, 2006 11:59 am
Location: Paullina IA

Re: Firewall bushings...

Looks about the same as mine.
The spacer part of my home made stepped bushings are the same thickness as the other owner-produced versions of the factory seaplane bushings that others have posted about here. They're also the same thickness as the Seaplanes West firewall spacer. Just one of those things, I guess.
Luckily the guy helping me works at a shop on the field that has an extensive hardware inventory, so we were able to lay our hands on the correct bolts & finish up the project in one session.
hotrod180 offline
Supporter
User avatar
Posts: 10534
Joined: Wed Jan 26, 2005 11:47 pm
Location: Port Townsend, WA
Cessna Skywagon -- accept no substitute!

DISPLAY OPTIONS

19 postsPage 1 of 1

Who is online

Users browsing this forum: No registered users and 1 guest

Latest Features

Latest Knowledge Base