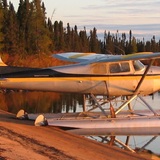
Well, the stripping and repainting of my C-180 has been quite a process.
It is not my first time but sadly it does not really seem to get easier.
It sure is a lot of work and I will be glad to be done.
A problem with the finish has recently evolved and I do not currently have an answer to what has happened. Suggestions welcome.
Some background - painting with EP2C Endura epoxy primer and base coating with Endura EX2C Matterhorn White. I personally have done the paint stripping and then transport the pieces to the local auto body shop where I do the prepping with Alumiprep and Alodine. After rinsing, the components are left to dry overnight before paint application on day 2 by the on site paint technician.
It all started out fine, good results on the elevators, flaps, rudder, doors, struts, vertical and horizontal stabs, both wings painted all ok.
Then when the fiberglass Selkirk cowlings were painted, the finish turned bad. The painter calls it "solvent pop", kind of a rough sandpaper finish which seems to emerge while curing. After paint application, it all seems fine. We left it sitting for a few hours with the ventilation fans running and it all looked good. At 5 pm he shut the fans off and went home. The next day the patchy, sporadic sandpaper finish was there on the cowls. This had not occurred on any of the other pieces, so I attributed it to some kind of contamination on the fiberglass cowling.
Last Thursday I proceeded to prep the fuselage, and Friday the primer and paint was applied, same process as all the rest of the aluminum components. When we finished painting the fuselage, it all looked just fine, but on Monday morning some patchy sandpaper sections appear on some areas of the fuselage, mostly on top but a bit on the side.
Wondering what has happened, what has changed?
Perhaps the ventilation fans need to run longer?
This is a frustrating development ...
It looks like the rough areas will have to be sanded and repainted.
Hoping this is not a prepping or contamination problem which will affect paint adherence.
Suggestions welcome. Thanks
Troubleshooting fresh paint on my C-180
Mon Jun 06, 2016 10:12 pm
Mon Jun 06, 2016 11:50 pm
Re: Troubleshooting fresh paint on my C-180
How long did you let the primer dry before laying on the top coat. Sounds like a typical paint reaction with whatever primer it's on.

Tue Jun 07, 2016 3:46 am
Re: Troubleshooting fresh paint on my C-180
pics would help alot more.
- Slantbuggy offline
- Posts: 58
- Joined: Sun Apr 26, 2015 7:33 am
- Location: Bridgton
Tue Jun 07, 2016 4:44 am
Re: Troubleshooting fresh paint on my C-180
I just painted the better part of 2 Champs with Aero Tech paint that was supplied by the customer. During the first batch of parts we got some solvent pop. This particular paint uses a "finger slick" method between coats to tell when the next coat should be applied. We followed there directions to the T on the rest of the parts and ended up with good results. It took 45 minutes to an hour between color coats for the previous coat to be flashed to a "finger Slick" level so the next coat could be applied.
It is a natural habit of an auto painter to lay paint on top surfaces a little heavier than vertical surfaces, You can level out the orange peal with more paint as it flows and levels out. We want the roof , hood, and deck lid to look like glass, On the sides (vertical) you have to apply the paint as wet as possible but not so heavy that it runs. This causes the top surfaces to take much longer to flash (off gas) between coats. Automotive base coat clear coat systems designed for collision repair have very short flash times, some as short as 5 minutes. Auto painters are not use to such long flash times between coats.
I am guessing that your auto painter didn't allow enough time between coats which trapped solvent that popped through during the curing period. I am assuming that the parts that didn't solvent pop were hung up to be paint so the painter couldn't dump the paint on as heavy as a horizontal surface so they didn't solvent pop. Which also explains why the sides of the fuselage look good but the top surfaces popped.
My suggestion to you is to have a talk with your painter about his painting technique. Don't attack him, I am sure he is an excellent auto painter, it's just that auto techniques don't work with a lot of the new single stage urethanes on the market today. It must be applied evenly on top, side , and bottom surfaces and it has to flash to a "Finger Slick" touch test between coats, this can be much longer than an auto painter is use to.
Tue Jun 07, 2016 6:32 am
Re: Troubleshooting fresh paint on my C-180
I'm just getting to the end of the paint portion of my C180 project and will be shooting the last pieces on Wednesday. As a clueless novice I can't speak to your issue but have one thought that might be helpful. I have stripped, prepped and painted my plane in component pieces and divided the airframe into multiple taped off sections, so about twenty strip, prep and paint sessions in all. Through the process I have evolved to allowing the epoxy primer to cure for about four days and then surface sanding and Scotchbright scuffing before applying the finish coat. Waiting and sanding has given me a much better finish than the pieces and sections that I finish painted within the 72 hour window that is required for adhesion to the epoxy without scuffing. I would imagine that doing this could conceivably help with your issue.
My other thought about painting is, holy shit what a pain in the ass! I couldn't afford the $20k to pay somebody else to endure this all but next time around I'm pimping out the wife or selling off the kids or robbing stores to pay for this insanity! That's not really true, except for the wife part, it's actually been pretty fun, well not fun, maybe interesting in that may-you-have-an-interesting-life, Chinese curse kind of way...
My other thought about painting is, holy shit what a pain in the ass! I couldn't afford the $20k to pay somebody else to endure this all but next time around I'm pimping out the wife or selling off the kids or robbing stores to pay for this insanity! That's not really true, except for the wife part, it's actually been pretty fun, well not fun, maybe interesting in that may-you-have-an-interesting-life, Chinese curse kind of way...
- flyingzebra offline

- Posts: 479
- Joined: Sat Jan 24, 2009 4:53 am
- Location: Northwest Washington state
- Aircraft: Cessna Skylane 182 N3440S, Aviat Husky N2918L
Tue Jun 07, 2016 7:48 am
Re: Troubleshooting fresh paint on my C-180
Solvent popping is exactly as described above....solvent trapped under the "skin" of fresh drying paint.
The "finger stick" method that is described by Cliff, is the only true way to tell when the paint is ready to accept another layer. If you take the back of a knuckle and just quickly and lightly touch the surface, there should be a barely perceptible "halo" of paint on your knuckle. If it's filled in, too wet. If you listen to the people that really understand how paint works, they'll all tell you basically the same thing. A time between coats is the worst method out there....there's soooooo many variables that make that time change....humidity, temp, airflow, substrate temp, gun pressure, etc......
I'd also echo the extended primer dry time over fiberglas. I'm a big fan of keeping parts in my booth for at least a couple days (radiant floor heat and positive air flow) to make sure that primer is dry and sealing anything under it, as well as the part being thoroughly saturated with heat. I've had problems before with fabric wings over a heavy aluminum leading edge, when it hadn't gotten all up to the same temp. The fabric will take on heat quicker than an aluminum structure...same with a light versus heavy structure. It's not that much work to scuff that primer before you shoot a topcoat over it. Fiberglas is pretty porous and if it can get contaminated, it will. I've had fairings that were prepped in a shop, that we had a terrible time trying to seal...everytime anything was layed on them they showed contamination....we finally figured out that they'd been in the shop, about 8' from a guy that was using some WD-40 to preserve/lube some parts.... that stuff penetrated the parts and was really tough to get cleaned off!!
Good luck, and sorry to hear about the problems!
John
- hardtailjohn offline
- Posts: 924
- Joined: Thu Mar 16, 2006 7:06 pm
- Location: Marion, Montana
God put me here to accomplish a certain amount of things...right now I'm so far behind, I'll never die!!
Tue Jun 07, 2016 11:05 am
Re: Troubleshooting fresh paint on my C-180
Really good advice on this solvent pop issue. Thank you.
It is making sense.
Moving forward with this project, I hope that smoothing out the solvent pop areas and applying one more coat will solve the problem.
This morning I moved the fuselage back to the hangar, it sure is a welcome change to see paint. Next will be to install the tail and prep for color scheme and the required touch ups on the white.
DISPLAY OPTIONS
Who is online
Users browsing this forum: No registered users and 0 guests
Latest Features
-
Live to Tell
A Minnesota pilot is surprised to learn that the sudden asymmetric drag of an out-of-rig ski can…Read More -
Creators
Working in some of the Yukon's most beautiful and remote environments, photographer Simon Blakesley captures aircraft in…Read More -
Aircraft Ownership and Maintenance
Upgrading to big tires can make a huge difference in backcountry performance, but with those gains come…Read More -
Tales from Yesteryear
In this tale from bush flying yesteryear, Don Cogger signs up to help Atlee Dodge Jr recovery…Read More


Latest Knowledge Base
-
Destinations
A regional guide with ideas for winter camping destinations in California, Nevada, New Mexico, and Arizona.Read More -
Aircraft
Finding an affordable aircraft that can handle the backcountry for $80K or less? A challenge for sure, but with the…Read More -
Aircraft
01.29.2018 - Zane - Updated tire diameter graphic to add 8.50x10 Guide to tires for use in the backcountry and off-airport landing…Read More -
Pilots
12.22.2013 - Initial article format Operating aircraft on skis and negotiating a snow-covered landscape is an entirely unique skillset and environment.…Read More


