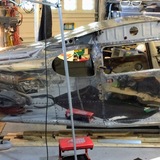
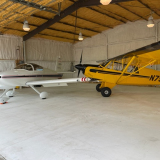
Backcountry Pilot • Interior Upgrade - Sort of Low Budget

Interior Upgrade - Sort of Low Budget

Aircraft building and project-level overhaul forum -- Kitplanes, experimental amateur-built, homebuilding, or even restoration of certified aircraft.
8 postsPage 1 of 1

Interior Upgrade - Sort of Low Budget

So I have mostly completed an interior upgrade in the 172. Since the upper plastic molding was in decent shape, it was decided that it should be salvaged to save some cost. Side panels were replaced using Kydex plastic cut from larger sheets. The old panels were used to help make the templates, but there was a lot of cut, fit, trim , fit, cut, trim, fit and repeat another 15 times to get the panels looking right. I had previously done the tunnel and flooring which really showed the how bad the old panels looked. Since the interior was out, all the old insulation was replaced with the standard black closed cell foam. The remaining exposed metal was painted to match all the plastic molding. We ran out of paint to do the doors, will take care of that this spring when it goes on floats. Overall I think this turned our pretty sweet with cost being pretty low with only needing the couple of sheets of Kydex, foam and some paint. It took a lot elbow grease with some help from my mechanic to paint and fine tune the kick and door panels. I realy like the extra knee room the kick panels give with them being recessed in from the front pillar, it gives a lot more room than you would expect. I wanted to share another option out there between Selkirk kit and the much more labor required utility route.

Before:
Image
Image
Image
Image
During
Image
Image
Image
Image
After:
Image
Image
Image
AK454 offline
User avatar
Posts: 17
Joined: Fri Jan 18, 2013 3:52 pm
Location: Anchorage

Re: Interior Upgrade - Sort of Low Budget

How did you do the doors? I'm trying to figure out a light weight, durable solution for the doors that doesn't look bad.
Bagarre offline
User avatar
Posts: 794
Joined: Wed Apr 16, 2014 7:18 pm
Location: Herndon
Aircraft: 1952 Cessna 170B project

Re: Interior Upgrade - Sort of Low Budget

I did the doors with the same material. I pulled them off the plane to make it easier for removal and installation of the panels. I used the old panel for tracing the template onto the Kydex.Once you have it rough cut, it is just a matter of trimming and fitting till you like the fit and finish. We did use a heat gun to shape on area to follow the contours of the door. Attention to detail and a lot of patience is required for this part. I will try to get a picture of the door today or tomorrow to show the finished product.
AK454 offline
User avatar
Posts: 17
Joined: Fri Jan 18, 2013 3:52 pm
Location: Anchorage

Re: Interior Upgrade - Sort of Low Budget

AK454 wrote:I did the doors with the same material. I pulled them off the plane to make it easier for removal and installation of the panels. I used the old panel for tracing the template onto the Kydex.Once you have it rough cut, it is just a matter of trimming and fitting till you like the fit and finish. We did use a heat gun to shape on area to follow the contours of the door. Attention to detail and a lot of patience is required for this part. I will try to get a picture of the door today or tomorrow to show the finished product.


Thanks. Looking forward to seeing them.

What thickness Kydex did you use and where did you buy it from?
Bagarre offline
User avatar
Posts: 794
Joined: Wed Apr 16, 2014 7:18 pm
Location: Herndon
Aircraft: 1952 Cessna 170B project

Re: Interior Upgrade - Sort of Low Budget

I went with the Pewter color and was .060 thick material. We have a couple of local plastic shops here around Anchorage that had a sheet and the plastic shop in Wasilla had a quite a few sheets in stock.. Should be pretty easy find a dealer down in the Lower 48.
AK454 offline
User avatar
Posts: 17
Joined: Fri Jan 18, 2013 3:52 pm
Location: Anchorage

Re: Interior Upgrade - Sort of Low Budget

I did a very similar upgrade with Kydex a couple years ago on my 180. I also used rubber channel on the edge of the Kydex and most of it was friction fit, with a few screws where needed. I had a local shop mix up a few rattle cans of grey paint which I used for the interior metal pieces and the doors and exposed interior structural areas. After 2 years, I'm very happy with how it all turned out. I finished off with Selkirk for the flap tunnel. Now I'm going to rehab the seats.
7GC offline
Supporter
Posts: 69
Joined: Sun Jun 01, 2008 10:47 am
Location: Alaska
Keep it light.

Re: Interior Upgrade - Sort of Low Budget

7GC wrote:I did a very similar upgrade with Kydex a couple years ago on my 180. I also used rubber channel on the edge of the Kydex and most of it was friction fit, with a few screws where needed. I had a local shop mix up a few rattle cans of grey paint which I used for the interior metal pieces and the doors and exposed interior structural areas. After 2 years, I'm very happy with how it all turned out. I finished off with Selkirk for the flap tunnel. Now I'm going to rehab the seats.


+1 on the rubber channel. You can get it at any auto-parts store and it really finishes it off.

Nice work!

Jim
jaudette offline
User avatar
Posts: 617
Joined: Mon Feb 25, 2013 2:12 pm
Location: Westcliffe
Aircraft: Husky A-1B
Vans RV-7a

Re: Interior Upgrade - Sort of Low Budget

I agree 100% with the rubber channel, it really helps with making the friction fit and making the whole set up look right. I only needed to install screws on the front kick panels and the doors. Here is what the door looks like now, as mentioned earlier we ran out of paint so the doors still need to be painted.
Image
AK454 offline
User avatar
Posts: 17
Joined: Fri Jan 18, 2013 3:52 pm
Location: Anchorage

DISPLAY OPTIONS

8 postsPage 1 of 1

Who is online

Users browsing this forum: No registered users and 1 guest

Latest Features

Latest Knowledge Base