Good call on removing the fin strobe. We did it a few years ago and gained about 3 mph. The replacement lighting is very bright(Whelen 650 and 500)
You'll love your Pponk engine.
Modernizing an old 182: STOL kit now in progress
Mon Jan 08, 2018 5:28 pm

Mon Jan 08, 2018 6:40 pm
Re: Let the games begin! Modernizing an old 182.
colopilot wrote:I'm in a bit of a slow phase here while I amass parts and paperwork, however one big step is finally moving. My P-Ponk in a box is crated up and ready to ship! The LTL driver will pick it up in Wasilla tomorrow, and then begins a journey across ocean and land to my hangar late next week. My O-470 wasn't a good candidate for anything other than a reman, so I'm dropping in an IO-520-F instead.
This is turning into the airplane BCP built. The engine, prop (through Flight Resources), STOL kit, nose fork, and transponder so far have been found or supplied by people on here. Pretty cool!
I was also slightly stressing about finding an LED tail beacon that would fit the available replacement fin caps (along with a new cap, mine is cracked) until I realized the 1957 182A was type certificated mere months ahead of the mandate for such things. FAA says anything with a TC before 4/1/57 has no requirement, and Cessna conveniently TC'd this plane on Dec 7, 1956.
Given the amount of other LED lighting to be installed, it will look like a UFO and still be significantly better than the single tail strobe it has now. So, the vertical fin strobe beacon comes off and a flush fin cap will go on. This should shave a few pounds off the tail (this may not actually be good for CG), get one more draggy thing out of the air (always good), and clean up the electrics a little bit.

If you need help when that thing gets here, shoot me a text!
Mon Jan 08, 2018 7:35 pm
Re: Let the games begin! Modernizing an old 182.
jaudette wrote:If you need help when that thing gets here, shoot me a text!
Will do! I'm trying to get them to deliver next Friday as long as it isn't snowing, we'll see if they can accommodate.

Tue Jan 30, 2018 3:34 pm
Re: Let the games begin! Modernizing an old 182.
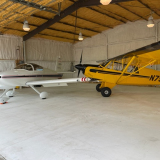
It's here! The freight company took their sweet time, but the truck finally arrived this morning. Jaudette (featured in the pic) also came over and helped me heave this thing around onto a cart so I can keep it out of the way for now. My P-Ponk magic STC packet also arrived over the weekend, so this is two big steps closer to fruition. I need to get the DER going on the 8.5 piston paperwork but am led to believe that will be a pretty easy process. TCM rates this IO-520 at a very respectable 285HP@2700 RPM.
Next up is getting the new mount/exhaust and prop ordered up from SPW and Flight Resources respectively, along with the rest of my fuel system and electrical overhaul parts. My IA has agreed that I'm crazy but not insane and the plan is actually correct, so the good stuff is about to start happening.
So far I think I may still be on track for a March-ish timeframe but it may go into April now with my day job interfering. It also turns out there is an experienced Sportsman STOL installer right on the field, so I may just tow it over there and have that done as part of this phase. I figure I will be learning this airplane all over again anyway, so no harm in doing it all at once.
Tue Jan 30, 2018 4:15 pm
Re: Let the games begin! Modernizing an old 182.
Good for you! I took delivery of my ponk about a year ago.
If my wife would wear perfume that smelled like that engine breaking in there is nothing she couldn't ask for.
If my wife would wear perfume that smelled like that engine breaking in there is nothing she couldn't ask for.
Wed Jan 31, 2018 10:48 pm
Re: Let the games begin! Modernizing an old 182.
I have really enjoyed reading this thread today! You have a beautiful airplane that will be even better once your vision for it is complete. Please keep us posted on how it comes along!
I noticed that you said your fin cap was cracked. Thankfully you caught that before you went flying! I had a beacon fall off of my rental slowhawk three weeks ago because of a crack that I missed Speaking of beacons, If you haven't purchased a vertical top yet, Stene sells a vertical top for a small beacon for your airplane (assuming that it is a 182A) that will fit the Aeroled Sunbeacon II just perfectly. We installed one of their small beacon vertical tops along with the SB II on our 185 recently and I would do it again in a heartbeat. This is what the install looks like

My only advice is that if the project takes longer than expected, don't feel bad about it and don't beat yourself up because of delays. As they say, stuff happens! In the end you will no doubt have a killer airplane!!!
Enjoy!
I noticed that you said your fin cap was cracked. Thankfully you caught that before you went flying! I had a beacon fall off of my rental slowhawk three weeks ago because of a crack that I missed
Speaking of beacons, If you haven't purchased a vertical top yet, Stene sells a vertical top for a small beacon for your airplane (assuming that it is a 182A) that will fit the Aeroled Sunbeacon II just perfectly. We installed one of their small beacon vertical tops along with the SB II on our 185 recently and I would do it again in a heartbeat. This is what the install looks likeMy only advice is that if the project takes longer than expected, don't feel bad about it and don't beat yourself up because of delays. As they say, stuff happens! In the end you will no doubt have a killer airplane!!!
Enjoy!

Thu Feb 01, 2018 4:30 pm
Re: Let the games begin! Modernizing an old 182.
Ryan, looks like that top cap fits very nice.
Kurt
Kurt


Fri Feb 02, 2018 7:44 pm
Re: Let the games begin! Modernizing an old 182.
pilotryan wrote:I have really enjoyed reading this thread today! You have a beautiful airplane that will be even better once your vision for it is complete. Please keep us posted on how it comes along!
I noticed that you said your fin cap was cracked. Thankfully you caught that before you went flying! I had a beacon fall off of my rental slowhawk three weeks ago because of a crack that I missed
Thanks for the positive words, I'm looking forward to completion for sure. I actually flew with the cracked tail cap, however a couple A&P's said it was alright. The cracks aren't in a place where I'm risking failure at this point. Still it's ugly so it needs to go. I appreciate the note on the LED beacon as well, though I am still likely to just remove it given the rest of the anti-collision lighting going in.
...On another note, what's the group consensus on using a 6.00-6 main wheel with an 8.50-6 tire? Goodyear's tire guide recommends 8.50-6 wheels, however it does seem like people are managing to use the 6.00 as well. I'm not finding anything conclusive so far.
Fri Feb 02, 2018 8:02 pm
Re: Let the games begin! Modernizing an old 182.
colopilot wrote:...On another note, what's the group consensus on using a 6.00-6 main wheel with an 8.50-6 tire? Goodyear's tire guide recommends 8.50-6 wheels, however it does seem like people are managing to use the 6.00 as well. I'm not finding anything conclusive so far.
I’m not sure what you’re trying to say? 6.00-6, 7.00-6, 8.00-6, 8.50-6, 26” Goodyears, and 26” through 31” Bushwheels all use 6 inch wheels.
Fri Feb 02, 2018 8:12 pm
Re: Let the games begin! Modernizing an old 182.
robw56 wrote:colopilot wrote:...On another note, what's the group consensus on using a 6.00-6 main wheel with an 8.50-6 tire? Goodyear's tire guide recommends 8.50-6 wheels, however it does seem like people are managing to use the 6.00 as well. I'm not finding anything conclusive so far.
I’m not sure what you’re trying to say? 6.00-6, 7.00-6, 8.00-6, 8.50-6, 26” Goodyears, and 26” through 31” Bushwheels all use 6 inch wheels.
Sorry, that wasn't phrased as well as it could have been. I included the Goodyear guide's relevant data below, you can see they list a 6.00-6 wheel for up to 8.00-6 tires, but then go to an 8.50-6 wheel for an 8.50-6 tire. The question is just whether I can actually use a 6.00-6 wheel on an 8.50-6 tire. Both are 6 inch wheels, the 8.50 being wider. I can't tell if it's really that big of a deal or not.

Sat Feb 03, 2018 7:20 am
Re: Let the games begin! Modernizing an old 182.
That thing is going to be a fire breather! Can't wait to see the progress!
Jim
Jim
Mon Feb 26, 2018 10:49 pm
Re: Let the games begin! Modernizing an old 182.
The fire breathing is on a slight delay, UPS managed to use my new SPW engine mount as a piñata somewhere between Alberta and here and the fine folks up at Acorn/SPW are having to unravel the mess. In the meantime I've been accumulating a lot of stuff with more to come. This morning FedEx delivered this care package from John and Larry @ Flight Resource. I'm still drooling on it, fortunately the blades are wrapped in plastic. I cannot wait to bolt this on and see it spin!

Most of the wire/electrical bits and several other interesting things are arriving this week. The fuel senders are on backorder and won't be here until later in March, however I should be able to complete the rest of the bladder install work if I can find the time before then. The carb and fuel valve will go out for overhaul next week after I drain the system, then it's fuel/electrical replace-it-all time. Guessing 40+ hours of work on those alone but we'll see. My original hope of flying again by end of March is proving to be too optimistic, but if I can keep at it I'm going for not too long after that.
Most of the wire/electrical bits and several other interesting things are arriving this week. The fuel senders are on backorder and won't be here until later in March, however I should be able to complete the rest of the bladder install work if I can find the time before then. The carb and fuel valve will go out for overhaul next week after I drain the system, then it's fuel/electrical replace-it-all time. Guessing 40+ hours of work on those alone but we'll see. My original hope of flying again by end of March is proving to be too optimistic, but if I can keep at it I'm going for not too long after that.
Wed Feb 28, 2018 7:42 am
Re: Let the games begin! Modernizing an old 182.
I think you're going to love that prop! I've put about 20 hours on the new carbon prop on my RV-7 and absolutely love it! It's smoother, less vibration and throttle response is instantaneous! The icing on the cake is that it's 8kts faster! If I could hang one of those on my Franklin, I would!
Here's a pic of mine:

P.S. You ought to come over and fly the RV. It's not an apples to apples comparison, but smoothness and throttle response will be similar.
Here's a pic of mine:
P.S. You ought to come over and fly the RV. It's not an apples to apples comparison, but smoothness and throttle response will be similar.
Wed Feb 28, 2018 8:17 am
Re: Let the games begin! Modernizing an old 182.
jaudette wrote:I think you're going to love that prop! I've put about 20 hours on the new carbon prop on my RV-7 and absolutely love it! It's smoother, less vibration and throttle response is instantaneous! The icing on the cake is that it's 8kts faster! If I could hang one of those on my Franklin, I would!
...
P.S. You ought to come over and fly the RV. It's not an apples to apples comparison, but smoothness and throttle response will be similar.
Definitely! I'll be out there most of the day Friday if you want to go up for a bit. Going to take advantage of the warm weather and drain the fuel out, pull the parts for overhaul, and get Ron started on what he needs to be ready for. I took off the last week of March for the engine hang and fuel cell replacement. I think we'll worry about the tires/fork after that, I don't want to attempt too much at the same time or mistakes will be made. Besides, I am really anxious to see it taxi under its own power again.
Mon Mar 26, 2018 8:13 pm
Re: Let the games begin! Modernizing an old 182.
This week should see some major progress. Today we got the prop governor pulled from the 470 and a few remaining bits disconnected; the old engine comes out in the morning. I also replaced the cabin wing vents with the Precise Flow vent kit, and installed Rosen visors. Both of those went in very quickly and should improve the cabin comfort level a bit.
I also got the instrument panel unmounted and the engine cluster pulled away from that, along with an apparently inop Nav head removed. Curiously it only had ground connected (no power) which explains some things, so maybe it works after all. Oh well, it's gone now. Tomorrow I'll move the remaining Nav head over to create two vertically-aligned spots for the CGR-30 combo being ordered this week. All other remaining engine/fuel gauges will come out, and the large empty space will be filled with an aluminum panel blank containing a RAM ball mount for the iPad, and a dual USB power outlet to run it. The tail stinger was also pulled so I can run new wire in advance of the AeroLED Suntail light.
Most of the morning was just spent relocating the airplane to my A&P's hangar and moving parts, engine, etc over there so I feel like it's decent progress for an afternoon. Hangar talk definitely occupied some time too.
I'm hopeful we'll get the fuel cells out in the next 1-2 days, but I won't lay predictions on that effort yet since it's likely to go slow. My carb and fuel valve are both still in Overhaul City anyway so it will probably be at least next week before I see those again, and my new senders are ... well, I don't know where. Not here in any event. The ultimate goal for this week is to have the panel cleaned up and ready to accept the CGR kit, and P-Ponk hung on the new SPW mount with the MT prop. I also need to get the firewall battery tray installed so that the wiring harness order for that can be finished up. Fuel cell install would be a bonus, but those may extend into next week.
Tue Mar 27, 2018 9:52 am
Re: Let the games begin! Modernizing an old 182.
colopilot wrote:.....Tomorrow I'll move the remaining Nav head over to create two vertically-aligned spots for the CGR-30 combo being ordered this week....
Sounds like things are coming together for all the work to happen!
I'm curious as to the "two vertically aligned spots" for your "GCR-30 combo".....
are you installing two of them?

Cessna Skywagon -- accept no substitute!
Tue Mar 27, 2018 9:40 pm
Re: Let the games begin! Modernizing an old 182.
This is going slow now so nothing really "done" today, but we did get the 520 prepped a good deal for install. Still a bit more to do on it (swap oil sump, pickup, pump from the 470), so we'll see how tomorrow goes. I traced out a lot of old wire and am about ready to pull new runs for the Suntail after making some new holes. Also on deck for tomorrow is fuel cell removal on both sides. If we haven't run away by the end of that, maybe we'll play with the new engine mount since the 470 should be out too.
The "might as well's" are what are really dragging this on, it's impossible to take on something like this and not want to improve everything else that you find at the same time. There are things I will just have to go back and do later or it'll never end. Now that I've taken apart almost everything I can find though, I'm hoping the project scope creep has reached its peak.
The combo package has a CGR-30P and a 30C, so two displays. The C is the companion gauge cluster. By having both, it puts all primary gauges right up front and center instead of having to scroll through pages. It's not mandatory, but I have the panel space and it will help with situational awareness. Plus $800 rebate through end of March on the combo kit is nice.
The "might as well's" are what are really dragging this on, it's impossible to take on something like this and not want to improve everything else that you find at the same time. There are things I will just have to go back and do later or it'll never end. Now that I've taken apart almost everything I can find though, I'm hoping the project scope creep has reached its peak.
hotrod180 wrote:Sounds like things are coming together for all the work to happen!
I'm curious as to the "two vertically aligned spots" for your "GCR-30 combo".....
are you installing two of them?
The combo package has a CGR-30P and a 30C, so two displays. The C is the companion gauge cluster. By having both, it puts all primary gauges right up front and center instead of having to scroll through pages. It's not mandatory, but I have the panel space and it will help with situational awareness. Plus $800 rebate through end of March on the combo kit is nice.
Wed Mar 28, 2018 8:40 am
Re: Let the games begin! Modernizing an old 182.
colopilot wrote: The "might as well's" are what are really dragging this on, it's impossible to take on something like this and not want to improve everything else that you find at the same time. There are things I will just have to go back and do later or it'll never end.....
Aircraft upgrades can be a slippery slope.
I've seen some people slide down that slope until they run out of money....
unfortunately, sometimes it's before the airplane is flyable again.
Cessna Skywagon -- accept no substitute!
Wed Mar 28, 2018 6:07 pm
Re: Let the games begin! Modernizing an old 182.
hotrod180 wrote:Aircraft upgrades can be a slippery slope.
I've seen some people slide down that slope until they run out of money....
unfortunately, sometimes it's before the airplane is flyable again.
Yeah, it can snowball into a monster if you let it. I had most of this anticipated when I bought it, though there have definitely been some unknowns. Tack on another one from today, I pulled out part of the headliner and was greeted by a dirt shower. Not sure I want to deal with reinstalling it, so I may go the utility-look foam route and dress the wires nice and neat up there. I'll have to get the rest of the liner and insulation out and see what I'm dealing with up there first before I decide that. The existing liner needs repair if I use it again though.
Today we got a lot done. The O470 is out of the airframe, and my mechanic is expecting to spend some time tomorrow swapping parts. Jaudette came over and we wrestled the shit out of a couple terrorist fuel cells. Got them both out in a little over two hours though which is really good considering we'd never done it before. In two days the bays will get cleaned and taped, and we'll try to get both new cells snapped back in same day. The manufacture dates on the cells are 1978 and 1979 respectively, so I am quite impressed at the service life. Goodyear made some good stuff! I'm less impressed at certain other details of their installation, but part of the fun is correcting old mistakes and doing it better. Pro-tip idea from a non-flying buddy of mine: Use a piece of slit hose to cover the opening. It makes a nice round edge for your arms to slide over and doesn't require taping. Worked great!
There is still a lot to do before it's flying in at least basic form again, but I am still confident for an April flight. I'll be cleaning up after that happens and finishing other details before summer, but I can mentally map the progression to completion. A little more every day and it'll eventually get there!


Wed Mar 28, 2018 7:11 pm
Re: Let the games begin! Modernizing an old 182.
Will be interesting to see how the nipples line up with the holes in the butt rib. I replaced my right bladder a few years ago when the outlet nipple started leaking and was told it was because of a poor repair in 1978. Had to send the first new one back since the nipples would not fit without trimming metal and I didn't want to cut on an original wing. Next one was marginal but I'm using it. Last August I decided to replace my left just because---it really wasn't leaking. When I pulled it out, it was original from 1954 with a 1953 mfg date. I've had the plane since 1988. I've seen numerous pictures of people on the wing like you and can't see myself doing that. I stood on my step ladder and could easily reach the far corners of the tank. Would be a breeze it the nipples line up and if the snap clips were s little easier in the far corners. For getting the filler plates reinstalled, I cut the heads off of two bolts that are about 2 1/2 inches and use that as the guide and something to hang onto.

DISPLAY OPTIONS
Who is online
Users browsing this forum: No registered users and 0 guests
Latest Features
-
Live to Tell
A Minnesota pilot is surprised to learn that the sudden asymmetric drag of an out-of-rig ski can…Read More -
Creators
Working in some of the Yukon's most beautiful and remote environments, photographer Simon Blakesley captures aircraft in…Read More -
Aircraft Ownership and Maintenance
Upgrading to big tires can make a huge difference in backcountry performance, but with those gains come…Read More -
Tales from Yesteryear
In this tale from bush flying yesteryear, Don Cogger signs up to help Atlee Dodge Jr recovery…Read More


Latest Knowledge Base
-
Destinations
A regional guide with ideas for winter camping destinations in California, Nevada, New Mexico, and Arizona.Read More -
Aircraft
Finding an affordable aircraft that can handle the backcountry for $80K or less? A challenge for sure, but with the…Read More -
Aircraft
01.29.2018 - Zane - Updated tire diameter graphic to add 8.50x10 Guide to tires for use in the backcountry and off-airport landing…Read More -
Pilots
12.22.2013 - Initial article format Operating aircraft on skis and negotiating a snow-covered landscape is an entirely unique skillset and environment.…Read More


