BigRenna-
Thanks for leading the way! Please keep taking lots of pictures!
gunny
Project: 180 Skywagon - The On-Going Saga
Mon Feb 02, 2015 9:15 am

Mon Feb 02, 2015 12:02 pm
Re: Project: 180 Skywagon - The On-Going Saga
Man, that is a freakin cool tool.
Sat Feb 14, 2015 2:01 pm
Re: Project: 180 Skywagon - The On-Going Saga
Word is your out flying, get your skis on yet!?
Sat Feb 14, 2015 2:37 pm
Re: Project: 180 Skywagon - The On-Going Saga
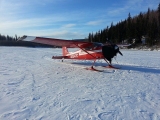
Yip. I saw Rene and Bill at Sherman. Looked like fun. DA this AM was -4600.

(pulled Bill's pic from SC.org)
Skis this week most likely...

(pulled Bill's pic from SC.org)
Skis this week most likely...
- Bigrenna offline


- Posts: 2339
- Joined: Sun Sep 25, 2011 4:02 pm
- Location: New England
- Aircraft: C180H / C170B
www.bushwagoneast.com
www.avthreads.com
Sun Mar 01, 2015 10:50 am
Re: Project: 180 Skywagon - The On-Going Saga
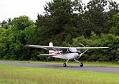
Look what I found. I figured you would have the skis on by now


Pulled these from the 180/185 group page from Facebook. Looks like you guys are having fun.
Pulled these from the 180/185 group page from Facebook. Looks like you guys are having fun.
Sun Mar 01, 2015 11:54 am
Re: Project: 180 Skywagon - The On-Going Saga
Yeah... Alton Bay was a fun time (nice and slippery.) The WX was absolutely perfect with lots of A/C on the ice.
- Bigrenna offline
- Posts: 2339
- Joined: Sun Sep 25, 2011 4:02 pm
- Location: New England
- Aircraft: C180H / C170B
www.bushwagoneast.com
www.avthreads.com
Tue Mar 03, 2015 1:22 pm
Re: Project: 180 Skywagon - The On-Going Saga
I thought you were putting your skis on.Possible cookout at Crow island this weekend.
Bill
Bill
Sun May 31, 2015 12:25 pm
Re: Project: 180 Skywagon - The On-Going Saga
Well it has been 10 months since I finished the first phase of the wagon resto. Its been a nutty trip with some hard flying... This week I just hit 230 hrs in the bird. The goal is to break 250 in 12 months...
Anyway, since I've been focusing on flying, I haven't been doing any major work to the A/C, but this week I thought I'd tackle the last big item on the original list. I left the camera home, but here's an iPhone pic. I'll get some good documentation when I start in on the other wing.


Anyway, since I've been focusing on flying, I haven't been doing any major work to the A/C, but this week I thought I'd tackle the last big item on the original list. I left the camera home, but here's an iPhone pic. I'll get some good documentation when I start in on the other wing.
- Bigrenna offline
- Posts: 2339
- Joined: Sun Sep 25, 2011 4:02 pm
- Location: New England
- Aircraft: C180H / C170B
www.bushwagoneast.com
www.avthreads.com
Sun May 31, 2015 3:29 pm
Re: Project: 180 Skywagon - The On-Going Saga
Way cool The Wing-X is on my short list. So, I'll be following your install closely, please keep us up to date! I'm still hammering away on my project... I way underestimated the time required and overestimated the time I can devote to the project. Still a long way to go!
Are you going/bringing it to Oshkosh this year?
Oh, by the way as long as you're messing with the wing, could you take some pictures of the roll servo installation for me? I've finished the pitch servo and will start that very soon.
thanks,
gunny
Are you going/bringing it to Oshkosh this year?
Oh, by the way as long as you're messing with the wing, could you take some pictures of the roll servo installation for me? I've finished the pitch servo and will start that very soon.
thanks,
gunny
Sun May 31, 2015 9:17 pm
Re: Project: 180 Skywagon - The On-Going Saga
29's are on, where are you headed?
Mon Jun 01, 2015 6:27 am
Re: Project: 180 Skywagon - The On-Going Saga
Gunny wrote:Are you going/bringing it to Oshkosh this year?
Thats the plan... We should be there for 3 or 4 days.
- Bigrenna offline
- Posts: 2339
- Joined: Sun Sep 25, 2011 4:02 pm
- Location: New England
- Aircraft: C180H / C170B
www.bushwagoneast.com
www.avthreads.com
Mon Jun 01, 2015 1:06 pm
Re: Project: 180 Skywagon - The On-Going Saga
Great! We'll have to meet up. I'd sure like to see your airplane in person.... and meet you too of course;) I'll probably be coming up in a T-6 so would be parking on the vultures row in warbirds. At this point I doubt my airplane will be done by then.
gunny
gunny
Mon Jun 01, 2015 7:36 pm
Re: Project: 180 Skywagon - The On-Going Saga

Alright... The Wing-X. http://www.wingxstol.com/
First thing to talk about is just WTF is this all about. Most 100 series Cessna owners knows about it, but exactly what is involved can be a bit of a mystery as there isn't much install info on the web. One thing for sure it's damn expensive. At $5k for the kit alone, its no joke... A shop that has done em before is in for 40-45 hrs while a first timer may be in as much as 60.
Their website claims the additional 12 sq feet will give a 25% reduction in ground roll (on wheels,) a 12-15% increase in climb performance, 1000' increase in service ceiling, and a GW increase.
All sound good, so lets do it right? Bummer is for me, I already put the big stab and Kenmore GW increase on, so nothing there... Increased T/O roll sounds nice though... An easy take off in the wagon is 250-300', but any decrease is welcomed. A really good crisp cold day with light fuel is about 1700'/min so another 200'/min might be real nice indeed...
For the most part, the general consensus seems to be that for floats, the kit is for sure a winner. For wheels, it gets a bit more convoluted. I've tried to do the research, and unfortunately the "been-there-done-thats" that I trust generally say not to install it. I'm not sure if this is because they say it its tough in the x-wind, a bitch to get to stop floating/flying, or just damn near impossible to get inside a regular hanger, but because I own the kit, AND its super easy to take off once the install is done, I'm gonna put the damn thing on and make up my own mind.
You can order it for the stock wing, or as in my case, for the Sportsman. I did test fit the kit while I was doing the Sportsman install and the fit is pretty snug. Paul from WingX and Willie Stene work very closely and have worked out all of the bugs, so I expect no issues due to mod conflicts.
Here goes....

First understand the kit breaks down into three basic steps. (If applicable to your A/C) The stainless strap, (for all) the packer, and then the tips.
The stainless strap is used if your A/C does not have the later beefier angle bracket at and around Sta 100 and if you want or are operating above a certain GW. This strap is centered at Sta 100 (just under the strut) and is stuffed under the leading edge skin trailing edge. The bitch here is you will have to unload the strut by lifting the wing and then move it down about 12". It also sucks ass to drill the stainless... But not impossible if patient, go slow, and have some extra bits handy. The packer is fitted using #6 universal head cherries so make sure you have the proper pneumatic puller.

The packer is made up of two bits of alum straps that are riveted up under the forward spar cap centered around Sta 136. These are aluminum and much easier to drill, but require some modifications to the ribs to get them to fit. You will need to cut at least two new inspection ports in two bays to gain access to buck the rivets. The Wing-X drawings are God awful, don't follow standard A/C convention, and have a bunch of confusing illustrations (e.g. large views of the left wing with exploded views of the right. WTF???) Might take an experienced sheet metal worker a couple of head scratches and some time to sort it all out, but in the end, it ain't rocket science. Actually being smart might be a detriment as I've seen the less experienced A&P just push thru this install w/out asking the important questions. Regardless... I will say that Paul C at WingX is FANTASTIC and will be there (even on the weekend) for support. Top notch customer service IMO. Although confusing, it is a good and complete kit.

Last of the three parts are the wing extensions. (the big parts) These come primed and will eventually just screw on like wing tips. Patience here is important as it is fairly critical to get the geometry perfect.

More tomorrow...
- Bigrenna offline
- Posts: 2339
- Joined: Sun Sep 25, 2011 4:02 pm
- Location: New England
- Aircraft: C180H / C170B
www.bushwagoneast.com
www.avthreads.com
Mon Jun 01, 2015 10:26 pm
Re: Project: 180 Skywagon - The On-Going Saga
Hello,
I did the Wing X to my '53 C180. I like it. I have a stock wing, no cuff. I needed the 400lbs G/W increase. i most likely would have done the sportsman otherwise, bang for the buck thing. It handles a crosswind fine, 30knots is fine. Taxing on bushwheels is by far more nerve racking in a wind. I think the performance is overall better than a cuff, but it cost better than twice the price of a cuff. Seems solid down to 40 kias on short final, almost R-Stol solid. Flint tips are nice too, but feel tippy with fuel.
I guess it comes down to using a cuff and working the airfoil harder, or just bolting on more wing and getting the extra lift that way. You will like it, and at $10k you will never admit otherwise.
Mike
Tue Jun 02, 2015 10:08 am
Re: Project: 180 Skywagon - The On-Going Saga
mghallen wrote:.... and at $10k you will never admit otherwise.
Very insightful.


Cessna Skywagon -- accept no substitute!
Tue Jun 02, 2015 11:38 am
Re: Project: 180 Skywagon - The On-Going Saga
hotrod180 wrote:mghallen wrote:.... and at $10k you will never admit otherwise.
Very insightful.
I have no issues with calling a spade a spade regardless the cost, or in my case, the labor. Zane has been bugging me about it, so once this last mod is finished, I will sit down and give a full review of all the mods with my honest thoughts.
- Bigrenna offline
- Posts: 2339
- Joined: Sun Sep 25, 2011 4:02 pm
- Location: New England
- Aircraft: C180H / C170B
www.bushwagoneast.com
www.avthreads.com
Tue Jun 02, 2015 12:19 pm
Re: Project: 180 Skywagon - The On-Going Saga
While no one wants to admit, even to themselves, that a pricey mod to their airplane didn't perform as hoped for, but by not admitting it they're really doing a big disservice to everyone else considering that mod.
I waffled for a long time on getting a Micro VG kit for my C150/150TD, heard both good and bad about them but finally a couple "makes a completely different airplane out of" type comment from two different people finally convinced me to get them. Maybe I'm just too ham-handed a pilot to feel the improvement, but I installed them and noticed very little difference in either stall speed or improved low-speed control. I don't mind admitting that to anyone, esp if they're on a budget & it will keep them from wasting their precious financial resources like I did IMHO. Maybe the VG's really improve things when added to a STOL cuff, I don't know, but even though they're not what I'd call bank-busters I will never spend the money to put them on a stock Cessna wing again.
Ditto flap gap seals--my C180 came with a set installed and I went back & forth about removing them. Even started a thread here to discuss them. Some people loved them, some hated them, and some couldn't tell the difference. I went ahead & removed them, and like the VG's couldn't tell any difference in stall speed or low speed handling, or in climb & cruise performance Glad I took them off anyway, knocked off 2 or 3 pounds plus now I can say my Skywagon has a stock wing like Cessna designed it.
Last edited by hotrod180 on Wed Jun 03, 2015 8:43 am, edited 1 time in total.
Cessna Skywagon -- accept no substitute!
Tue Jun 02, 2015 6:16 pm
Re: Project: 180 Skywagon - The On-Going Saga

Lots of places to start, but the first step I did was to cut the access holes in the underside of the wings. I did this earlier in the spring so I could use the hole to mount the AOA. (repeat on the pics) The instructions say you can cut as many as needed, but really the job can be done with just two in the right spot. (This is not a how-to, so confirm your own measurements) but the holes are roughly inboard of Sta 136 and 154, 2nd bay aft of the forward spar.
I used the ARC360 from Spruce which is totally awesome. Super easy to use, fast, and perfect holes. No muss, no fuss. http://www.aircraftspruce.com/catalog/topages/arc360.php?clickkey=7060

You may want to rivet the backing plates for the inspection covers at this stage, but don't squeeze em yet as you will want the holes as large as possible to get your arms in there... and for that, make sure you wrap some tape around the edges of the holes to save your forearms from getting all cut up.


Next on the agenda is to get the strut out of the way so you can gain access to the Sta 100 lower rivets. I use a Genie Superlift as it is perfect. Its manual crank allows for very small adjustments and its fork is just wide enough to lay a small cradle on and grab the outboard wing. It is also perfect for lifting the TW to get A/C into flight attitude for weighing, fuel calibration, or whatever... Once you have the bolt loose, releave the tension and drive out the bolt with a brass drift. It's tough to get a hammer on the drift, so if you can't get the bolt totally out, careful not to cheat and ease it out with a ratchet... This will gall the inside of the fork and weaken it.
http://www.northerntool.com/shop/tools/product_200336940_200336940?cm_ven=google_PPC&cm_cat=Dynamic+Search+Ads+Test&cm_pla=generic&cm_ite=_inpage:Seats&mkwid=sla20nh0M&pcrid=42986990951&mt=b&storeId=6970&langId=-1&type=search&gclid=COb8182t8sUCFY0XHwodRwQA5Q


It's a bit freaky, but crank the wing up just enough to let the strut end drop out. With the strut free, lower it just enough to gain access to the rivet line.

Next step, drilling out some rivet heads....
- Bigrenna offline
- Posts: 2339
- Joined: Sun Sep 25, 2011 4:02 pm
- Location: New England
- Aircraft: C180H / C170B
www.bushwagoneast.com
www.avthreads.com
Tue Jun 02, 2015 6:27 pm
Re: Project: 180 Skywagon - The On-Going Saga
Thanks for the continued updates..... For a 180/185 guy this thread is the gift that keeps on giving. 
- fiftynineSC offline
- Posts: 390
- Joined: Mon Dec 07, 2009 11:41 am
- Location: Frisco
- Aircraft: Cessna 185F
Tue Jun 02, 2015 6:31 pm
Re: Project: 180 Skywagon - The On-Going Saga
fiftynineSC wrote:Thanks for the continued updates..... For a 180/185 guy this thread is the gift that keeps on spending.
Fixed it for you 59SC.
Great work Greg, I can't wait to hear your thoughts on this mod. (And all the mods that you've done for that matter.)
- mountainmatt offline

- Posts: 2803
- Joined: Sat Apr 11, 2009 2:43 pm
- Location: Colorful Colorado
FlyingPoochProductions
FlyColorado.org
FlyColorado.org
DISPLAY OPTIONS
Who is online
Users browsing this forum: No registered users and 1 guest
Latest Features
-
Live to Tell
A Minnesota pilot is surprised to learn that the sudden asymmetric drag of an out-of-rig ski can…Read More -
Creators
Working in some of the Yukon's most beautiful and remote environments, photographer Simon Blakesley captures aircraft in…Read More -
Aircraft Ownership and Maintenance
Upgrading to big tires can make a huge difference in backcountry performance, but with those gains come…Read More -
Tales from Yesteryear
In this tale from bush flying yesteryear, Don Cogger signs up to help Atlee Dodge Jr recovery…Read More


Latest Knowledge Base
-
Destinations
A regional guide with ideas for winter camping destinations in California, Nevada, New Mexico, and Arizona.Read More -
Aircraft
Finding an affordable aircraft that can handle the backcountry for $80K or less? A challenge for sure, but with the…Read More -
Aircraft
01.29.2018 - Zane - Updated tire diameter graphic to add 8.50x10 Guide to tires for use in the backcountry and off-airport landing…Read More -
Pilots
12.22.2013 - Initial article format Operating aircraft on skis and negotiating a snow-covered landscape is an entirely unique skillset and environment.…Read More


