×

Error

You need to login in order to reply to topics within this forum.

Backcountry Pilot • 1999 ACA 7ECA Citabria Aurora

1999 ACA 7ECA Citabria Aurora

Aircraft building and project-level overhaul forum -- Kitplanes, experimental amateur-built, homebuilding, or even restoration of certified aircraft.
286 postsPage 1 of 151, 2, 3, 4, 5 ... 15

1999 ACA 7ECA Citabria Aurora

We bought this plane last week and brought it home to Livermore.

Even though it’s a fairly new aircraft compared to the rest of our fleet, it has 7335 hours on the tach and 9365 on the Hobbs meter.

The Lycoming O-235 engine isn’t going to set any records, but it has only 600 hours SMOH (2400 hour TBO).

We bought it from the original owner that bought it new in 1999, and it’s been a workhorse on the line at a local flight school for the past 20 years.

The wings were ratty and got red tagged by the FAA on the ramp, so the previous owner sent it to a shop at Calaveras to have the wings recovered. Turns out the metal spars were corroded, so he put all new wings on it and covered it in Stits Poly Fiber and painted it with yellow polyurethane.

The covering on the fuselage is beat up and due for replacement, but the owner moved to NC and wanted to sell the plane without fixing it, so we picked it up for a song.

We went to Calaveras, inspected the plane, did a taxi test to make sure the wings weren’t too far out of rig, and then flew it home.

The plan is to take the wings off, strip the covering off the fuselage, rehab the tubing and all the other bits, and then recover it with matching Poly Fiber.

———

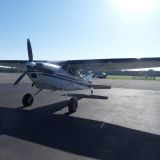
We started the day with low clouds and had to wait it out before we could hop in the 182 to fly to Calaveras.

Image

All the recent rain makes for some very green landscapes

Image

Here she is in the shops hangar

Image

The new wings look gorgeous.

Image

Then the work begins

Image

Image

Image

Finally everything is inspected and it’s ready to come out

Image

Sump the fuel tanks and check all the inspection panels fitted securely

Image

Image

Basic VFR panel

Image

Image

Image

Image

With something as major as new wings installed, we did a high speed taxi/hover taxi for the first run. Everything felt good so we took off on the second attempt and flew around the pattern and landed.

Then we took off as a flight of two with the 182 and flew back to Livermore.

Image

Image

I was in the 182 and loped along in formation at 120 mph, but that’s pretty darn good speed for the Citabria.

Here’s a video of all the stuff from the flight to bring it home. There’s a big cloverleaf at the end of the video which was fun.

https://youtu.be/F7qf_6pq6NI

And finally back in its hangar at Livermore, safe and sound.

Image

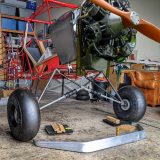
Lots of squawks...tailwheel is beat and shimmies on landing rollout, main wheel bearings are shot, rudder pedals need to be rebushed, left rear window needs to be replaced...who knows what else but it’s to be expected on a 20 year old plane with this many hours. Nothing we can’t handle.

Silicone repair attempt on a window crack

Image

Fuselage covering all bagged out

Image

Hardware is ugly

Image

Gross cosmetics on the fuselage

Image

So as of today we have a fleet of four aircraft, all very different from each other!

Cessna 170B
Cessna 182D
Christen Eagle II
Citabria 7ECA

The obligatory internet disclaimer: All aircraft maintenance and inspections outlined in this thread are conducted in accordance and compliance with all applicable laws and regulations.
Last edited by Aryana on Tue Mar 05, 2019 8:21 pm, edited 2 times in total.
Aryana offline
Supporter
User avatar
Posts: 936
Joined: Mon Apr 14, 2014 9:06 am
Location: SoCal
Aircraft: 1955 Cessna 170

1999 ACA 7ECA Citabria Aurora

Draining all the fuel in preparation for removal of the wings.

Image

Got the wing root fairings off and disconnected the electrical wires for wing tip nav lights & strobes, as well as the aileron cables that run up both sides of the cockpit.

Image

Image

Flying wires and cables for the rudder/elevator removed.

Image

Prop removed

Image

Front seat and door off.

Image

Upper and lower cowling off.

Image

Image

Image

Image

Fuel lines disconnected.

Image

Image

Rudder removed

Image

Pins for the elevator hinge took a little coercing but they came out without too much trouble.

Image

Image

Now the fun part begins...the horizontal. It’s just a steel tube that slides on to another that nests inside. Why they don’t use anti seize on these when they build them at the factory, I’ll never know.

The time required to remove these is measured in days, not hours.

Image

Image

Image

Image

Image

The gang

Image

Image

Image
Last edited by Aryana on Thu Mar 07, 2019 12:14 am, edited 1 time in total.
Aryana offline
Supporter
User avatar
Posts: 936
Joined: Mon Apr 14, 2014 9:06 am
Location: SoCal
Aircraft: 1955 Cessna 170

1999 ACA 7ECA Citabria Aurora

In an earlier post, I mentioned how it takes days to get the horizontal off when it’s seized in place.

Here’s the trick in case anyone ever has to undertake this task.

- Use two long pry bars, one on top and one on bottom, putting outward pressure on the horizontal stab where its aft tube inserts into the fuselage. Large screwdrivers work perfect here.

Image

- AeroKroil in the seam, with a heat gun heating the fuselage tube inside the vertical stab.

- Stop and spray the AeroKroil in the seam every now and then and continue heating the fuselage tubing until it’s nice and hot.

*DO NOT BURN UP YOUR AIRPLANE - The interior of the fabric is much more flammable than the exterior. Cut away all the fabric from the area that you will be using the heat gun.


- After many cycles of heat and penetrant, once the tubing is nice and hot, one person repeatedly moves the horizontal up and down while the other person uses both pry bars to put outward pressure on the horizontal to separate it from the fuselage.

- It will slowly work it’s way off, don’t rush it.

Image

This horizontal hasn’t been off since new in 1999, and it looks like a combination of mud and glue was used in the mating surfaces of the tubes. Terrible!!

Left side

Image

Image

Right side

Image

Took me about 20 mins total work today to get both horizontals off. Much better than the 2-7 days* that all the mechanics on the field were saying it would take.

*I guess technically this is the second day since we started soaking it with penetrant yesterday.

Image

Image
Last edited by Aryana on Thu Mar 07, 2019 1:51 am, edited 10 times in total.
Aryana offline
Supporter
User avatar
Posts: 936
Joined: Mon Apr 14, 2014 9:06 am
Location: SoCal
Aircraft: 1955 Cessna 170

Re: 1999 ACA 7ECA Citabria Aurora

The fuselage, before your work, looked like most of the airplanes I used to fly.
contactflying offline
Posts: 4972
Joined: Wed Apr 03, 2013 7:36 pm
Location: Aurora, Missouri 2H2
Download my free "https://tinyurl.com/Safe-Maneuvering" e-book.

Re: 1999 ACA 7ECA Citabria Aurora

Wow, what a project. Keep the pics coming.
aftCG offline
User avatar
Posts: 360
Joined: Mon Jul 12, 2010 9:55 pm
Location: Tacoma
Aircraft: Kitfox series 5

Re: 1999 ACA 7ECA Citabria Aurora

Disconnected the forward fuel lines from both tanks.

Left

Image

Right

Image

The interconnected tank vent hose wouldn’t budge so it was cut and will be replaced.

Image

Left jury strut removed

Image

Image

And the right

Image

Image

Next step is to remove the wing attach bolts and nuts and replace them with long screwdrivers in preparation for a no wind day to remove the wings.

Image

Random interior shots

Image

Image
Aryana offline
Supporter
User avatar
Posts: 936
Joined: Mon Apr 14, 2014 9:06 am
Location: SoCal
Aircraft: 1955 Cessna 170

Re: 1999 ACA 7ECA Citabria Aurora

Replaced all four wing mounting bolts with screwdrivers today in preparation to take the wings off.

Image

Image

Used a punch in one because it fit so good

Image

All the strut attach hardware is loosened and ready to come off. Just need a few guys to show up and the wings are ready to come off now.

Image

Image

Image

Time to peel back the fabric. This part is always fun.

Image

Image

Image

Image

Image

Image

All this fluffy padded interior will not be reused. It all weighs a lot. We’re going to do a very spartan and bare interior to save weight.

Image

Image

Image

Image

Image

Image

Definitely some work to be done on the tubing before painting it all.

Image

Image

Image

Some wavy wood!

Image

Image

One piece is dated 2005 and has clearly been replaced. Nothing in the logs about it, but that’s not surprising.

Image

All the rest of the wood is dated 1998

Image

When built new at the factory, they use these expanding rivets to hold the wood to the fuselage tubing.

Image

You can see bolts installed where they replaced the wood

Image

All the wood formers will be replaced with new.

Image

Plate on top of the fuse for the data plate and antenna.

Image

Image

Image

Image

Next step is to remove the wings. Thanks for following along.

Image
Aryana offline
Supporter
User avatar
Posts: 936
Joined: Mon Apr 14, 2014 9:06 am
Location: SoCal
Aircraft: 1955 Cessna 170

Re: 1999 ACA 7ECA Citabria Aurora

Very interested to see what you are going to do for interior panels. Any hints?
A1Skinner offline
Supporter
User avatar
Posts: 5186
Joined: Sat Jan 21, 2012 11:38 am
Location: Eaglesham
FindMeSpot URL: [url:1vzmrq4a]http://share.findmespot.com/shared/faces/viewspots.jsp?glId=0az97SSJm2Ky58iEMJLqgaAQvVxMnGp6G[/url:1vzmrq4a]
Aircraft: Cessna P206A, AT402/502/602

1999 ACA 7ECA Citabria Aurora

The Poly Fiber will be pink on the inside, so leaving it totally bare won’t work.

As of right now we’re thinking some aluminum panels with no upholstery in select spots, with Selkirk foam attached to directly to the fabric in some other spots.

Having some of the control linkages exposed and visible on the side panel isn’t a bad thing. We’ll get creative and see what we can do.
Aryana offline
Supporter
User avatar
Posts: 936
Joined: Mon Apr 14, 2014 9:06 am
Location: SoCal
Aircraft: 1955 Cessna 170

Re: 1999 ACA 7ECA Citabria Aurora

Aryana wrote:The Poly Fiber will be pink on the inside, so leaving it totally bare won’t work.

As of right now we’re thinking some aluminum panels with no upholstery in select spots, with Selkirk foam attached to directly to the fabric in some other spots.

Having some of the control linkages exposed and visible on the side panel isn’t a bad thing. We’ll get creative and see what we can do.
I'm not sure youd want to leave fabric totally bare no matter which system you use unless you brushed silver onto it for UV protection. Actually, just brushed silver would look pretty decent. Some selkirk foam would add a bit of protection.
Are you going to add a baggage door?
A1Skinner offline
Supporter
User avatar
Posts: 5186
Joined: Sat Jan 21, 2012 11:38 am
Location: Eaglesham
FindMeSpot URL: [url:1vzmrq4a]http://share.findmespot.com/shared/faces/viewspots.jsp?glId=0az97SSJm2Ky58iEMJLqgaAQvVxMnGp6G[/url:1vzmrq4a]
Aircraft: Cessna P206A, AT402/502/602

1999 ACA 7ECA Citabria Aurora

I don’t mean leaving it bare in terms of not following and using the entire process. Taking the interior up through paint isn’t feasible, but I think I just wasn’t clear enough in my post which may sound confusing.

I meant leaving the interior of the fabric “bare” as it is after you take it all the way through paint on the exterior. The inside of the fabric on the fuselage will be pink after the entire Poly Fiber process, and that isn’t our favorite color.

Some Selkirk foam could be installed directly on the fabric to make it prettier which is what we’re considering. Also the sheet metal around the throttles could be left bare or painted instead of the upholstery which is glued on it from the factory.

A spartan interior like you find on many Champs is more along the lines of what we’re going to lean towards.
Aryana offline
Supporter
User avatar
Posts: 936
Joined: Mon Apr 14, 2014 9:06 am
Location: SoCal
Aircraft: 1955 Cessna 170

Re: 1999 ACA 7ECA Citabria Aurora

Aryana wrote:I don’t mean leaving it bare in terms of not following and using the entire process. Taking the interior up through paint isn’t feasible, but I think I just wasn’t clear enough in my post which may sound confusing.

I meant leaving the interior of the fabric “bare” as it is after you take it all the way through paint on the exterior. The inside of the fabric on the fuselage will be pink after the entire Poly Fiber process, and that isn’t our favorite color.

Some Selkirk foam could be installed directly on the fabric to make it prettier which is what we’re considering. Also the sheet metal around the throttles could be left bare or painted instead of the upholstery which is glued on it from the factory.

A spartan interior like you find on many Champs is more along the lines of what we’re going to lean towards.


I understood what you meant by the pink color. But I'd still be worried that any exposed (pink) areas could be exposed to UV. I'm not suggesting taking it right to paint, but brushing some silver on would get rid of both the pink and UV issues.
A1Skinner offline
Supporter
User avatar
Posts: 5186
Joined: Sat Jan 21, 2012 11:38 am
Location: Eaglesham
FindMeSpot URL: [url:1vzmrq4a]http://share.findmespot.com/shared/faces/viewspots.jsp?glId=0az97SSJm2Ky58iEMJLqgaAQvVxMnGp6G[/url:1vzmrq4a]
Aircraft: Cessna P206A, AT402/502/602

Re: 1999 ACA 7ECA Citabria Aurora

Water enters via the wing root-fuselage openings for cables and fuel lines. Window frames can leak. Dihedral and fairings help that happen. Figure a way to close that entry more with flex seals. Wood formers show the results. Then in the fuselage moisture condenses and rises with no way to breathe. Figure a way to let it escape. Longerons and floor get exposed to moisture. Protect them. Great airplanes had a '69 7ECA and '78 GCBC.

Gary
PA1195 offline
Posts: 400
Joined: Sun Jul 27, 2014 9:19 pm
Location: Fairbanks
Aircraft: 1941 Taylorcraft STC'd BC12D-4-85 w/C-85 Stroker

Re: 1999 ACA 7ECA Citabria Aurora

A1Skinner wrote:I understood what you meant by the pink color. But I'd still be worried that any exposed (pink) areas could be exposed to UV. I'm not suggesting taking it right to paint, but brushing some silver on would get rid of both the pink and UV issues.


Very true [emoji1360]

PA1195 wrote:Water enters via the wing root-fuselage openings for cables and fuel lines. Window frames can leak. Dihedral and fairings help that happen. Figure a way to close that entry more with flex seals. Wood formers show the results. Then in the fuselage moisture condenses and rises with no way to breathe. Figure a way to let it escape. Longerons and floor get exposed to moisture. Protect them. Great airplanes had a '69 7ECA and '78 GCBC.

Gary


One thing we always add to these planes when we recover them are the seaplane drainage grommets. Not a single one anywhere on the fuselage from ACA’s factory build. They work great to suck all the moisture out in flight. Without em, the water has nowhere to go.

The flex seals are a great idea for sure, even if this plane won’t ever see rain again. [emoji1360]
Aryana offline
Supporter
User avatar
Posts: 936
Joined: Mon Apr 14, 2014 9:06 am
Location: SoCal
Aircraft: 1955 Cessna 170

Re: 1999 ACA 7ECA Citabria Aurora

Aryana wrote:
A1Skinner wrote:I understood what you meant by the pink color. But I'd still be worried that any exposed (pink) areas could be exposed to UV. I'm not suggesting taking it right to paint, but brushing some silver on would get rid of both the pink and UV issues.


Very true [emoji1360]

PA1195 wrote:Water enters via the wing root-fuselage openings for cables and fuel lines. Window frames can leak. Dihedral and fairings help that happen. Figure a way to close that entry more with flex seals. Wood formers show the results. Then in the fuselage moisture condenses and rises with no way to breathe. Figure a way to let it escape. Longerons and floor get exposed to moisture. Protect them. Great airplanes had a '69 7ECA and '78 GCBC.

Gary


One thing we always add to these planes when we recover them are the seaplane drainage grommets. Not a single one anywhere on the fuselage from ACA’s factory build. They work great to suck all the moisture out in flight. Without em, the water has nowhere to go.

The flex seals are a great idea for sure, even if this plane won’t ever see rain again. [emoji1360]


Where on the fuselage do you put the drain grommets?

Kurt
G44 offline
Supporter
User avatar
Posts: 2093
Joined: Thu Oct 27, 2011 10:46 am
Location: Michigan

Re: 1999 ACA 7ECA Citabria Aurora

Kurt, typically they’re found on the bottom trailing edges of the wings and horizontal stab, but you can put them wherever you want.

This one will get a few on the belly too.
Aryana offline
Supporter
User avatar
Posts: 936
Joined: Mon Apr 14, 2014 9:06 am
Location: SoCal
Aircraft: 1955 Cessna 170

Re: 1999 ACA 7ECA Citabria Aurora

Aryana wrote:Kurt, typically they’re found on the bottom trailing edges of the wings and horizontal stab, but you can put them wherever you want.

This one will get a few on the belly too.


Yep, I have put them on the wings, horizontal stab and elevators but was curious where on the fuselage you are going to put them.

Kurt
G44 offline
Supporter
User avatar
Posts: 2093
Joined: Thu Oct 27, 2011 10:46 am
Location: Michigan

Re: 1999 ACA 7ECA Citabria Aurora

In the three point ground attitude, the most obvious low spots where water could collect in the best spots, usually on both sides of the center bottom stringer.
Aryana offline
Supporter
User avatar
Posts: 936
Joined: Mon Apr 14, 2014 9:06 am
Location: SoCal
Aircraft: 1955 Cessna 170

Re: 1999 ACA 7ECA Citabria Aurora

Today was a fun day

Image

Image

Image

Image

Image

Wing dolly

Image

By the time all 4 guys finally showed up, it was late afternoon and the wind had picked up so we pushed the plane so that one wing was sheltered in the hangar.

Image

Struts off

Image

And then pull the screwdrivers previously inserted in the wing attach holes to pull it off the fuselage.

Image

Image

Now that the wings are off, it’s time for some airplane musical hangars.

Image

Image

The 182D moves into the hangar with the Citabria wings.

Image

Then the Christen Eagle II bumps the 170B out of my hangar so I can install a UGB-16 engine monitor.

Image

And the 170B goes where the 182D used to live and the Citabria fuselage is in the end room where the Eagle used to park.

Image

Afterwards I helped a neighbor lift his crashed 172 on to a Harbor Freight motorcycle lift. Same one I have, but mine is not used for airplanes, LOL!

Image

Image

Image
Aryana offline
Supporter
User avatar
Posts: 936
Joined: Mon Apr 14, 2014 9:06 am
Location: SoCal
Aircraft: 1955 Cessna 170

Re: 1999 ACA 7ECA Citabria Aurora

I"m enjoying this Arash! Keep posting pics.

I didn't realize that a Citabria had so much wood inside.... guess I never thought about it and have never seen one naked. Bad assumptions on my part......

Why does the wood appear that it has water damage? Was the plane kept outside its whole life? Or does it collect that much condensation over the years?

Keith
kg offline
Supporter
User avatar
Posts: 481
Joined: Thu Sep 25, 2008 6:56 am
Location: Murfreesboro
Aircraft: Cessna 180J

DISPLAY OPTIONS

Next
286 postsPage 1 of 151, 2, 3, 4, 5 ... 15

Who is online

Users browsing this forum: No registered users and 0 guests

Latest Features

Latest Knowledge Base