Doublers
Sat Apr 21, 2018 9:02 am
Re: Doublers
We cant see from the pic in this thread... Ryan had told me on the telephone they were upside down.
- Bigrenna offline


- Posts: 2339
- Joined: Sun Sep 25, 2011 4:02 pm
- Location: New England
- Aircraft: C180H / C170B
www.bushwagoneast.com
www.avthreads.com
Sat Apr 21, 2018 11:44 am
Re: Doublers
Incorrectly doesn't equate upside down! LOL. These bad boys are installed right side up but in the wrong spot.Bigrenna wrote:We cant see from the pic in this thread... Ryan had told me on the telephone they were upside down.

I just don't think that they wanted to spend extra time to do it right the first time. Just like drilling out the seat rail holes instead of installing the new McFarlane rails that they had on hand. It'll get fixed right but it is going to take forever.Rob wrote:I am of the opinion that while the more technical thoughts and concerns shared here are true and accurate, that doesn't make them right for in this application.
That installation shows either;
A) a shortage of pride in work performed , or
B) a shortage of skill in the work performed
I believe the installer of that step honestly thought you'd never see the back side.
I agree with bigrenna, poor prep, poor doubler construction, and questionable (possibly illegal) methods...
Sure it's just a step install, but I suspect you paid fair market value for this work. You did not receive a fair product in return.
Take care, Rob

Sat Apr 21, 2018 7:26 pm
Re: Doublers
Your not alone in the shits, its been a tough road for many of us. Thats why so many folks here warned against doing much more than getting airworthy at the get go...Airframe and power plant are vitally important, everything else is minor perks and big $$$
Still, so frustrating to see a corner like this cut. If this install reflects the integrity of the mechs that did your refurb (?), you really need someone high caliber to go back through everything they touched! At least, thats what I would do...be careful who you trust from here on out; my advice is listen to the folks that have thousands of hours owning these planes, crazy concept right [emoji23][emoji379]
Still, so frustrating to see a corner like this cut. If this install reflects the integrity of the mechs that did your refurb (?), you really need someone high caliber to go back through everything they touched! At least, thats what I would do...be careful who you trust from here on out; my advice is listen to the folks that have thousands of hours owning these planes, crazy concept right [emoji23][emoji379]
Sat Apr 21, 2018 7:30 pm
Re: Doublers
X2. If they cut this corner, I'd be worried about what other corners they cut...Skalywag wrote:Your not alone in the shits, its been a tough road for many of us. Thats why so many folks here warned against doing much more than getting airworthy at the get go...Airframe and power plant are vitally important, everything else is minor perks and big $$$
Still, so frustrating to see a corner like this cut. If this install reflects the integrity of the mechs that did your refurb (?), you really need someone high caliber to go back through everything they touched! At least, thats what I would do...be careful who you trust from here on out; my advice is listen to the folks that have thousands of hours owning these planes, crazy concept right [emoji23][emoji379]

Tue Apr 24, 2018 9:23 am
Re: Doublers
Some related, model 172 history:
In the early 1970s Cessna offered the now-cancelled, 4-page Accessory Kit AK172-162B, STEP & HANDLE INSTALLATION, for specific serial number 172 airplanes. Neither steps nor the single, centerline-mounted handle was installed with a doubler, tho the steps did pickup existing horizontal floorboard flange rivet line and vertical door post structure.
On December 5, 1983, an improved FUEL STEP AND HANDLE INSTALLATION Accessory Kit, AK172-168, was offered for specific serial number 172 airplanes. The kit is now 13 pages and at Revision J (AK172-168J) dated April 21, 2006. This revised kit has the familiar handle at boot cowl upper “corners”, each with a dedicated internal doubler picking up firewall flange and windshield rivet lines. For the steps, the kit provides specific layout and fastener instructions to install both an external doubler underlying the step as well as an internal reinforcement, providing 5 layers of structure along the floorboard flange (step+doubler+skin+flange+reinforcement).
On July 4, 2005, Cessna issued Service Bulletin SEB05-2, FUSELAGE SKIN AND FUEL STEP INSPECTION AND MODIFICATION, for specific serial number model 172 airplanes recommending inspection of skin underlying fuel steps (for cracks) and modifying same in accordance with 10-page Service Kit SK172-157. Said service kit provides specific layout and fastener instructions to install both an external doubler underlying the step plus an internal reinforcement, again providing 5 layers of structure along the floorboard flange.
I was unable to find either C180- or C185-specific step & handle kits.
Referenced documents are available at [url]support.cessna.com[/url]
22 June 2020 edit: SEB05-2 was SE05-2
Last edited by iPat on Mon Jun 22, 2020 1:27 pm, edited 1 time in total.
Fri Apr 27, 2018 5:30 am
Re: Doublers
Slightly off topic but does anyone know the thickness of the two doublers called out in AK172-168J?
Fri Apr 27, 2018 7:23 am
Re: Doublers
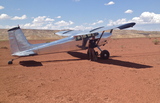
When I look at this picture of Rob's 180, it looks like the step is ahead of the door post so am curious what is on the back side for this install.


Fri Apr 27, 2018 8:13 am
Re: Doublers
This is what goes on the backside.


Fri Apr 27, 2018 8:29 am
Re: Doublers
180Marty wrote: When I look at this picture of Rob's 180, it looks like the step is ahead of the door post so am curious what is on the back side for this install.
The door post is abeam the wing strut.
I've never seen fueling steps attached to or aft of the door post.
Rob's are in the normal location, and I assume properly bolted through the floor flange.
Marty, does your 180 have steps, and where/how are they located?

Cessna Skywagon -- accept no substitute!
Fri Apr 27, 2018 10:46 am
Re: Doublers
No steps on mine. Hotrod, when I look at your step, it looks like the rear two bolts (one above the other) replaced rivets on the front row of the door post----those number 5 flush ones that like to smoke on early 180's.
Fri Apr 27, 2018 11:07 am
Re: Doublers
akgreg wrote:This is what goes on the backside.
How did you balance the step on its edge like that? Can I get a tutorial?
thx

Fri Apr 27, 2018 3:26 pm
Re: Doublers
akgreg wrote:This is what goes on the backside.
Just keep in mind that if you use the rivet line of the floor pan, you cant use that doubler that FA Dodge provides.
- Bigrenna offline
- Posts: 2339
- Joined: Sun Sep 25, 2011 4:02 pm
- Location: New England
- Aircraft: C180H / C170B
www.bushwagoneast.com
www.avthreads.com
Fri Apr 27, 2018 5:14 pm
Re: Doublers
asa wrote: How did you balance the step on its edge like that? Can I get a tutorial?
Fricken magic man!
You'll have to ask Atlee Dodge. I just took a screen shot from their website.
Sat Apr 28, 2018 7:39 am
Re: Doublers
180Marty wrote:No steps on mine. Hotrod, when I look at your step, it looks like the rear two bolts (one above the other) replaced rivets on the front row of the door post----those number 5 flush ones that like to smoke on early 180's.
NOw that I look again, maybe you're right. I can't recall if those go through the door post or just what.
Cessna Skywagon -- accept no substitute!
Sat Apr 28, 2018 12:50 pm
Re: Doublers
Adhesives, like beer, are the solution to, and cause of, many of life's problems.
Effective adhesive joint design is very different than mechanical fastener joint design. For one, adhesive bonds are strongest at a particular thickness for a few technical reasons that would bore most, and they are very weak in tensile stress for the same technical reasons. Every means of eliminating tensile loads must usually be taken to make adhesives a practical solution. Conventional mechanical fasteners are used where there are couples in a part for this reason- the pre-loads from rivets and screws and the higher tensile modulus for the fasteners mean the stress is accommodated more by the fasteners rather than the adhesive by orders of magnitude in practical cases. And mechanical fasteners in the most effective joints are most often never intended to even experience shear (even wing skin rivets). The pre-load from solid rivet installation or bolts is intended to keep the friction of the joint high enough to resist relative motion and thereby eliminate shear, and the pre-load itself eliminated reverse loads to improve the fatigue life calculations by orders of magnitude.
The use of adhesives is highly advantageous when the joint is appropriately designed for both weight and strength reasons. Inappropriately designed joints are a tragedy waiting to happen. By the idea that the adhesive itself is stronger than the substrate is false in the case of metal/adhesive joints. The joint itself needs to be designed so that the shear loads imposed by the adhesive meet or exceed the principal (Mohr) stresses of the joint members.
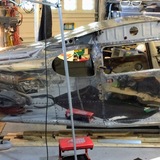
Here is a bonded space truss instrument I designed and built in my shop for an NASA atmospheric science experiment that is flying for a couple of weeks above the arctic circle in June and Antarctica for up to a few months later this year. The joints are all pinned, and the bonded joints are entirely in shear. Other fastener methods were employed where moments were possible during parachute opening loads and ground impact. The use of adhesives where appropriate saves over 100 pounds of payload mass, allowing longer and higher flights (up to 140k').
Effective adhesive joint design is very different than mechanical fastener joint design. For one, adhesive bonds are strongest at a particular thickness for a few technical reasons that would bore most, and they are very weak in tensile stress for the same technical reasons. Every means of eliminating tensile loads must usually be taken to make adhesives a practical solution. Conventional mechanical fasteners are used where there are couples in a part for this reason- the pre-loads from rivets and screws and the higher tensile modulus for the fasteners mean the stress is accommodated more by the fasteners rather than the adhesive by orders of magnitude in practical cases. And mechanical fasteners in the most effective joints are most often never intended to even experience shear (even wing skin rivets). The pre-load from solid rivet installation or bolts is intended to keep the friction of the joint high enough to resist relative motion and thereby eliminate shear, and the pre-load itself eliminated reverse loads to improve the fatigue life calculations by orders of magnitude.
The use of adhesives is highly advantageous when the joint is appropriately designed for both weight and strength reasons. Inappropriately designed joints are a tragedy waiting to happen. By the idea that the adhesive itself is stronger than the substrate is false in the case of metal/adhesive joints. The joint itself needs to be designed so that the shear loads imposed by the adhesive meet or exceed the principal (Mohr) stresses of the joint members.
Here is a bonded space truss instrument I designed and built in my shop for an NASA atmospheric science experiment that is flying for a couple of weeks above the arctic circle in June and Antarctica for up to a few months later this year. The joints are all pinned, and the bonded joints are entirely in shear. Other fastener methods were employed where moments were possible during parachute opening loads and ground impact. The use of adhesives where appropriate saves over 100 pounds of payload mass, allowing longer and higher flights (up to 140k').
Last edited by lesuther on Sat Apr 28, 2018 3:34 pm, edited 1 time in total.
Sat Apr 28, 2018 2:29 pm
Re: Doublers
lesuther wrote:Adhesives, like beer, are the solution to, and cause of, many of life's problems.
Effective adhesive joint design is very different than mechanical fastener joint design. For one, adhesive bonds are strongest at a particular thickness for a few technical reasons that would bore most, and they are very weak in tensile stress for the same technical reasons. Every means of eliminating tensile loads must usually be taken to make adhesives a practical solution. Conventional mechanical fasteners are used where there are couples in a part for this reason- the pre-loads from rivets and screws and the higher tensile modulus for the fasteners mean the stress is accommodated by the fasteners rather than the adhesive by orders of magnitude in practical cases. And mechanical fasteners in the most effective joints are most often never intended to even experience shear (even wing skin rivets). The pre-load from solid rivet installation or bolts is intended to keep the friction of the joint high enough to resist relative motion and thereby eliminate shear, and the pre-load itself eliminated reverse loads on the fatigue life calculations by orders of magnitude.
The use of adhesives is highly advantageous when the joint is appropriately designed for both weight and strength reasons. Inappropriately designed joints are a tragedy waiting to happen. By the idea that the adhesive itself is stronger than the substrate is false in the case of metal/adhesive joints. The joint itself needs to be designed so that the shear loads imposed by the adhesive meet or exceed the principal (Mohr) stresses of the joint members.
Here is a bonded space truss instrument I designed and built in my shop for an NASA atmospheric science experiment that is flying for a couple of weeks above the arctic circle in June and Antarctica for up to a few months later this year. The joints are all pinned, and the bonded joints are entirely in shear. Other fastener methods were employed where moments were possible during parachute opening loads and ground impact. The use of adhesives where appropriate saves over 100 pounds of payload mass, allowing longer and higher flights (up to 140k').
After reading your entire post, and pondering what you said, my only question is.....who's the girl?
Cessna Skywagon -- accept no substitute!
Sat Apr 28, 2018 3:29 pm
Re: Doublers
The woman is a new engineer for the client with the payload at the NASA facility in Palestine, Texas after getting the flight ready cert awarded.
Sat Apr 28, 2018 4:50 pm
Re: Doublers
pilotryan wrote: This is why I like to post here. When I go through this area I will make sure that the skin and the doubler get cleaned up and installed properly. What adhesive would you consider using on this?
This suggests that you intend to remove and potentially reinstall this step. You didn't ask for suggestions, but I would like to offer a thought for you to ponder.
Do you intend to install larger tires on this plane at any point? The reason I ask, is that I am 5'6", and have yet to see a need for a step when fueling my 180. Standing on a 29" tires allows me to reach the fuel as easy or easier than a step would.
Like everyone else, as soon as I got my 180 home I started buying up every mod on the planet for the old girl. Finding a guy in Canaduh who makes copies of the boot cowl step, strut step, and boot cowl handle, I immediately ordered the package. In fact I ordered a ton of stuff (almost literally)... and then it hit me... The 180/5 series planes started life as 1500lb. +/- airplanes, and by the end of the run, 1800lb. examples became quite common.
About this time a huge portion of the readers are rolling their eyes, and either ready to shout out how few ounces these things weigh, or point fingers at the manufacturers to suggest their numbers are fraudulent.... whatever.... denial is why 70% of Americans are overweight, and 40% are obese. And the airplanes reflect that same attitude. Grams turn to Ounces turn to Pounds.... simple math.
If it were me, I'd pull that crap job off the airplane and throw it in the air. If it stayed aloft, I'd consider installing it. If it hits the ground, I'd give deeper thought to just how bad I needed it before I put them on 'cause all the cool kids have one'... A few replaced rivets, a few less pounds, and a much cleaner job.
FWIW... mine took that test and hit the ground... Now? ... still sitting on the same shelf I put them on years ago

Take care, Rob

Sat Apr 28, 2018 5:21 pm
Re: Doublers
Rob wrote:pilotryan wrote: This is why I like to post here. When I go through this area I will make sure that the skin and the doubler get cleaned up and installed properly. What adhesive would you consider using on this?
This suggests that you intend to remove and potentially reinstall this step. You didn't ask for suggestions, but I would like to offer a thought for you to ponder.
Do you intend to install larger tires on this plane at any point? The reason I ask, is that I am 5'6", and have yet to see a need for a step when fueling my 180. Standing on a 29" tires allows me to reach the fuel as easy or easier than a step would.
Like everyone else, as soon as I got my 180 home I started buying up every mod on the planet for the old girl. Finding a guy in Canaduh who makes copies of the boot cowl step, strut step, and boot cowl handle, I immediately ordered the package. In fact I ordered a ton of stuff (almost literally)... and then it hit me... The 180/5 series planes started life as 1500lb. +/- airplanes, and by the end of the run, 1800lb. examples became quite common.
About this time a huge portion of the readers are rolling their eyes, and either ready to shout out how few ounces these things weigh, or point fingers at the manufacturers to suggest their numbers are fraudulent.... whatever.... denial is why 70% of Americans are overweight, and 40% are obese. And the airplanes reflect that same attitude. Grams turn to Ounces turn to Pounds.... simple math.
If it were me, I'd pull that crap job off the airplane and throw it in the air. If it stayed aloft, I'd consider installing it. If it hits the ground, I'd give deeper thought to just how bad I needed it before I put them on 'cause all the cool kids have one'... A few replaced rivets, a few less pounds, and a much cleaner job.
FWIW... mine took that test and hit the ground... Now? ... still sitting on the same shelf I put them on years ago
Take care, Rob
Good general reminder. However, is this thing ever going on skis? if so, they're pretty key.
-DP
- denalipilot offline


- Posts: 2789
- Joined: Mon Oct 15, 2007 4:53 pm
- Location: Denali
- Aircraft: C-170B+
DISPLAY OPTIONS
Who is online
Users browsing this forum: No registered users and 1 guest
Latest Features
-
Live to Tell
A Minnesota pilot is surprised to learn that the sudden asymmetric drag of an out-of-rig ski can…Read More -
Creators
Working in some of the Yukon's most beautiful and remote environments, photographer Simon Blakesley captures aircraft in…Read More -
Aircraft Ownership and Maintenance
Upgrading to big tires can make a huge difference in backcountry performance, but with those gains come…Read More -
Tales from Yesteryear
In this tale from bush flying yesteryear, Don Cogger signs up to help Atlee Dodge Jr recovery…Read More


Latest Knowledge Base
-
Destinations
A regional guide with ideas for winter camping destinations in California, Nevada, New Mexico, and Arizona.Read More -
Aircraft
Finding an affordable aircraft that can handle the backcountry for $80K or less? A challenge for sure, but with the…Read More -
Aircraft
01.29.2018 - Zane - Updated tire diameter graphic to add 8.50x10 Guide to tires for use in the backcountry and off-airport landing…Read More -
Pilots
12.22.2013 - Initial article format Operating aircraft on skis and negotiating a snow-covered landscape is an entirely unique skillset and environment.…Read More


