As part of my efforts to seal up my 1957 182, I purchased a complete set of the Knots2U door and window seals. The set covers both cockpit doors, both windows, and the baggage door. I also purchased a tube of the sealant (glue), and some extra silicone grease.
One note: A well vented space, safety glasses, and a supply of Nitrile gloves are highly recommended for what comes next here. The solvent and glue fumes were no joke, and this was in a fully opened T-hangar. A floor creeper is also very useful.
The first step is to remove the old seals. Mine were quite old, so this wasn't too hard as they were coming apart in places anyway. Some gentle persuasion with a beveled putty knife took care of the stubborn areas, you just need to be careful not to dig into the metal as the steel blade will gouge the aluminum easily.
The next step was adhesive removal. I used their recommended 3M solvent, and while it worked, it did take some effort where the previous installer had caked it on. There were other spots where it just came right off though. I used both cloth shop rags, and non-scratching ScotchBrite pads soaked in the solvent to do the job. A few weeks after I did this, K2U published a new recommendation for some industrial strength solvent that apparently works much better, but was only now available in small-ish quantities. I suggest trying whatever the new stuff is.
Removing old glue from the window frames is much easier if you pull the spring arm off and let it hang freely. One of mine would not come off, so that window took 3x as long due to the tight space to work in.
Installing them was straightforward. Get some of those small foam paintbrushes from your local hardware store for glue application, though if you move quickly you won't need more than 1-2 of them for the plane. The glue sets within ~20 seconds, so you need to work quickly regardless. This isn’t as scary as it sounds - just plan ahead, read the instructions a couple times first, and think about where you will stick the seal before you do it. I put a small bead of glue on the door, (again quickly) spread it into a film, and then applied the seal. You have maybe a few seconds to move the seal before it's down for good, so do not screw that part up.
The K2U seals are very pliable and will go where you put them, so don’t worry about the door curves. Like they say, do <10” at a time give or take, as you won’t be able to lay down glue and stick the seals in the right place without mistakes otherwise. It’s OK to stick a section and take a break before the next one.
The silicone grease doesn’t exactly soak in, and I initially put too much on thinking I needed a good layer of it. This causes the seal to “stick” to the mating surface when you open the door again, so be sparing with it. I noticed around a couple of the curves, I had a small bit of seal sticking out of the gap with the door closed. I haven’t yet trimmed it, but expect to. The older Cessna doors were formed by hand to each unique fuselage, so a little “handcrafted” discrepancy will happen from time to time.
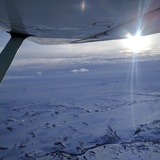
In flight, I immediately noticed that the air blowing in around the door and window was gone. Not reduced, gone. The only air coming in was where I wanted it to be - from the vents. This will be a noticeable improvement in winter flying.
Perhaps more strikingly, I took decibel noise measurements before and after using a handheld sound meter. With the old seals, I recorded near 100dB levels at the pilot’s position. After the seals with no other changes, the noise level dropped 11dB! That is a huge difference. That’s also with the old can vents open (they don’t seal in my plane anyway). I think replacing those vents could reduce it further, but this was a big unexpected change.
Between this and getting my prop balanced to 0.04IPS, the comfort level definitely increased. I would certainly recommend the K2U seal kits, they are not terribly expensive and work as good or better than advertised. It’s also a pilot-installable product with just a log entry required.
Pirep: Knots2U Door/Window Seal Installation and Flight Test
Fri Oct 20, 2017 2:20 pm
Fri Oct 20, 2017 5:24 pm
Re: Pirep: Knots2U Door/Window Seal Installation and Flight
Great write up!
I need to seal my doors/vent window up, I think you put it higher on my priority list. Sounds like you got some great results without too much effort.
I need to seal my doors/vent window up, I think you put it higher on my priority list. Sounds like you got some great results without too much effort.
- CamTom12 offline

- Posts: 3705
- Joined: Sun Jul 08, 2012 1:08 pm
- Location: Huntsville
- FindMeSpot URL: https://share.delorme.com/camtom12
- Aircraft: Ruppe Racer
Experimental Pacer
home hand jam "wizard"
Fri Oct 20, 2017 5:44 pm
Re: Pirep: Knots2U Door/Window Seal Installation and Flight
Get rid of those worthless can vents! I installed the air vents Sporty's sell's, expensive but worth every penny! You pax will love it on a hot bumpy day, strong flow that can be directed any direction. They seal up perfectly when needed.

Fri Oct 20, 2017 5:58 pm
Re: Pirep: Knots2U Door/Window Seal Installation and Flight
Thanks for the great write up. I need to do mine as well.
Fri Oct 20, 2017 9:00 pm
Re: Pirep: Knots2U Door/Window Seal Installation and Flight
G44 wrote:Get rid of those worthless can vents! I installed the air vents Sporty's sell's, expensive but worth every penny! You pax will love it on a hot bumpy day, strong flow that can be directed any direction. They seal up perfectly when needed.
The Sporty's vents are on my list for next year. I was just holding off until I do something better about OAT than their "drill a hole in the windscreen and bolt it there" workaround. I will do another dB sound test before/after when those go in.
Fri Oct 20, 2017 10:53 pm
Re: Pirep: Knots2U Door/Window Seal Installation and Flight
The Soros vent tube STC is now owned by Vantage Plastics. It's not as elegant a solution as the Sporty's offering, but great bang for the buck. I've installed them on two airplane's now. They seal nicely in winter. You can install the factory thermometer in them.
http://www.planeplastics.com/pdf/ventube.pdf
http://www.planeplastics.com/pdf/ventube.pdf
Sun Oct 22, 2017 6:53 pm
Re: Pirep: Knots2U Door/Window Seal Installation and Flight
The vent tubes pinecone mentioned are great. They seal up very nice and are easy to install.
Thanks for the PIREP on the door seals, I'll have to check them out for a couple planes I work on.
Sent from my SM-G870W using Tapatalk
Thanks for the PIREP on the door seals, I'll have to check them out for a couple planes I work on.
Sent from my SM-G870W using Tapatalk

Mon Oct 23, 2017 4:31 pm
Re: Pirep: Knots2U Door/Window Seal Installation and Flight
I have had the Soros Ventubes in my airplane for 13+ years, and I agree that they are much better than the stock Cessna versions--and for the money, one heckuva bang for the buck. A complete kit, which includes the 2 Ventubes, vents to install in the back under the back window, and a vent to install in the tail (it replaces an inspection plate) is $168 at Spruce. Getting the whole kit is worth it, as it improves the air flow both summer, when the Ventubes and the normal vent are the intake sources, and winter, when the heater is the intake source. The Ventubes also seal off pretty thoroughly when closed, at least much better than the Cessna versions.
Before I bought my airplane, I occasionally flew a 172 with the Sporty's $450 versions. Although they are slightly more versatile about where the air can be directed, quite honestly they don't do any better job of getting air into the cabin, nor do they shut off any more cleanly--still a little leakage when closed. They also are a bit harder to install, especially regarding the OAT gauge. With the Soros Ventubes, the original OAT gauge is installed in the passenger side Ventube, just as in the stock Cessna vents.
Cary
"I have slipped the surly bonds of earth..., put out my hand and touched the face of God." J.G. Magee
Tue Oct 24, 2017 3:20 pm
Re: Pirep: Knots2U Door/Window Seal Installation and Flight
Forgot to mention before: my airplane had new door seals installed a few months before I bought her. But for some reason, whoever did it stripped out the window seal but didn't put in a new one, and the door seal for the baggage compartment appeared to be OEM. So last year I put in a new window seal and a couple of months later a new baggage door seal.
My vendor was Aircraft Door Seals LLC. Great kits, and the window seal wasn't difficult, but for a ham-hand like me, it was not easy to do the baggage door seal. But it got done, and the difference is phenomenal! My airplane is already noisy, and I don't think that changed perceptibly, but it really reduced the air influx. The door seals are still in good shape, but when it's time to replace them, Aircraft Door Seals LLC will have my business. https://www.aircraftdoorseals.com/produ ... essna-172/
I also slathered on too much of the silicon grease, and for awhile the stickiness, especially with the window, was annoying. Then I got smart--wiped off as much as I could, the problem disappeared!
Cary
"I have slipped the surly bonds of earth..., put out my hand and touched the face of God." J.G. Magee
Wed Oct 25, 2017 9:50 am
Re: Pirep: Knots2U Door/Window Seal Installation and Flight
Cary,
I believe that aircraftdoorseals.com was ourchased by knots 2 u last spring and now they are one and the same. I am curious what the difference is between these from aircraft spruce https://www.aircraftspruce.com/catalog/ ... seals3.php and the knots 2 u? Looks like the same picture of an airplane for the advertisement but about a third the price.
I believe that aircraftdoorseals.com was ourchased by knots 2 u last spring and now they are one and the same. I am curious what the difference is between these from aircraft spruce https://www.aircraftspruce.com/catalog/ ... seals3.php and the knots 2 u? Looks like the same picture of an airplane for the advertisement but about a third the price.
Thu Oct 26, 2017 7:37 pm
Re: Pirep: Knots2U Door/Window Seal Installation and Flight
silflexer wrote:Cary,
I believe that aircraftdoorseals.com was ourchased by knots 2 u last spring and now they are one and the same. I am curious what the difference is between these from aircraft spruce https://www.aircraftspruce.com/catalog/ ... seals3.php and the knots 2 u? Looks like the same picture of an airplane for the advertisement but about a third the price.
I can't say for certain about these door seals, but often both Knots2U and Aircraft Spruce sell stuff that can also be bought direct from the company that creates them. So it may very well be the very same items.
The thing is that the larger established companies that sell others' stuff are usually better set up to do online and telephone sales. They take their piece off the top, but it's worth it for the convenience to both buyer and seller--and for the little guy, the big ones can provide more exposure than trying to advertise, which is really pricey for little companies.
Cary
"I have slipped the surly bonds of earth..., put out my hand and touched the face of God." J.G. Magee
DISPLAY OPTIONS
Who is online
Users browsing this forum: No registered users and 0 guests
Latest Features
-
Live to Tell
A Minnesota pilot is surprised to learn that the sudden asymmetric drag of an out-of-rig ski can…Read More -
Creators
Working in some of the Yukon's most beautiful and remote environments, photographer Simon Blakesley captures aircraft in…Read More -
Aircraft Ownership and Maintenance
Upgrading to big tires can make a huge difference in backcountry performance, but with those gains come…Read More -
Tales from Yesteryear
In this tale from bush flying yesteryear, Don Cogger signs up to help Atlee Dodge Jr recovery…Read More


Latest Knowledge Base
-
Destinations
A regional guide with ideas for winter camping destinations in California, Nevada, New Mexico, and Arizona.Read More -
Aircraft
Finding an affordable aircraft that can handle the backcountry for $80K or less? A challenge for sure, but with the…Read More -
Aircraft
01.29.2018 - Zane - Updated tire diameter graphic to add 8.50x10 Guide to tires for use in the backcountry and off-airport landing…Read More -
Pilots
12.22.2013 - Initial article format Operating aircraft on skis and negotiating a snow-covered landscape is an entirely unique skillset and environment.…Read More


