What Is your normal procedure for getting the 185 on floats to break surface tension and fly? I know there are numerous high time experienced 185 operators on this sight and I’m not just trying to kick a can around. I honestly would like to hear others opinions.
Disclosure: I am not a high time float pilot. I have a 185 that is occasionally on edo 3430’s.
I’ve tried the ‘lift the wing and one float and easy back’ on the yoke approach. Works ok when medium /light loads. But when heavily loaded: a robust yank of full flaps to break water surface and then bleed off to 2 notches to accelerate seems to be most productive for me. I literally feel back pressure in the seat as the plane accelerates once surface tension is broken. Rolling one wing and lifting the upwind float almost seems like figure skating with a hippo,.....fun, but unless the hippo is highly athletic you not going anywhere! I’m sure there is much finesse that I’m lacking but how do most of you operate. I realize water and wind conditions dictate a lot of this but on an average day, average water and wind, with a heavy load, do you stay on the run until you can lift one float? Or like me, get impatient, look at the airspeed and say we should be off by now and pull the flap handle? Am I breaking etiquette here? Hope not just trying to become more efficient at float operations.
N
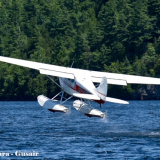
Takeoff technique cessna 185 on floats
Wed Nov 11, 2020 12:06 am

Wed Nov 11, 2020 5:42 am
Re: Takeoff technique cessna 185 on floats
I do the flap thing just like you do, then going back to one notch shortly after clearing the water when it feels right (that's with extended wings and Aerocets).
Steve
Steve

Wed Nov 11, 2020 9:53 am
Re: Takeoff technique cessna 185 on floats
Short takeoffs in these things is all about finesse, frankly. And, that requires finesse at all stages of the takeoff. For a couple of locals who are about as good as they get, visit with Andy Greenblatt, owner of Shadow Air. Andy is a class act, and a very helpful gent, and last I heard was flying a 185 on these floats. Second, get in touch with Gary Pearse. Gary is retired from ADF&G, where he flew a 185 on 3430s. Gary is a "student" of all things aviation, very knowledgeable and helpful. He now flies a souped up Taylorcraft BC-12. Ask around the East Ramp, and you should be able to find both of these guys.
But, here are my suggestions:
Prior to takeoff: First, make sure your prop governor is actually allowing the engine to turn up max rpm...which is 2850 rpm. Do that with a digital tach checker. I can't tell you how many airplanes I've checked that the mechanical tach is showing max at t/o, but in fact, they are low.
Then, make absolutely certain, prior to EVERY takeoff that your floats are not in fact carrying around more water than they should be. In the spring, prior to mounting the floats, open EVERY compartment, verify that the pump out tube goes all the way to the bottom of the compartment, and is functioning properly. A few extra pounds of water in each compartment adds up. Also, check the bottoms of your floats this fall if you can. I've seen floats that looked okay above water, but where bottoms had obviously been run up hard on something, and bottom skin was pushed in ahead of several bulkheads. If you've got those, it's time for new bottoms.
Initial takeoff run....First, set the trim for the optimum position. Takes a little experimentation, but start at the "Takeoff' mark on the indicator. Then, you hold the yoke ALL the way aft until the bows of the floats rise as much as they're going to. Pilots talk about second rise, etc....I just get the bows as high as they're going to get, THEN, and only then, I roll the plane over onto the step. This is a definite finesse operation: Push too hard and fast, and you'll create a lot of drag, too slow, and you slow down the acceleration. So, relax the back pressure, then gently push on the yoke to encourage the floats up onto the step. It takes a few seconds, but then.....
The step.....Running on the step, your goal is to maintain a pitch attitude that allows the airplane to accelerate cleanly. This requires a very delicate feel on the yoke. I tell students to start this way: Once on the step, PUSH (very gently) forward on the yoke until you feel the floats snub. Now, bring the attitude back JUST A BIT. That's going to be the best acceleration attitude, just aft of the snub. Come aft just a bit more, and you'll be dragging the heels of the floats, which feels subtle, but creates a lot of drag.
Now, for the launch: More finesse required. Your control applications MUST result in totally independent changes in the airplane's attitude. What I mean is this: If you try to roll one float out of the water, it MUST be a symmetrical roll, coordinated with rudder. Just applying aileron to roll is going to also YAW the plane, which will create tremendous drag. So, that roll has to be coordinated with simultaneous rudder application. Same goes for pitch....most people don't notice this, but often when they pull on the yoke with the left hand, they also inadvertently apply some left aileron. So, again, symmetry is essential.
Oh, and then there's the "pull on some flaps" thing. I always START the run with 20 degrees of flap in these airplanes. Now, when you're ready to launch, I recommend you pull to 30 flaps to "pry" the plane out of the water....NOT 40 degrees. Then of course, relax the flaps back to 20 once the plane is out of the water, lower the nose, and allow the plane to accelerate in ground (water) effect. BUT, again, this "pull" on the flap handle requires complete isolation of that effect. What I mean is, when you pull that flap handle, you have to separate that movement from the other controls. When you pull the flap handle, the natural result is to also move the yoke, typically aft. That'll come with time and practice, but at first, you have to learn to SEPARATE all these control inputs, till you're ready to combine them.
It takes waaaaay longer to read all that than the maneuver requires in practice.
So, here's my routine, and, important note: This is for a Cessna 185 mounted on EDO 3430 straight floats. (Second note: Aerocet pulled their plugs off a set of EDO 3500 floats, a close relative of the 3430, but not quite the same design)....so here we go:
After my runup, as I turn into the takeoff lane to initiate the takeoff, I verify that everything is where it should be. I keep my thumb on the throttle control (at idle) and extend my pinky finger down to touch the flap lever as I turn to the takeoff heading....verifying that flaps are set.
Smoothly come up with power to max. I quickly check that the engine is making power by looking at the FUEL FLOW instrument. If you're flowing fuel, you're making power, and the fuel flow check is quick and easy, minimum distraction or interpretation. Once power is set:
Yoke all the aft, as the nose rises to as high as it gets, then:
Smoothly push the yoke forward as the airplane comes up onto the step. Patience is required here, don't force it, but "encourage" it over onto the step. Keep all the controls mostly static where they need to be during acceleration (aileron into crosswind, for example, but don't wag the controls around).
Once you've reached the hull speed of the floats, (assuming you've practiced one control application at a time FIRST) I roll in left aileron (a lot), with opposite rudder to keep it aligned. Why roll left? Engine torque helps a left roll, you're fighting it with a right roll. AT THE SAME TIME: I pull the flap handle up to 30 degree mark, KEEPING the flap release button pressed, AND apply a slight pull to encourage the plane to launch. This is where finesse counts in spades. And, each control application MUST be separated, while being applied simultaneously. One pull or roll or....cannot create another unwanted control input....symmetry is essential.
Now comes the next bit of finesse: As the airplane comes out of the water, simultaneously relax the back pressure some to lower the nose, gently and smoothly relax the flaps back to the 20 degree mark, and roll wings level. Now you're flying in low "ground effect", hopefully with the floats just inches from the surface, as the airplane accelerates to climb speed.
Done right, the airplane will come out of the water just slightly below stall speed. How can this be? Ground effect permits flight below stall speed. What does this mean? You MUST remain in very low ground effect smoothly as the airplane accelerates. If those floats touch the water, lots of drag.....If you keep the nose too high, LOTS of drag. Don't fight the airplane.
Simple, eh? It sounds like there's a lot going on, and there is. Initially, you'll screw it up and have to start over. That's okay, this requires practice. Keep at it till you've got all these movements separated and smooth as glass. Soon, you'll feel in your butt whether the plane is accelerating as desired on the step, you'll FEEL the right combination of pull/roll, and flap application.
Get in touch with those guys I noted at the beginning, neither are instructors, but both are knowledgeable and will share their knowledge.
MTV

Wed Nov 11, 2020 11:28 am
Re: Takeoff technique cessna 185 on floats
MTV, that is quite simple one of the best primers I've ever read for a float take-off. If I may re-integrate any one portion it would be your comment regarding finesses. Nothing is more important and believe you me my sweet little 170B requires a boatload of it but she's never failed me. Wise words for all who indulge in wet runway operations, thank you for your insight.

Wed Nov 11, 2020 9:13 pm
Re: Takeoff technique cessna 185 on floats
MTV- That was awesome. I'm gonna laminate that and put it in the airplane.
- Durango Skywagon offline
- Posts: 281
- Joined: Sat Oct 27, 2007 6:29 pm
- Location: Durango, Colorado
- FindMeSpot URL: http://share.findmespot.com/shared/face ... 0mZtv6OxWk
How to Overthrow the System: brew your own beer; kick in your Tee Vee; kill your own beef; build your own cabin and piss off the front porch whenever you bloody well feel like it. - Edward Abbey
My Spot Page
My Spot Page
Wed Nov 11, 2020 10:18 pm
Re: Takeoff technique cessna 185 on floats
Thanks M
I’ve always valued your instruction ability. I will reach out to those you mentioned in the spring.
Yes, I think everything you have described here is what you instructed me years ago in your 170. One thing still floating in the back of my mind is: does this technique still apply to when your at gross weight? How about when light? Seems the plane will just lift off when ready at light weight.
Thanks again for response and I will review it again in the spring in detail getting ready for the season.
If you make it back here sometime, let’s get together and do some flying again. You can show me how to improve my 185 flying abilities. Or I can demonstrate how not to do it. Haha
Good to hear from you. Thanks again for your insight.
N
Thu Nov 12, 2020 5:08 am
Re: Takeoff technique cessna 185 on floats
Over the years I've learned that consistency is the key, it breeds finesse and competency. So that said unless there is an overriding element I apply the same technique regardless of weight. All that changes is the time element, weight determines the time required for execution the technique remains the same whenever and wherever possible.
Sat Nov 14, 2020 4:27 pm
Re: Takeoff technique cessna 185 on floats
mtv wrote:Short takeoffs in these things is all about finesse, frankly. And, that requires finesse at all stages of the takeoff. For a couple of locals who are about as good as they get, visit with Andy Greenblatt, owner of Shadow Air. Andy is a class act, and a very helpful gent, and last I heard was flying a 185 on these floats. Second, get in touch with Gary Pearse. Gary is retired from ADF&G, where he flew a 185 on 3430s. Gary is a "student" of all things aviation, very knowledgeable and helpful. He now flies a souped up Taylorcraft BC-12. Ask around the East Ramp, and you should be able to find both of these guys.
But, here are my suggestions:
Prior to takeoff: First, make sure your prop governor is actually allowing the engine to turn up max rpm...which is 2850 rpm. Do that with a digital tach checker. I can't tell you how many airplanes I've checked that the mechanical tach is showing max at t/o, but in fact, they are low.
Then, make absolutely certain, prior to EVERY takeoff that your floats are not in fact carrying around more water than they should be. In the spring, prior to mounting the floats, open EVERY compartment, verify that the pump out tube goes all the way to the bottom of the compartment, and is functioning properly. A few extra pounds of water in each compartment adds up. Also, check the bottoms of your floats this fall if you can. I've seen floats that looked okay above water, but where bottoms had obviously been run up hard on something, and bottom skin was pushed in ahead of several bulkheads. If you've got those, it's time for new bottoms.
Initial takeoff run....First, set the trim for the optimum position. Takes a little experimentation, but start at the "Takeoff' mark on the indicator. Then, you hold the yoke ALL the way aft until the bows of the floats rise as much as they're going to. Pilots talk about second rise, etc....I just get the bows as high as they're going to get, THEN, and only then, I roll the plane over onto the step. This is a definite finesse operation: Push too hard and fast, and you'll create a lot of drag, too slow, and you slow down the acceleration. So, relax the back pressure, then gently push on the yoke to encourage the floats up onto the step. It takes a few seconds, but then.....
The step.....Running on the step, your goal is to maintain a pitch attitude that allows the airplane to accelerate cleanly. This requires a very delicate feel on the yoke. I tell students to start this way: Once on the step, PUSH (very gently) forward on the yoke until you feel the floats snub. Now, bring the attitude back JUST A BIT. That's going to be the best acceleration attitude, just aft of the snub. Come aft just a bit more, and you'll be dragging the heels of the floats, which feels subtle, but creates a lot of drag.
Now, for the launch: More finesse required. Your control applications MUST result in totally independent changes in the airplane's attitude. What I mean is this: If you try to roll one float out of the water, it MUST be a symmetrical roll, coordinated with rudder. Just applying aileron to roll is going to also YAW the plane, which will create tremendous drag. So, that roll has to be coordinated with simultaneous rudder application. Same goes for pitch....most people don't notice this, but often when they pull on the yoke with the left hand, they also inadvertently apply some left aileron. So, again, symmetry is essential.
Oh, and then there's the "pull on some flaps" thing. I always START the run with 20 degrees of flap in these airplanes. Now, when you're ready to launch, I recommend you pull to 30 flaps to "pry" the plane out of the water....NOT 40 degrees. Then of course, relax the flaps back to 20 once the plane is out of the water, lower the nose, and allow the plane to accelerate in ground (water) effect. BUT, again, this "pull" on the flap handle requires complete isolation of that effect. What I mean is, when you pull that flap handle, you have to separate that movement from the other controls. When you pull the flap handle, the natural result is to also move the yoke, typically aft. That'll come with time and practice, but at first, you have to learn to SEPARATE all these control inputs, till you're ready to combine them.
It takes waaaaay longer to read all that than the maneuver requires in practice.
So, here's my routine, and, important note: This is for a Cessna 185 mounted on EDO 3430 straight floats. (Second note: Aerocet pulled their plugs off a set of EDO 3500 floats, a close relative of the 3430, but not quite the same design)....so here we go:
After my runup, as I turn into the takeoff lane to initiate the takeoff, I verify that everything is where it should be. I keep my thumb on the throttle control (at idle) and extend my pinky finger down to touch the flap lever as I turn to the takeoff heading....verifying that flaps are set.
Smoothly come up with power to max. I quickly check that the engine is making power by looking at the FUEL FLOW instrument. If you're flowing fuel, you're making power, and the fuel flow check is quick and easy, minimum distraction or interpretation. Once power is set:
Yoke all the aft, as the nose rises to as high as it gets, then:
Smoothly push the yoke forward as the airplane comes up onto the step. Patience is required here, don't force it, but "encourage" it over onto the step. Keep all the controls mostly static where they need to be during acceleration (aileron into crosswind, for example, but don't wag the controls around).
Once you've reached the hull speed of the floats, (assuming you've practiced one control application at a time FIRST) I roll in left aileron (a lot), with opposite rudder to keep it aligned. Why roll left? Engine torque helps a left roll, you're fighting it with a right roll. AT THE SAME TIME: I pull the flap handle up to 30 degree mark, KEEPING the flap release button pressed, AND apply a slight pull to encourage the plane to launch. This is where finesse counts in spades. And, each control application MUST be separated, while being applied simultaneously. One pull or roll or....cannot create another unwanted control input....symmetry is essential.
Now comes the next bit of finesse: As the airplane comes out of the water, simultaneously relax the back pressure some to lower the nose, gently and smoothly relax the flaps back to the 20 degree mark, and roll wings level. Now you're flying in low "ground effect", hopefully with the floats just inches from the surface, as the airplane accelerates to climb speed.
Done right, the airplane will come out of the water just slightly below stall speed. How can this be? Ground effect permits flight below stall speed. What does this mean? You MUST remain in very low ground effect smoothly as the airplane accelerates. If those floats touch the water, lots of drag.....If you keep the nose too high, LOTS of drag. Don't fight the airplane.
Simple, eh? It sounds like there's a lot going on, and there is. Initially, you'll screw it up and have to start over. That's okay, this requires practice. Keep at it till you've got all these movements separated and smooth as glass. Soon, you'll feel in your butt whether the plane is accelerating as desired on the step, you'll FEEL the right combination of pull/roll, and flap application.
Get in touch with those guys I noted at the beginning, neither are instructors, but both are knowledgeable and will share their knowledge.
MTV
Hell of a post MTV! Wealth of info there.


Sun Nov 15, 2020 12:33 am
Re: Takeoff technique cessna 185 on floats
MTV and I sort of hung out with the same guys a long time ago.........
This worked great for me hauling loads in a 185/206:
20 degrees of flaps
Once the plane is on step and the airspeed has started to come alive and is getting close to 40, reach down and slowing start rolling the trim wheel aft (one click at a time). The aircraft will find the perfect attitude and just fly right out of the water. A person has to be careful not to push forward on the yoke while running the trim.
Mike
DISPLAY OPTIONS
Who is online
Users browsing this forum: No registered users and 0 guests
Latest Features
-
Live to Tell
A Minnesota pilot is surprised to learn that the sudden asymmetric drag of an out-of-rig ski can…Read More -
Creators
Working in some of the Yukon's most beautiful and remote environments, photographer Simon Blakesley captures aircraft in…Read More -
Aircraft Ownership and Maintenance
Upgrading to big tires can make a huge difference in backcountry performance, but with those gains come…Read More -
Tales from Yesteryear
In this tale from bush flying yesteryear, Don Cogger signs up to help Atlee Dodge Jr recovery…Read More


Latest Knowledge Base
-
Destinations
A regional guide with ideas for winter camping destinations in California, Nevada, New Mexico, and Arizona.Read More -
Aircraft
Finding an affordable aircraft that can handle the backcountry for $80K or less? A challenge for sure, but with the…Read More -
Aircraft
01.29.2018 - Zane - Updated tire diameter graphic to add 8.50x10 Guide to tires for use in the backcountry and off-airport landing…Read More -
Pilots
12.22.2013 - Initial article format Operating aircraft on skis and negotiating a snow-covered landscape is an entirely unique skillset and environment.…Read More


