Denali Bandag used to buff those 29s down for us to remove the tread, and lighten them up some. Made them better tires in my opinion.
Your project looks great.....you've obviously kept your priorities in order, and the result is a good functional airplane.
MTV
Project. Straight tail 182. Pponk
Sun Oct 11, 2015 1:01 pm

Sun Oct 11, 2015 2:51 pm
Re: Project. Straight tail 182. Pponk
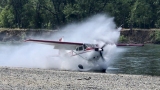
PAMR MX wrote:Finally got some bigger tires...
8.50 on heavy bush wheels aluminum wheels.
Do you happen to know the weight difference between the 6" Cleveland wheels and the 6" ABW replacements?
- denalipilot offline


- Posts: 2789
- Joined: Mon Oct 15, 2007 4:53 pm
- Location: Denali
- Aircraft: C-170B+
Fri Nov 27, 2015 12:13 am
Re: Project. Straight tail 182. Pponk
denalipilot wrote:PAMR MX wrote:Finally got some bigger tires...
8.50 on heavy bush wheels aluminum wheels.
Do you happen to know the weight difference between the 6" Cleveland wheels and the 6" ABW replacements?
Not sure on the weight difference. Tried to weigh a few 8.50 tires mounted on Cleveland wheels but I got a few pounds of variation between the setups. Maybe a pound per wheel? Total guess.

Fri Nov 27, 2015 12:38 am
Re: Project. Straight tail 182. Pponk
My elevator trim pretty well froze up as soon as the cold weather got here. I had some repairs to the tail I wanted to do so took all that stuff apart and will be going through it over the winter.
The rudder was first on the list. The upper portion of the rudder was bent up. The skins get dented around the balance portion of the rudder. I think it's all from wind damage. Some cruel individual re skinned one side with ALL cherry max except the trailing edge. Skins all drilled off.

I have seen these rudder tail posts with significant corrosion. The steel also tends to corrode out the surrounding aluminum parts. This issue is an AD on a few types of airplanes. This one wasn't that bad.

All the parts cleaned and ready for paint.

Epoxy prime complete. I like to use the Poly Fiber epoxy primer.

I like the skins made my Air Metal Fabricators in Washington. They need to be cut to size but they are significantly cheaper then Anything else.

The frame is really fun to put together. It's really had to screw up since you have access to everything at this point.

And just like that out of the jig and done!! It's really that easy. Lol.

Next the horizontal stab if people are interested at all.
The rudder was first on the list. The upper portion of the rudder was bent up. The skins get dented around the balance portion of the rudder. I think it's all from wind damage. Some cruel individual re skinned one side with ALL cherry max except the trailing edge. Skins all drilled off.
I have seen these rudder tail posts with significant corrosion. The steel also tends to corrode out the surrounding aluminum parts. This issue is an AD on a few types of airplanes. This one wasn't that bad.
All the parts cleaned and ready for paint.
Epoxy prime complete. I like to use the Poly Fiber epoxy primer.
I like the skins made my Air Metal Fabricators in Washington. They need to be cut to size but they are significantly cheaper then Anything else.
The frame is really fun to put together. It's really had to screw up since you have access to everything at this point.
And just like that out of the jig and done!! It's really that easy. Lol.
Next the horizontal stab if people are interested at all.
Fri Nov 27, 2015 6:03 am
Re: Project. Straight tail 182. Pponk
cool, thanks for posting.
Any pics of the jig, or what you did to make the jig?
Look forward to following along.
jake
Any pics of the jig, or what you did to make the jig?
Look forward to following along.
jake
- Slantbuggy offline
- Posts: 58
- Joined: Sun Apr 26, 2015 7:33 am
- Location: Bridgton
Fri Nov 27, 2015 6:24 am
Re: Project. Straight tail 182. Pponk
PAMR MX wrote:My elevator trim pretty well froze up as soon as the cold weather got here. I had some repairs to the tail I wanted to do so took all that stuff apart and will be going through it over the winter.
The rudder was first on the list. The upper portion of the rudder was bent up. The skins get dented around the balance portion of the rudder. I think it's all from wind damage. Some cruel individual re skinned one side with ALL cherry max except the trailing edge. Skins all drilled off.
I have seen these rudder tail posts with significant corrosion. The steel also tends to corrode out the surrounding aluminum parts. This issue is an AD on a few types of airplanes. This one wasn't that bad.
All the parts cleaned and ready for paint.
Epoxy prime complete. I like to use the Poly Fiber epoxy primer.
I like the skins made my Air Metal Fabricators in Washington. They need to be cut to size but they are significantly cheaper then Anything else.
The frame is really fun to put together. It's really had to screw up since you have access to everything at this point.
And just like that out of the jig and done!! It's really that easy. Lol.
Next the horizontal stab if people are interested at all.
Really like your craftsmanship and attention to detail. Keep sending more details .Thanks
- 182 STOL driver offline
- Posts: 1529
- Joined: Tue Apr 22, 2008 8:27 pm
Fri Nov 27, 2015 10:57 am
Re: Project. Straight tail 182. Pponk
Finished product looks great! But what jig? Looks like everything was just laying on a plywood table.
So is skin from Air Metal Fabricators cheaper than from Karl Anderson?
He lives near Skagit airport in western WA, I've been to his shop and he does beautiful work.
So is skin from Air Metal Fabricators cheaper than from Karl Anderson?
He lives near Skagit airport in western WA, I've been to his shop and he does beautiful work.

Cessna Skywagon -- accept no substitute!
Fri Nov 27, 2015 4:17 pm
Re: Project. Straight tail 182. Pponk
Yes, keep the pic's coming.

Fri Nov 27, 2015 5:10 pm
Re: Project. Straight tail 182. Pponk
Thanks for the good words.
I will check with Anderson and see what his prices are. Funny that there are two people in Washington making corrugated skins. I know air metal has an stc with their skins.... Not that I think it's required. They also make the trailing edge flap bulb.
I didn't get any pictures in the jig... Even if you used all the original parts it would not be very straight if ya just did it on a plywood table with no jig....
Horizontal wasn't too bad. It had some minor dings and bent cracked ribs.
Skin removed down the the ribs.

The whole thing fits on one shelf.

I should have parts cleaned and all the new parts next week to finish.
I will check with Anderson and see what his prices are. Funny that there are two people in Washington making corrugated skins. I know air metal has an stc with their skins.... Not that I think it's required. They also make the trailing edge flap bulb.
I didn't get any pictures in the jig... Even if you used all the original parts it would not be very straight if ya just did it on a plywood table with no jig....
Horizontal wasn't too bad. It had some minor dings and bent cracked ribs.
Skin removed down the the ribs.
The whole thing fits on one shelf.
I should have parts cleaned and all the new parts next week to finish.
Fri Nov 27, 2015 6:19 pm
Re: Project. Straight tail 182. Pponk
pretty cool to see the work that you are doing along the way, particularly on the skins.
keep up the documentation of the thread. it has been very informative.
that thing must be a real rocket ship!
keep up the documentation of the thread. it has been very informative.
that thing must be a real rocket ship!
- Mojave Flyer offline
- Posts: 168
- Joined: Sat Sep 27, 2014 2:06 pm
- Location: Newport
- Aircraft: Piper PA-28-180
Fri Nov 27, 2015 7:04 pm
Re: Project. Straight tail 182. Pponk
This is really cool. Thanks for the post PAMRMX.
- Zzz offline


- Posts: 2854
- Joined: Fri Oct 08, 2004 11:09 pm
- Location: northern
- Aircraft: Swiveling desk chair
Half a century spent proving “it is better to be thought a fool than to open your mouth and remove all doubt.”
Fri Nov 27, 2015 11:24 pm
Re: Project. Straight tail 182. Pponk
Very cool please keep posting.
- bushpilot490 offline
- Posts: 122
- Joined: Fri Jan 24, 2014 10:01 pm
- Location: Afton
- Aircraft: C-175 with 180hp conversion
Sat Nov 28, 2015 9:36 am
Re: Project. Straight tail 182. Pponk
Good morning PARM MX. When you get a chance would you mind posting a photo of your rudder jig. In a couple of months I will need to replace the skins on the rudder of my 180 project (actually a 185 rudder for the gross weight increase STC) and it would be nice to have a place to start when building a jib. Does your jig support the trailing edge of the rudder or just the hinge line? Thank you.
Tim
Tim
Tim
Wed Dec 02, 2015 10:43 pm
Re: Project. Straight tail 182. Pponk
Made some more progress on the stab today. One IB rib was bent with some cracks, one middle rib was squashed and all the nose ribs were old style ribs. It also had aluminum aft stab brackets one of witch had the typical crack. Cessna has really been jacking up their prices on this stuff. $1500 just for these few parts.

The new nose ribs are one gauge thicker. They also have the flutes a bit smaller and allow for more rivets helping to alleviate cracking.

The new rear stab mount brackets are steel rather then aluminum. Much less prone to crack.

Etch and alodine all parts. A tote works great for alodine soaking the smaller parts. 1 to three minutes is all you need.


All epoxy primed. It should last a long time.

Pretty much every tinnerman nut plate was busted. Thought it be cool to install machine screw nut plates but decided to stick with sheet metal screws. 24 of them on here.

The best sheet metal air drill in the world. Sioux. Love this little guy.

All the new skins get dimpled where the nut plates live.


The new nose ribs are one gauge thicker. They also have the flutes a bit smaller and allow for more rivets helping to alleviate cracking.
The new rear stab mount brackets are steel rather then aluminum. Much less prone to crack.
Etch and alodine all parts. A tote works great for alodine soaking the smaller parts. 1 to three minutes is all you need.
All epoxy primed. It should last a long time.
Pretty much every tinnerman nut plate was busted. Thought it be cool to install machine screw nut plates but decided to stick with sheet metal screws. 24 of them on here.
The best sheet metal air drill in the world. Sioux. Love this little guy.
All the new skins get dimpled where the nut plates live.
Thu Dec 03, 2015 12:14 am
Re: Project. Straight tail 182. Pponk
Cool, please keep posting!!! Very interesting.
- bushpilot490 offline
- Posts: 122
- Joined: Fri Jan 24, 2014 10:01 pm
- Location: Afton
- Aircraft: C-175 with 180hp conversion
Thu Dec 03, 2015 8:02 am
Re: Project. Straight tail 182. Pponk
Very nice, love to see the work. I had my '55 C 180 wings re skinned(severe corrosion) in 1991 by a repair station. I remember when checking with the owner and he told me he could get everything he needed from Cessna. I was surprised that they still supported such an old airplane and that was 1991. He even bought flat skins which were expensive. I thought he would make the easy skins but 12 grand later I had my wings. For many years my dad had a '56 tall gear C182, I got my instrument rating in it. It was a hell of an airplane. I would buy it back if I could but it shows destroyed on the registry. I bought one of those Sioux drills about ten years ago, expensive but I've never been sorry. Works perfect.
Thu Dec 03, 2015 9:28 pm
Re: Project. Straight tail 182. Pponk
You're doing a great job, keep the updates coming!
Thu Apr 21, 2016 9:24 pm
Re: Project. Straight tail 182. Pponk
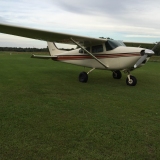
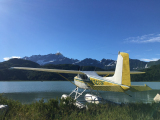
The day I picked up the 182.

Today

Stripping paint is a monumental project. It may be the least fun thing a person can do with an airplane.
Polishing aluminum isn't exactly easy either but at least it looks cool! Still have lots to do but mostly just flying this summer.
Today
Stripping paint is a monumental project. It may be the least fun thing a person can do with an airplane.
Polishing aluminum isn't exactly easy either but at least it looks cool! Still have lots to do but mostly just flying this summer.
Thu Apr 21, 2016 11:15 pm
Re: Project. Straight tail 182. Pponk
Looking awesome!
- denalipilot offline
- Posts: 2789
- Joined: Mon Oct 15, 2007 4:53 pm
- Location: Denali
- Aircraft: C-170B+
Thu Apr 21, 2016 11:33 pm
Re: Project. Straight tail 182. Pponk
I've really enjoyed your updates and the polished aluminum looks great!
- EDW offline
- Posts: 38
- Joined: Sun Aug 16, 2015 1:05 am
- Location: Anchorage
- FindMeSpot URL: https://share.delorme.com/EricWieman
- Aircraft: Cessna 172
DISPLAY OPTIONS
Who is online
Users browsing this forum: No registered users and 0 guests
Latest Features
-
Live to Tell
A Minnesota pilot is surprised to learn that the sudden asymmetric drag of an out-of-rig ski can…Read More -
Creators
Working in some of the Yukon's most beautiful and remote environments, photographer Simon Blakesley captures aircraft in…Read More -
Aircraft Ownership and Maintenance
Upgrading to big tires can make a huge difference in backcountry performance, but with those gains come…Read More -
Tales from Yesteryear
In this tale from bush flying yesteryear, Don Cogger signs up to help Atlee Dodge Jr recovery…Read More


Latest Knowledge Base
-
Destinations
A regional guide with ideas for winter camping destinations in California, Nevada, New Mexico, and Arizona.Read More -
Aircraft
Finding an affordable aircraft that can handle the backcountry for $80K or less? A challenge for sure, but with the…Read More -
Aircraft
01.29.2018 - Zane - Updated tire diameter graphic to add 8.50x10 Guide to tires for use in the backcountry and off-airport landing…Read More -
Pilots
12.22.2013 - Initial article format Operating aircraft on skis and negotiating a snow-covered landscape is an entirely unique skillset and environment.…Read More


