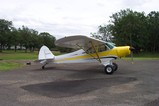
Here is the airplane...
First step I wanted to do is add the packer and doubler strips in the wings for the WingX extension. These parts are installed in the wing at the top of the front spar outboard of the wing attach point. Basically it extends a bulbed “angle” that is already part of the wing by about 20 inches..

These are the parts that are installed.. the part resting against the ladder is the “packer” and the part on top of that I am holding is the “doubler”...

The parts are mounted in the wing extending and doubling this angle with the “bulb”.. this angle ends just before the rib shown.. I have already drilled out the necessary rivets in the spar...

Here are the parts in place ready to rivet in..

By the way, there are 4 inspection hole backers and plates included in the kit that you can install in the wings for access...

All of the rivets are increased to 5/32 and additional rivets are installed at a 1 inch spacing..

A good assortment of long reach “Clecos” is a must have for This project.. both the packer and doubler are 1/8 inch aluminum.. add the wing skin and internal structure and there is at least 3/8 inch worth of material that needs to be riveted together..

There is a stainless strap that gets installed on the bottom of the front spar right where the wing strut attaches... this part is only installed if the aircraft DOES NOT have the doubler angle installed from the factory... this aircraft is old enough being a 58 that the strap is required.. So, we removed the strut to facilitate the installation... And that’s where we found the BIG problem..

Right here... this is the fuselage bulkhead that the lower wing strut attaches to.. there is a MAJOR crack going right through those two holes in the center..

Not only is it cracked on the one side, it also has a smaller crack on the other side... What is interesting.. These cracks are in the area where AD 2020-18-01 is inspected.. BUT.. The AD only applies to 182E models and up.. This is a 182A and is not affected by the AD... Definitely going to inspect every airplane in this area more thoroughly, AD or not..

This belly panel also had a lot of the rivets replaced with larger ones to the point where most of them
Pulled right through the panel... easy piece to make but points to previous repairs that were not really done correctly..

Decided to remove the wings for a couple reasons.. one, less weight on the airframe when removing the bulkhead. Two, less chance of them getting damaged by falling off a high stand. Three, owner always wanted to install the Monarch long range wing tanks..

This is what’s left of a Cessna 175 airframe... We robbed the baggage door off of it a while back and installed that in a 170 via STC.. A lot of the airframe parts from Cessna 170, 172, 175, 180, 182 and even 185’s are the same parts.. I actually used the outboard left gear attach casting out of this to repair a different 182... Now I am going to remove the bulkhead out of it to replace the cracked one... I did verify the bulkhead part numbers first and they are the same between models..

Rolled the 175 on its top and started drilling... at the same time I am figuring the best way to remove the bulkhead with minimal rivet drilling so I can repeat it on the 182..

Trying to do the whole job with just this section of belly skin removed..

And a look at the 175 bulkhead area that is cracked on the 182... This is a clean piece with hardly any dirt and oil on it..

And the other side...

And after a lot of drilling, head scratching and yanking we got the bulkhead out in one piece....
I am going to disassemble this a little more to make it easier to install. Plus I want to go ahead and at least give it a epoxy primer coat since there is some minor aluminum corrosion in areas where it was riveted to the floor boards and belly skin that needs to be cleaned off anyway..
More to come..
Brian
Sent from my iPhone using Tapatalk