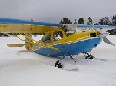
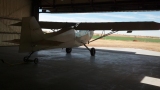
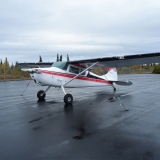
Backcountry Pilot • One more Cessna interior project

One more Cessna interior project

Aircraft building and project-level overhaul forum -- Kitplanes, experimental amateur-built, homebuilding, or even restoration of certified aircraft.
64 postsPage 1 of 41, 2, 3, 4

One more Cessna interior project

So, in spite of my better judgement, i took the plunge today and started to redo the interior on the old girl.

before;

Image

After;

Image

before;

Image

after;

Image

Now the hard work starts #-o

One question for those who have done this already,

Image

What did you do with these upholstery tack-strips? mostly they are held in place by a bunch of small solid rivets, did you leave them or remove them?
slowhawk offline
User avatar
Posts: 501
Joined: Thu Aug 07, 2008 8:33 am
Location: Nowhere

Re: One more Cessna interior project

I'm watching closely, this is on my list for my '56 172. Keep the pictures coming!
Jeredp offline
KB and Supporter
User avatar
Posts: 625
Joined: Fri Apr 20, 2012 10:31 am
Location: WA
FindMeSpot URL: http://share.findmespot.com/shared/face ... 7NYN40QT2I
Aircraft: Cessna 172

Re: One more Cessna interior project

Yeah, keep the pix coming, so that I'll never be tempted to tackle such a job myself! :)

Cary
Cary offline
User avatar
Posts: 3801
Joined: Sun Jan 10, 2010 6:49 pm
Location: Fort Collins, CO
"I have slipped the surly bonds of earth..., put out my hand and touched the face of God." J.G. Magee

Re: One more Cessna interior project

I've done all 3 ways, I've taken them out, drilled the spot welds cleaned them and primed them, reassembled with 1097ad rivets and reinstalled.. I've also just primed them in situa. And I've completely removed them. If you ever plan on having a headliner don't lose them.. They are virtually impossible to find and they are pricey. Option 1 is a lot of work for no visual benefit, but if corrosion is an issue, it is the way to do it.. Over here corrosion is an issue. If you are in a dry area where you don't get much corrosion issues option 2 works just fine. And if yours are so gone that option 3 is your choice, then you end up having an utility interior with no headliner.
mmartin1872 offline
User avatar
Posts: 221
Joined: Tue Feb 08, 2011 7:18 pm
Location: Chilliwack
FindMeSpot URL: http://share.findmespot.com/shared/face ... rdxTuiNhdo
Aircraft: Cessna 182
Stinson 108-2
Stinson 108-3
Taylorcraft BC12D - Project
Starduster II
Thorpe S18
Piper Clipper
Poorman's 180 - Project

Re: One more Cessna interior project

Well, i guess i should have been more clear #-o

I'm going with a "utility" interior like i have seen in some of the other projects. So next is the adhesive removal, then primer, maybe paint before going back with selkerk foam insulation, probably. There is some corrosion in between the tack-strips and the skin, so i would rather remove them, never did like the headliner anyway.

I expect this project will evolve as i go :shock:
slowhawk offline
User avatar
Posts: 501
Joined: Thu Aug 07, 2008 8:33 am
Location: Nowhere

Re: One more Cessna interior project

Now you've done it! It's a lot o work but you'll be happy with the end result. I took all those strips off on my 170. I also took off all the brackets that hold in my headliner so I didn't have to make cut outs in the 1/4" foam. It also looks cleaner.

Here's some pictures for motivation...

Image

Image

Image

Image

Image

Image
robw56 offline
User avatar
Posts: 3263
Joined: Thu Jan 18, 2007 9:30 pm
Location: Ward
Aircraft: 1957 C-180A

Re: One more Cessna interior project

Yep Rob, saw those pictures before on your thread, that's what got me started thinking (so you're partially to blame 8) . Did you drill out all those rivets? what did you go back with, Cherry rivets?
slowhawk offline
User avatar
Posts: 501
Joined: Thu Aug 07, 2008 8:33 am
Location: Nowhere

Re: One more Cessna interior project

Rob, your 170 looks amazing! I too am following in those footsteps and have already disposed of the 150 pounds or so of MEK and gunge soaked rags and scrubbies.
A few questions: Where did you get the 10-32 screw in swivel rings that the cargo net is hooked to and how did you (or anybody else) enter the removal of the headliner attach crap, in the log books? I've had a conversation about removing those parts with my IA and he feels uncomfortable with it.
Thanks for the photos!
FZ
flyingzebra offline
User avatar
Posts: 479
Joined: Sat Jan 24, 2009 4:53 am
Location: Northwest Washington state
Aircraft: Cessna Skylane 182 N3440S, Aviat Husky N2918L

Re: One more Cessna interior project

Keep the pics coming, guys. Each one is persuasive: "Cary, don't you dare do that!"

Cary
Cary offline
User avatar
Posts: 3801
Joined: Sun Jan 10, 2010 6:49 pm
Location: Fort Collins, CO
"I have slipped the surly bonds of earth..., put out my hand and touched the face of God." J.G. Magee

Re: One more Cessna interior project

Cary wrote: "Cary, don't you dare do that!"

:lol:

Worked for about an hour today. adhesive remover applied with a paint brush seemed to work ok, plastic scraper took off most the heavy duty "black tar", green scratch pad soaked in adhesive remover for the finish and papertowel clean up. the pictures are coming, need to clean my hands #-o
slowhawk offline
User avatar
Posts: 501
Joined: Thu Aug 07, 2008 8:33 am
Location: Nowhere

Re: One more Cessna interior project

slowhawk wrote:Yep Rob, saw those pictures before on your thread, that's what got me started thinking (so you're partially to blame 8) . Did you drill out all those rivets? what did you go back with, Cherry rivets?


Yep, drilled all the rivets out. Filled the holes with standard rivets. You'll need a buddy with a bucking bar to help you with that.
robw56 offline
User avatar
Posts: 3263
Joined: Thu Jan 18, 2007 9:30 pm
Location: Ward
Aircraft: 1957 C-180A

Re: One more Cessna interior project

flyingzebra wrote:Rob, your 170 looks amazing! I too am following in those footsteps and have already disposed of the 150 pounds or so of MEK and gunge soaked rags and scrubbies.
A few questions: Where did you get the 10-32 screw in swivel rings that the cargo net is hooked to and how did you (or anybody else) enter the removal of the headliner attach crap, in the log books? I've had a conversation about removing those parts with my IA and he feels uncomfortable with it.
Thanks for the photos!
FZ


The rings are made with AN-42 eyebolts, 3/16" schakles, and four AN-960 washers as spacers.

Image
robw56 offline
User avatar
Posts: 3263
Joined: Thu Jan 18, 2007 9:30 pm
Location: Ward
Aircraft: 1957 C-180A

Re: One more Cessna interior project

flyingzebra wrote: Rob, your 170 looks amazing! .....


Rob has definitely set the bar pretty high with the great looking job he did on his 170.
hotrod180 offline
Supporter
User avatar
Posts: 10534
Joined: Wed Jan 26, 2005 11:47 pm
Location: Port Townsend, WA
Cessna Skywagon -- accept no substitute!

Re: One more Cessna interior project

Looking good, Rob. As an alternative to your cargo ring, folks might also consider this:
http://www.cargosystems.com/shop/hardware/78680/
or this:
http://www.cargosystems.com/shop/hardware/40027-10/
Both have worked well for me, but I like the second option better, though more costly because I use it with one of these below to quickly clip the webbing net on and off of the ring.
http://www.cargosystems.com/shop/hardware/40044-10/
http://www.cargosystems.com/shop/hardware/40065-10/
Matt 7GCBC offline
User avatar
Posts: 330
Joined: Fri Feb 11, 2005 11:12 pm
Location: Northwest
FindMeSpot URL: http://share.findmespot.com/shared/face ... vXLMMuZOv7

Re: One more Cessna interior project

Cary wrote:Yeah, keep the pix coming, so that I'll never be tempted to tackle such a job myself! :)

Cary

I concur, although I would love to find a shop that could do this work for my good ole 182. I never was a fan of the old style headliners and looking at these interiors with the Selkirk foam sure makes me want to go that direction, along with the utility floor covering versus the carpet as well.

Keep the images coming. Even the wife likes this idea 8)
Easy Riser offline
User avatar
Posts: 78
Joined: Sat Oct 04, 2014 5:39 am
Location: Selman
Aircraft: Rans S7
'67 Cessna 180 the African Queen

Re: One more Cessna interior project

Easy Riser wrote:
Cary wrote:Yeah, keep the pix coming, so that I'll never be tempted to tackle such a job myself! :)

Cary

I concur, although I would love to find a shop that could do this work for my good ole 182. I never was a fan of the old style headliners and looking at these interiors with the Selkirk foam sure makes me want to go that direction, along with the utility floor covering versus the carpet as well.

Keep the images coming. Even the wife likes this idea 8)


Before you even THINK about hiring someone to do a project like this, just buy a new King Air....cheaper.... #-o

MTV
mtv offline
Knowledge Base Author
User avatar
Posts: 10514
Joined: Sat Feb 25, 2006 1:47 am
Location: Bozeman

Re: One more Cessna interior project

Easy Riser wrote:I concur, although I would love to find a shop that could do this work for my good ole 182. I never was a fan of the old style headliners and looking at these interiors with the Selkirk foam sure makes me want to go that direction, along with the utility floor covering versus the carpet as well.

Keep the images coming. Even the wife likes this idea 8)


MTV is spot on for sure!

Im 3500 hrs into my Wagon project. Add up your shops hourly do the math... (puke)
Bigrenna offline
KB and Supporter
User avatar
Posts: 2339
Joined: Sun Sep 25, 2011 4:02 pm
Location: New England
Aircraft: C180H / C170B
www.bushwagoneast.com
www.avthreads.com

Re: One more Cessna interior project

Oh, I know I am dreaming. I can do the work (if only I could find the time). The worst of it is the solvents used to remove the adhesive. I have worked with them all, Toluene, MEK, Gasoline etc. I have had quite enough of that stuff in my life. I have learned through the years to try and at least ACT smarter. Most of that stuff will do just the opposite.

Anyway dreaming is cheap, kind of like living vicariously through watching others, so carry on!

BTW Greg, I REALLY like your polished wagon. More dreaming I suspect.
Easy Riser offline
User avatar
Posts: 78
Joined: Sat Oct 04, 2014 5:39 am
Location: Selman
Aircraft: Rans S7
'67 Cessna 180 the African Queen

Re: One more Cessna interior project

amacbean offline
User avatar
Posts: 544
Joined: Mon Aug 08, 2005 3:22 pm
Location: Springville
FindMeSpot URL: http://share.findmespot.com/shared/face ... 7GsCKYBvNX
Aircraft: Cessna 170b

Re: One more Cessna interior project

amacbean wrote:I took out most of the tack strips for the headliner as well, except for those around the back windows. On those I didn't want to drill out the rivets and then put new ones back in, and then have to paint the heads on the outside to match the plane. I just cut the foam to run up as close to them as possible. I also left the clips on the ceiling in and just cut holes in the foam for them. I use some of the clips to route the wires for the intercom, and I hang a LED light from one of the others when I'm packing/unpacking the plane at night.


Also, we made some covers for the pulleys where the aileron and flap cables go out to the wings behind the door posts. This cut down on wind drafts in the winter substantially. We made them out of 1/8" sintra (white opaque polystyrene) and painted them to match. They aren't perfect, but it looks better than not having them.


Lots of good ideas. Has anybody ever put shoulders harnesses in for the rear seat passengers?
SkyLarkin offline
Supporter
User avatar
Posts: 187
Joined: Thu Aug 18, 2011 10:14 pm
Location: Trapper Creek, Alaska

DISPLAY OPTIONS

Next
64 postsPage 1 of 41, 2, 3, 4

Who is online

Users browsing this forum: No registered users and 0 guests

Latest Features

Latest Knowledge Base