Modernizing an old 182: STOL kit now in progress
Wed Apr 18, 2018 9:54 am
Re: Let the games begin! Modernizing an old 182.
All of the bushings, bolts, etc came as part of the kit. There's the mount and then a separate mounting parts kit to hang it, so it's all legal and per STC; it's a pretty complete kit. We had to interpret the cabin heat inlet relocation somewhat just because of the number of ways Cessna built them, otherwise it's an impressive stack of hardware and engineering-level documentation. The mount isn't cheap, but the level of design and fabrication is likewise impressive, and with proper care (cleaning up exposed metal, heat shielding, and so on) I see no reason this mount won't outlast the plane.

Wed May 02, 2018 10:26 am
Re: Let the games begin! Modernizing an old 182.
Continuing to get parts back on the plane with one of the biggest of them all - the engine! We hung it last Tuesday. My advice is to read through the SPW instructions front to back a couple times, as the LORD mounts they have you use require some unique methods and brute-force tools. It all (eventually) lined up though, and is very exciting to see that 520 sitting proud.
As soon as my EI gauges arrive I'll be able to wire up the probes and route wiring. I'm holding off on intake/exhaust and some other engine related activities until I can lay it all out at once and think the entirety of this phase through. I did pull the vacuum and block that off though. My G5's have arrived and I'm slowly working towards the new panel design with Saircorp. I think we're close to the part where I give them money and start to see physical cut pieces for test-fit! The avionics shop is also about to start up on my panel harness in advance. Airframe wiring and fuel cells are also soon to be done now that my Cies senders are here.
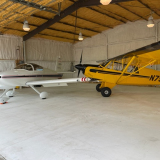
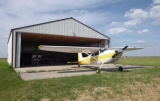
I also moved into a new hangar this weekend. My fellow tenants were amused at the flatbed trailer loads of stuff that kept coming as we transferred between them, it's amazing how much crap accumulates in a man cave in such a short period of time. This one is larger, cleaner, and has full utilities and facilities though, along with a smooth floor and much-improved lighting. It should really help my ability to work on this project in a proper way, though we kind of just piled everything in there in advance of a thunderstorm so I need to re-organize the layout. Many of my new neighbors have aircraft in various stages of build or restoration and the local EAA chapter's hangar is the other side of my wall, so it's a great row to be in.

As soon as my EI gauges arrive I'll be able to wire up the probes and route wiring. I'm holding off on intake/exhaust and some other engine related activities until I can lay it all out at once and think the entirety of this phase through. I did pull the vacuum and block that off though. My G5's have arrived and I'm slowly working towards the new panel design with Saircorp. I think we're close to the part where I give them money and start to see physical cut pieces for test-fit! The avionics shop is also about to start up on my panel harness in advance. Airframe wiring and fuel cells are also soon to be done now that my Cies senders are here.
I also moved into a new hangar this weekend. My fellow tenants were amused at the flatbed trailer loads of stuff that kept coming as we transferred between them, it's amazing how much crap accumulates in a man cave in such a short period of time. This one is larger, cleaner, and has full utilities and facilities though, along with a smooth floor and much-improved lighting. It should really help my ability to work on this project in a proper way, though we kind of just piled everything in there in advance of a thunderstorm so I need to re-organize the layout. Many of my new neighbors have aircraft in various stages of build or restoration and the local EAA chapter's hangar is the other side of my wall, so it's a great row to be in.
Thu May 03, 2018 10:08 am
Re: Let the games begin! Modernizing an old 182.
The straight tail, trimmable stabiliser 182 is such an excellent all rounder - it may be on this thread, but am assuming useable fuel is 55 USG, or do you plan to fit either the rear baggage tank or new wing tanks?
Thu May 03, 2018 11:05 am
Re: Let the games begin! Modernizing an old 182.
L18C-95 wrote:The straight tail, trimmable stabiliser 182 is such an excellent all rounder - it may be on this thread, but am assuming useable fuel is 55 USG, or do you plan to fit either the rear baggage tank or new wing tanks?
Yep I have the standard 55 usable on board. I'm going to wait to see what the burn and range look like with this new engine before deciding any next steps. If I do anything it'll be flint tip tanks, so I am pre-wiring for those gauges and pumps while I have things apart in case I add them later.
Thu May 03, 2018 12:06 pm
Re: Let the games begin! Modernizing an old 182.
55 USG even with an IO-520 should be good for 3 1/2 hours with decent VFR reserves - in a few decades of GA (not counting corporate turbine), I can only think of half a dozen flights at most where I have flown for more than 3 1/2 hours without a pit stop. The original rear baggage 18 USG reserve tank option always struck me as quite a good compromise, helping CofG when you have a long sector and you don’t want to inflict 5 hours on passengers. Not sure how easy it is to retrofit.
Thu May 03, 2018 1:15 pm
Re: Let the games begin! Modernizing an old 182.
The rear baggage option did look interesting, what I didn't like was the reduction in effective door opening since it sits higher, at least as far as I know. It could make using the baggage space a bit more challenging. I try to keep my flights in the 3-3.5hr range as well, though I have occasionally gone over that dodging weather. Still, I hit my personal limits around that point too. We'll see how it all works out once it's flying again. With the old engine I planned 12gph and that netted me 4 hours with 30 min reserve. The burn will be higher on the 520 naturally, but also covering more distance in that time so we'll see how it averages out. I'm changing so much on this plane that I won't hazard a guess, it will take flight testing of speed vs fuel burn to determine what best cruise (speed) and best economy (distance per gallon used) end up.
Thu May 03, 2018 5:25 pm
Re: Let the games begin! Modernizing an old 182.
colopilot wrote:The rear baggage option did look interesting, what I didn't like was the reduction in effective door opening since it sits higher, at least as far as I know. It could make using the baggage space a bit more challenging. I try to keep my flights in the 3-3.5hr range as well, though I have occasionally gone over that dodging weather. Still, I hit my personal limits around that point too. We'll see how it all works out once it's flying again. With the old engine I planned 12gph and that netted me 4 hours with 30 min reserve. The burn will be higher on the 520 naturally, but also covering more distance in that time so we'll see how it averages out. I'm changing so much on this plane that I won't hazard a guess, it will take flight testing of speed vs fuel burn to determine what best cruise (speed) and best economy (distance per gallon used) end up.
Put'em in dude. We just wrapped up mine today. It's a big install; but in all my days of flying I never felt like I had too much fuel. Especially flying around in the sticks!
Of course, it's easy to spend your money...
Thu May 03, 2018 6:19 pm
Re: Let the games begin! Modernizing an old 182.
jaudette wrote:Put'em in dude. We just wrapped up mine today. It's a big install; but in all my days of flying I never felt like I had too much fuel. Especially flying around in the sticks!
Of course, it's easy to spend your money...
Yeah, I need a sponsor. Interested?
Thu May 03, 2018 6:25 pm
Re: Let the games begin! Modernizing an old 182.
We all need sponsors....
Fri May 04, 2018 6:36 am
Re: Let the games begin! Modernizing an old 182.
jaudette wrote:We all need sponsors....
And a support group. Aviators Anonymous, a 12-step program for convincing yourself this isn't a problem.
Fri May 04, 2018 7:38 am
Re: Let the games begin! Modernizing an old 182.
In the meantime you might consider carrying fuel bags and using them when needed. 5 gal each and when empty they take up almost no room, and don't weigh much. I carry a couple in the SQ2 for long legs (at 90mph), like Tok to Whitehorse- never needed them but nice to have in case of a strong headwind.
http://www.airframesalaska.com/Liquid-Containment-Bag-p/5.2bag.htm
http://www.airframesalaska.com/Liquid-Containment-Bag-p/5.2bag.htm
colopilot wrote:L18C-95 wrote:The straight tail, trimmable stabiliser 182 is such an excellent all rounder - it may be on this thread, but am assuming useable fuel is 55 USG, or do you plan to fit either the rear baggage tank or new wing tanks?
Yep I have the standard 55 usable on board. I'm going to wait to see what the burn and range look like with this new engine before deciding any next steps. If I do anything it'll be flint tip tanks, so I am pre-wiring for those gauges and pumps while I have things apart in case I add them later.
- Barnstormer offline
- Posts: 2700
- Joined: Sun Oct 14, 2012 7:42 am
- Location: Alaska
- Aircraft: C185
Fri May 04, 2018 5:39 pm
Re: Let the games begin! Modernizing an old 182.
Barnstormer wrote:In the meantime you might consider carrying fuel bags and using them when needed. 5 gal each and when empty they take up almost no room, and don't weigh much. I carry a couple in the SQ2 for long legs (at 90mph), like Tok to Whitehorse- never needed them but nice to have in case of a strong headwind.
http://www.airframesalaska.com/Liquid-Containment-Bag-p/5.2bag.htm
Yeah I agree, bags are a good way to ferry fuel in if you think it's going to be tight. I also have a nice 12v electric pump that would be perfect for that to avoid heaving it on top of a bush-tire'd 182. Thanks for the link!
Last edited by colopilot on Fri May 04, 2018 10:07 pm, edited 1 time in total.
Fri May 04, 2018 6:00 pm
Re: Let the games begin! Modernizing an old 182.
colopilot wrote:jaudette wrote:We all need sponsors....
And a support group. Aviators Anonymous, a 12-step program for convincing yourself this isn't a problem.
Maybe one for our wives, anonymous annoyed wives of aviators, a 12 step program to convince them that this isn't a problem...


Tue May 08, 2018 8:52 pm
Re: Let the games begin! Modernizing an old 182.
Speaking of that moment when you realize you may have a problem, Avionics Santa came! Two G5's and a CGR-30 combo kit are now patiently awaiting install (and a new panel). Most of the CGR kit goes in without the gauges, really those displays are a very minor part of what's there. I opened this box and took a deep breath once I really saw what I was in for, now the estimates of 30-40 hours of work begin to make a lot of sense.
In addition to the usual engine monitoring, we configured for carb temp, fuel flow/totalization, CO sensor, OAT (replaces the crappy Cessna vent gauge), dual Ammeter shunts, and any other relevant function we could set up at the time. EI worked with me to set up the display layout exactly how I wanted as well. Every one of these is custom built to spec and then tested/calibrated before it leaves. EI and Chief have been absolutely fantastic to work with on the CGR config and purchase.
I bought the G5's through a local shop, Executive Aviation East at KFTG who will also be doing the harness/certification on those, and they've been great so far too. It's also nice to have capable avionics people right on the field. I will have EA connect up the G5's and certify the new pitot-static system, along with some other validation of my work on the panel end of things.
I can't wait to light this all up for the first time!


Side note, both fuel bays are now taped and ready for new cells too!
In addition to the usual engine monitoring, we configured for carb temp, fuel flow/totalization, CO sensor, OAT (replaces the crappy Cessna vent gauge), dual Ammeter shunts, and any other relevant function we could set up at the time. EI worked with me to set up the display layout exactly how I wanted as well. Every one of these is custom built to spec and then tested/calibrated before it leaves. EI and Chief have been absolutely fantastic to work with on the CGR config and purchase.
I bought the G5's through a local shop, Executive Aviation East at KFTG who will also be doing the harness/certification on those, and they've been great so far too. It's also nice to have capable avionics people right on the field. I will have EA connect up the G5's and certify the new pitot-static system, along with some other validation of my work on the panel end of things.
I can't wait to light this all up for the first time!
Side note, both fuel bays are now taped and ready for new cells too!
Wed May 16, 2018 2:01 pm
Re: Let the games begin! Modernizing an old 182.
My newly re-covered seats were delivered back to me today! New foam, leather, embroidered logo, and painted frames. I used a local guy, C&C Aircraft Interiors.


As I dig into the CGR-30 kit I am even more impressed at the level of detail they put into it. There are a lot of wires going on with this thing, but they are pre-pinned and all of them are labeled. The splice connectors they supply are screw-tightened and airtight. Basically all of the work looks to be in mounting the hardware/probes/etc and spending as much as time as you want dressing it up neatly. They make the wiring really hard to screw up if you're paying attention at all. I expect to start that install shortly.
As I dig into the CGR-30 kit I am even more impressed at the level of detail they put into it. There are a lot of wires going on with this thing, but they are pre-pinned and all of them are labeled. The splice connectors they supply are screw-tightened and airtight. Basically all of the work looks to be in mounting the hardware/probes/etc and spending as much as time as you want dressing it up neatly. They make the wiring really hard to screw up if you're paying attention at all. I expect to start that install shortly.
Fri May 18, 2018 5:48 pm
Re: Let the games begin! Modernizing an old 182.
Email me your N number and serial number and I can set you up with the paperwork for the panel kit.
[email protected]
[email protected]
Fri May 18, 2018 5:50 pm
Re: Let the games begin! Modernizing an old 182.
What's your panel kit Aeropod? Have one for a 206?AEROPOD wrote:Email me your N number and serial number and I can set you up with the paperwork for the panel kit.
[email protected]
Fri May 18, 2018 6:36 pm
Re: Let the games begin! Modernizing an old 182.
The 55 gal useable fuel for an early C182 needs to be adjusted once the fuel bladders have been replaced after 1973, because the useable fuel drops 2 gals per tank for many Cessna’s, per SE75-7 and it’s associated Supplement 1, referenced by AD 75-16-01.
The original SE75-7:
https://support.cessna.com/custsupt/con ... s_id=25704
I have a copy of the supplement, but couldn’t find a url to copy, but it broadens the SE75-7 to include C180A thru E, C182A thru G, and C185/C185A.
Sorry!
The original SE75-7:
https://support.cessna.com/custsupt/con ... s_id=25704
I have a copy of the supplement, but couldn’t find a url to copy, but it broadens the SE75-7 to include C180A thru E, C182A thru G, and C185/C185A.
Sorry!
Fri May 18, 2018 9:43 pm
Re: Let the games begin! Modernizing an old 182.
That might explain the odd quantity placards (basically P-touch labels) someone stuck on the wings. I researched those SE's from your post, there is also a SE75-10 mentioning them. Seems to apply to bladders shipped from Cessna after 1973 made by Goodrich, but I will verify further if I can. I think the cells I pulled out may have been Goodrich brand from the late 70's so that lines up with the stickers. I really wonder if the new ones I'm putting in apply to this though since they're a different brand. Thanks for the details!
Tony I will email you.
Tony I will email you.
Sat May 19, 2018 7:01 am
Re: Let the games begin! Modernizing an old 182.
When the subject of fuel quantities in an airplane comes up, we always hear the old saw “my butt can’t stand sitting in one of these things that long anyway” or similar.
But, to me, that’s not why I like long range tanks. To me, long range tanks allow me to explore country with low fuel availability. They allow me to overfly a place that rapes you in fuel cost. And they’re insurance for that time I plane everything to a T and Mother Nature has different ideas.
I’ve got five hours range plus in my plane, but I never sit in it that long on one flight, but I have options.
Fuel bags: I hate gas inside the cabin. Gas containers leak, or they smell of fuel. Passengers puke when you combine a bit of turbulence and fuel vapors.
The ABW fuel bags work for some, but mine leaks, and I’d never buy another.
Long range fuel is a very good thing. Early in my career, a gent pushed me to fly a couple extra legs on a trip. Rather, I let him. Anyway, I sweated fuel big time on that trip, and I swore I’d never push fuel again.
With small tanks and a big motor, at some point you’ll find yourself really wishing for more gas capacity, believe me.
MTV

DISPLAY OPTIONS
Who is online
Users browsing this forum: No registered users and 0 guests
Latest Features
-
Live to Tell
A Minnesota pilot is surprised to learn that the sudden asymmetric drag of an out-of-rig ski can…Read More -
Creators
Working in some of the Yukon's most beautiful and remote environments, photographer Simon Blakesley captures aircraft in…Read More -
Aircraft Ownership and Maintenance
Upgrading to big tires can make a huge difference in backcountry performance, but with those gains come…Read More -
Tales from Yesteryear
In this tale from bush flying yesteryear, Don Cogger signs up to help Atlee Dodge Jr recovery…Read More


Latest Knowledge Base
-
Destinations
A regional guide with ideas for winter camping destinations in California, Nevada, New Mexico, and Arizona.Read More -
Aircraft
Finding an affordable aircraft that can handle the backcountry for $80K or less? A challenge for sure, but with the…Read More -
Aircraft
01.29.2018 - Zane - Updated tire diameter graphic to add 8.50x10 Guide to tires for use in the backcountry and off-airport landing…Read More -
Pilots
12.22.2013 - Initial article format Operating aircraft on skis and negotiating a snow-covered landscape is an entirely unique skillset and environment.…Read More


