Bagarre wrote:Thanks. I didn't know it came with the glue.
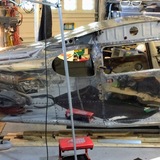
On the firewall cleaning thing mentioned earlier, I highly recommend cleaning it back to bare metal.
You'll be surprised at what's lurking under the glue. Mine had a but of corrosion where the glue was heaviest. Not so bad to replace the firewall but bad enough to set me back two days of scrubbing.
The boot cowl was a different story for me. The glue really attacked it over the years. I have a new piece of metal on order for that little mess.
Did you decide on a flap tunnel option? I really like the fleckstone paint. It looks good and is easy to install (and repair later on).
Just to clarify, doesn't come with the glue they just have a paper that comes with the reccomendation of the 3m trim adhesive for the firewall. I believe it reccomended something else for the roof and sides.
Yea I have been scrubbing it off bit by bit. Would have been way easier if I would have been thinking ahead for the firewall and done all of it before getting my panel in and wiring underneath. Things to think about for the future...although hope to never do this again this deep.
As for the flap tunnel, still leaning towards the Selkirk cover for it, still not set in stone. although I do like the fleckstone paint option too.