Why is self etching primer generally green? I've searched, asked A&P's locally etc without an exact answer. I'm trying to figure out the best ways to paint before I get to the big mama of painting the wings, control surfaces and the fuselage. I've done the "old school" ways previously inside with some aluma prep and alodine then primer shot the Imron gray. Wasn't able to fully wash the inside after each step so just used lots of wet rags and a bucket of water to wash it down then let it dry.
What I've read and watched is the self etching is the "easy way." Otherwise if your aluminum surface is scuffed, prepped and clean you can just start with an epoxy primer and then shoot your top coat of paint and be done.
Done with the babbling...so why is self etching primer generally green in color like that of Nason or the Variprime?
1955 Cessna 170B rebuild
Thu Jan 19, 2017 9:24 pm
- kygreen229 offline
- Posts: 130
- Joined: Mon Aug 26, 2013 10:43 am
- Location: Boise, ID
Thu Jan 19, 2017 10:45 pm
1955 Cessna 170B rebuild
kygreen229 wrote:Why is self etching primer generally green? I've searched, asked A&P's locally etc without an exact answer. I'm trying to figure out the best ways to paint before I get to the big mama of painting the wings, control surfaces and the fuselage. I've done the "old school" ways previously inside with some aluma prep and alodine then primer shot the Imron gray. Wasn't able to fully wash the inside after each step so just used lots of wet rags and a bucket of water to wash it down then let it dry.
What I've read and watched is the self etching is the "easy way." Otherwise if your aluminum surface is scuffed, prepped and clean you can just start with an epoxy primer and then shoot your top coat of paint and be done.
Done with the babbling...so why is self etching primer generally green in color like that of Nason or the Variprime?
Self etching primers use Zinc as part of the conversion process. "But Zinc is yellow!" You say, this is true. I believe, well my grandfather told me, they added some darker pigments to aid in UV stabilization which rendered the paint more green. You will see both yellow and green self etching primers.
If you have the patience scuffing all the surfaces with scotchbrite and going to a good epoxy primer will give much better adhesion if your ultimate goal is to topcoat with polyurethane.
Fri Jan 20, 2017 12:18 am
Re: 1955 Cessna 170B rebuild
Prep it and paint it with an epoxy primer, I recommend the ppg 515k011/910-12 primer. Nice color green, looks factory and it works great.
keep them flying!
Fri Jan 20, 2017 6:48 am
Re: 1955 Cessna 170B rebuild
Thanks for the info guys.
- kygreen229 offline
- Posts: 130
- Joined: Mon Aug 26, 2013 10:43 am
- Location: Boise, ID
Fri Jan 20, 2017 7:26 am
Re: 1955 Cessna 170B rebuild
I would caution against using water later in the process, especially closer to paint time. Use a proper degreaser like U-POL. It has anti-static properties and is an aggressive degreaser even removing silicone. It's also safe on a painted sub-strait and wont attack the primer.
My process: I first do a good pass with red scotchbright to get my initial scuff. Then I do a hot water pressure wash (in the beginning) to remove any stripper etc... then I get on it again with the scothbright for a mild pass making sure I didn't miss anything. Then blow the hell out of the airplane with hi pressure air. Vacuum, blow, vacuum, blow, vacuum,etc... (not to be confused with suck/blow.) Once I feel there are NO particulates left in the little nooks, I do two passes with 3M general adhesive cleaner. Once this is done, I mask and get all my prep work done. Just before paint, I use U-POL with lint free wipes, then a final pass with a tack cloth.... Cross fingers, and paint.
My advice would be to stay away from etch primer, especially VariPrime. I have shot Land Rovers and one Cessna with that and have wished I went epoxy. As said above, skip the etch and use a good epoxy prime. Remember... With etch, you still have to shoot a primer as it is porous, so its a bit redundant. FYI... Nason is ok, but its a economy paint. With paint, you really do get what you pay for so buy the best you can afford. I have not used it yet, but my next project I am going to try Boeing's high solid epoxy primer BMS 10-11. It's supposed to be the bomb... At around $100/qt its around two times the price of top shelf auto paint. (AkzoNobel sells it under BAC 452 in green.)
Not sure what you are shooting outside...? Looks like you shot Imron inside? This is a great choice as it is super durable. FWIW, the 5.0 can be thick. I like to reduce it a tiny bit with thinner as it lays nicer (use the correct thinner for Imron) Just be careful as it will start to run! Really try and buy good paint for the exterior as you will regret shooting crap paint here. If your feeling a bit more spendy, feel confident you can lay down thin layers and have the time, you could even try a base/clear which looks great. Word of caution: Take care not to get too heavy on the control surfaces. Cessna's have a really wide envelope for balance, but you'd be surprised at how little paint it takes to make an elevator unbalanceable. Flutter is no joke!
Anyway, thanks for keeping us posted! I enjoy seeing all these threads. Good luck with the painting. The best advice I can give is take your time, do your absolute best patiently preppeing, shoot, then give yourself a F-ing break after its done. Good painting is really difficult and its never perfect!
- Bigrenna offline


- Posts: 2339
- Joined: Sun Sep 25, 2011 4:02 pm
- Location: New England
- Aircraft: C180H / C170B
www.bushwagoneast.com
www.avthreads.com
Fri Jan 20, 2017 9:03 pm
Re: 1955 Cessna 170B rebuild
Bigrenna wrote:I would caution against using water later in the process, especially closer to paint time. Use a proper degreaser like U-POL. It has anti-static properties and is an aggressive degreaser even removing silicone. It's also safe on a painted sub-strait and wont attack the primer.
My process: I first do a good pass with red scotchbright to get my initial scuff. Then I do a hot water pressure wash (in the beginning) to remove any stripper etc... then I get on it again with the scothbright for a mild pass making sure I didn't miss anything. Then blow the hell out of the airplane with hi pressure air. Vacuum, blow, vacuum, blow, vacuum,etc... (not to be confused with suck/blow.) Once I feel there are NO particulates left in the little nooks, I do two passes with 3M general adhesive cleaner. Once this is done, I mask and get all my prep work done. Just before paint, I use U-POL with lint free wipes, then a final pass with a tack cloth.... Cross fingers, and paint.
My advice would be to stay away from etch primer, especially VariPrime. I have shot Land Rovers and one Cessna with that and have wished I went epoxy. As said above, skip the etch and use a good epoxy prime. Remember... With etch, you still have to shoot a primer as it is porous, so its a bit redundant. FYI... Nason is ok, but its a economy paint. With paint, you really do get what you pay for so buy the best you can afford. I have not used it yet, but my next project I am going to try Boeing's high solid epoxy primer BMS 10-11. It's supposed to be the bomb... At around $100/qt its around two times the price of top shelf auto paint. (AkzoNobel sells it under BAC 452 in green.)
Not sure what you are shooting outside...? Looks like you shot Imron inside? This is a great choice as it is super durable. FWIW, the 5.0 can be thick. I like to reduce it a tiny bit with thinner as it lays nicer (use the correct thinner for Imron) Just be careful as it will start to run! Really try and buy good paint for the exterior as you will regret shooting crap paint here. If your feeling a bit more spendy, feel confident you can lay down thin layers and have the time, you could even try a base/clear which looks great. Word of caution: Take care not to get too heavy on the control surfaces. Cessna's have a really wide envelope for balance, but you'd be surprised at how little paint it takes to make an elevator unbalanceable. Flutter is no joke!
Anyway, thanks for keeping us posted! I enjoy seeing all these threads. Good luck with the painting. The best advice I can give is take your time, do your absolute best patiently preppeing, shoot, then give yourself a F-ing break after its done. Good painting is really difficult and its never perfect!
HOLY MOLY! that is quite the process but I'm sure it does lead to better results. The more prep, the better the paint job. Fully understand that. The inside is my learning curve, again with the help of my A&P/IA, but he is not a painter and does not wish to be haha. Although he has done some great paint on our company 206's.
Inside was done with Nason. I prepped, and prepped the inside of my doors today and did a final scotchbrite pass, blew it off well with air, then wiped it down again and one more pass with the air hose before I shot the epoxy primer. It looks like it laid down nicely. First time shooting primer like this directly over aluminum...just makes me nervous as hell with all the prep and to think it wouldn't stick correctly.
I appreciate all the help! Dont need a show stopper, just a durable paint job that doesnt waste the time and $$ doing it.
- kygreen229 offline
- Posts: 130
- Joined: Mon Aug 26, 2013 10:43 am
- Location: Boise, ID
Sat Jan 21, 2017 6:13 am
Re: 1955 Cessna 170B rebuild
kygreen229 wrote:I appreciate all the help! Dont need a show stopper, just a durable paint job that doesnt waste the time and $$ doing it.
Of course, take my post with a grain of salt as I tend to be a bit of a prima donna... LOL 80% of a great paint job is prep and application. I shot a friends jeep several years ago with a SS Nason and its still holding up great. Cant wait to see your bird flying!
- Bigrenna offline
- Posts: 2339
- Joined: Sun Sep 25, 2011 4:02 pm
- Location: New England
- Aircraft: C180H / C170B
www.bushwagoneast.com
www.avthreads.com
Sat Jan 21, 2017 9:47 am
Re: 1955 Cessna 170B rebuild
If you don't paint a lot, it's thought to know when prep is good enough for your desired result.
I wish I would have done a little more prep before shooting my interior and might redo the most visible spots.
But, if you're covering it with foam or side panels, adhesion is far more important than finish.
I have the worst time with all the small stuff. So much that I just boxed everything smaller than my arm and sent it to the powder coated (to include the instrument panel).
They have a 20 foot long oven... I was very tempted to give them my wings too
Sat Jan 21, 2017 5:08 pm
Re: 1955 Cessna 170B rebuild
Prep is everything but you nailed it, at least for me. With the lack of experience painting especially aluminum I just don't know when enough prep is enough. Adhesion is my biggest goal, I can personally deal with not having the best looking paint, although why would you not want it to look good right?
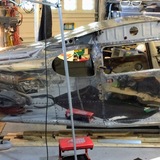
Also, the interior im fairly happy with. Except for the color of gray it turned out. Has like a blue tint to it and it really shows against my powder coated gray panel. It's not bad just different than I expected. It was called Ford gray when I picked it at the paint store...live and learn! Here are the door primed with epoxy.
Sent from my iPhone using Tapatalk
- kygreen229 offline
- Posts: 130
- Joined: Mon Aug 26, 2013 10:43 am
- Location: Boise, ID
Sat Jan 21, 2017 7:28 pm
Re: 1955 Cessna 170B rebuild
I'll be completely happy if my doors turn out that well.
Sun Jan 22, 2017 12:52 am
Re: 1955 Cessna 170B rebuild
Bagarre wrote:I'll be completely happy if my doors turn out that well.
This is just primer, the gray I painted today is the final top coat and is not pictured here. As stated it's not bad just not the gray I expected.
Sent from my iPhone using Tapatalk
- kygreen229 offline
- Posts: 130
- Joined: Mon Aug 26, 2013 10:43 am
- Location: Boise, ID
Mon Jan 23, 2017 9:20 pm
Re: 1955 Cessna 170B rebuild
Prepping to start on the Sportsmans STOL. 
Sent from my iPhone using Tapatalk
Sent from my iPhone using Tapatalk
- kygreen229 offline
- Posts: 130
- Joined: Mon Aug 26, 2013 10:43 am
- Location: Boise, ID
Mon Jan 23, 2017 9:51 pm
Re: 1955 Cessna 170B rebuild
Are you going to prime that leading edge before you install Sportsman kit?
Mon Jan 23, 2017 10:38 pm
Re: 1955 Cessna 170B rebuild
Now is also the time also to run wires for wingtip LEDs and/or strobes, even if you don't plan to install them anytime soon. Looking great!
- denalipilot offline


- Posts: 2789
- Joined: Mon Oct 15, 2007 4:53 pm
- Location: Denali
- Aircraft: C-170B+
Mon Jan 23, 2017 10:51 pm
Re: 1955 Cessna 170B rebuild
If you don't want to run wires, a string could be installed to pull some later. A length of lightweight plastic tubing for a conduit is another way. Then you don't need to worry about tying the wires to each rib to prevent abrasion.
Mon Jan 23, 2017 11:00 pm
Re: 1955 Cessna 170B rebuild
Pinecone wrote:If you don't want to run wires, a string could be installed to pull some later. A length of lightweight plastic tubing for a conduit is another way. Then you don't need to worry about tying the wires to each rib to prevent abrasion.
Unless there's something I'm unaware of, just run em through the foam blocks of the Sportsman
- denalipilot offline
- Posts: 2789
- Joined: Mon Oct 15, 2007 4:53 pm
- Location: Denali
- Aircraft: C-170B+
Tue Jan 24, 2017 7:34 am
Re: 1955 Cessna 170B rebuild
Definitely planning on priming the leading edge area before install. Prob just a good epoxy primer. Runnin wires for strobes or a tube as mentioned is not a bad idea. Even if I don't ever install them, would be there for a buyer in the future. Thanks for the ideas.
Sent from my iPhone using Tapatalk
Sent from my iPhone using Tapatalk
- kygreen229 offline
- Posts: 130
- Joined: Mon Aug 26, 2013 10:43 am
- Location: Boise, ID
Wed Jan 25, 2017 9:33 am
Re: 1955 Cessna 170B rebuild

Templates cut lets do this!
Sent from my iPhone using Tapatalk
- kygreen229 offline
- Posts: 130
- Joined: Mon Aug 26, 2013 10:43 am
- Location: Boise, ID
Wed Jan 25, 2017 2:03 pm
Re: 1955 Cessna 170B rebuild

Have fun... I just got through putting a set of those on the leading edge of a 180 this morning...
Brian
Sent from my iPhone using Tapatalk
- Brian-StevesAircraft offline
- Posts: 759
- Joined: Tue Dec 13, 2005 1:13 pm
- Location: Beagle (White City) Oregon
Wed Jan 25, 2017 8:56 pm
Re: 1955 Cessna 170B rebuild
It's fun for sure...well seeing it come together is anyway 
The wing already had the cutout for a 172 style heated pitot and an associated inspection panel. Measuring another 172 wing (newer style wing) in the shop it looks like the same area as that wing. SO, one of the foam blocks station 64.xx seems to sit basically right next to this cutout for the pitot tube, but not interfere. Looks like it will work ok, just wanted to hear anyone else's experience.
The wing already had the cutout for a 172 style heated pitot and an associated inspection panel. Measuring another 172 wing (newer style wing) in the shop it looks like the same area as that wing. SO, one of the foam blocks station 64.xx seems to sit basically right next to this cutout for the pitot tube, but not interfere. Looks like it will work ok, just wanted to hear anyone else's experience.
- kygreen229 offline
- Posts: 130
- Joined: Mon Aug 26, 2013 10:43 am
- Location: Boise, ID
DISPLAY OPTIONS
Who is online
Users browsing this forum: No registered users and 0 guests
Latest Features
-
Live to Tell
A Minnesota pilot is surprised to learn that the sudden asymmetric drag of an out-of-rig ski can…Read More -
Creators
Working in some of the Yukon's most beautiful and remote environments, photographer Simon Blakesley captures aircraft in…Read More -
Aircraft Ownership and Maintenance
Upgrading to big tires can make a huge difference in backcountry performance, but with those gains come…Read More -
Tales from Yesteryear
In this tale from bush flying yesteryear, Don Cogger signs up to help Atlee Dodge Jr recovery…Read More


Latest Knowledge Base
-
Destinations
A regional guide with ideas for winter camping destinations in California, Nevada, New Mexico, and Arizona.Read More -
Aircraft
Finding an affordable aircraft that can handle the backcountry for $80K or less? A challenge for sure, but with the…Read More -
Aircraft
01.29.2018 - Zane - Updated tire diameter graphic to add 8.50x10 Guide to tires for use in the backcountry and off-airport landing…Read More -
Pilots
12.22.2013 - Initial article format Operating aircraft on skis and negotiating a snow-covered landscape is an entirely unique skillset and environment.…Read More


